If you’ve ever been let down by a soggy, bland apple pie, you’re in good company—I spent years politely pushing half-eaten slices aside at holiday tables. But discovering this apple pie method absolutely flipped the script for me. With a double crust that keeps every bite flaky and a stovetop-cooked filling packed with fresh apple flavor, you end up with that dreamy combo of tender slices and caramel-rich goo that makes you want to sneak forkfuls straight from the pan.
You’ll walk away from the finished pie with your entire kitchen smelling like a fall orchard and that golden-brown crust sending satisfying cracks under your knife. The best part? None of the guesswork—every slice holds together, every mouthful has layered, balanced spice, and you’re finally in control of the texture.
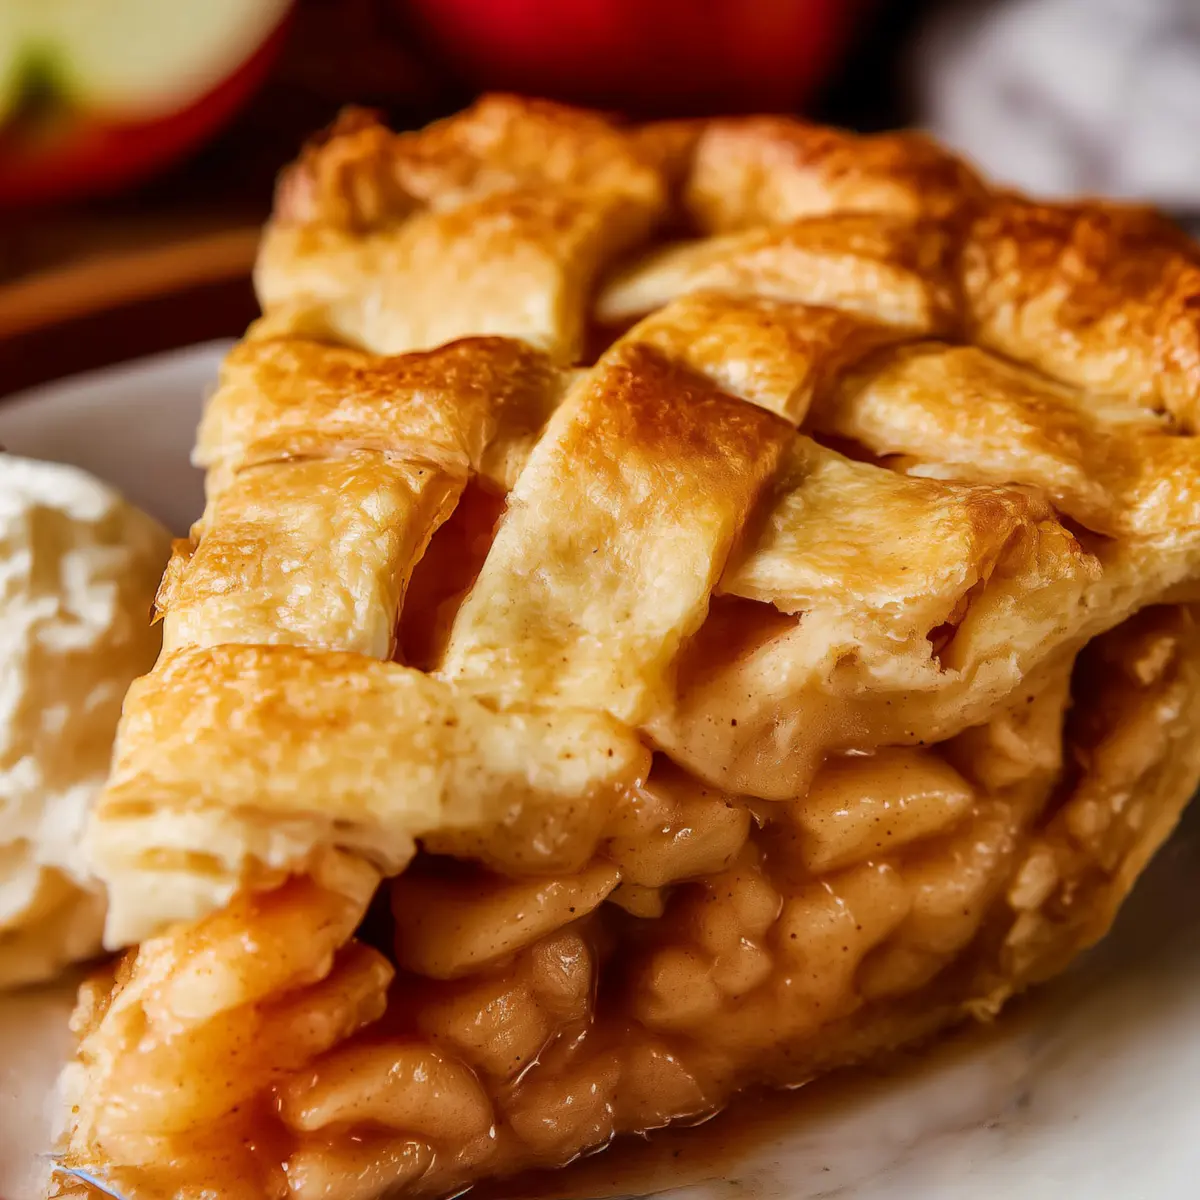
Why This Classic Apple Pie Stands Out
If you’ve tried loads of apple pie recipes and felt they all blend together, this one is a total game changer. Here’s what puts it in a league of its own: you start by cooking your apples gently on the stove, locking in all those sweet-tart juices and letting the spices really mingle. Instead of ending up with raw apples or sad mush, you control every step, getting that perfect tender bite and syrupy caramel sauce in every forkful.
Then there’s the crust—no skimping on flavor or flake here. Both top and bottom get their moment in the spotlight, making this pie absolutely irresistible from edge to center. It’s a showstopper at family meals, cozy weekends, or any time you want tradition with a little extra oomph. Honestly, it’s the kind of apple pie you’ll start making “just because.”
The Essential Ingredients for Apple Pie Perfection
Let’s talk about what actually goes into making the best apple pie ever. These aren’t just your standard fillers—each ingredient shows up for a reason:
- pie crust – Provides a buttery, flaky foundation and top; homemade dough really makes a difference here, capturing all the gooey filling without getting soggy.
- Lemon zest – Adds a fresh zing to balance the sweetness and brings out the apple flavor.
- Lemon juice – Stops the apples from browning and injects brightness into every bite.
- Apples – A blend of tart and sweet varieties (think Granny Smith, Gala, Golden Delicious) gives a layered, sweet-tart flavor and helps the texture stay spot on.
- Brown sugar – Caramelizes in the pan, creating those deep, rich, molasses-y notes that make the filling taste even more autumnal.
- Granulated sugar – Sweetens and helps the apples release their juices while cooking.
- All purpose flour – Thickens the filling so you get luscious syrup—not soup—inside your crust.
- Kosher salt – Brings out all the flavors and makes sure the sweetness doesn’t get overwhelming.
- Cinnamon – Classic spice, warm and inviting, gives that signature apple pie aroma.
- Nutmeg – Adds extra depth and a hint of nutty warmth that pairs so well with apples.
- Cardamom (optional) – Just a little lifts everything with floral, citrusy notes—you can skip it, but it’s worth trying at least once!
- Vanilla – For a bakery-style, custard-like finish in the filling.
- Milk – Used for brushing the crust so it bakes to a golden brown, matte finish.
- Beaten egg (optional) – Also for brushing; it gives the crust a glossy, bakery window shine.
- Raw sugar – Sprinkled on top before baking, it adds crunch and those alluring sparkly edges.
See the recipe card below for the full list of ingredients and measurements.
Step-by-Step: How to Make Apple Pie Like a Pro
- Pick your apples. Go for a mix—tart and sweet—to get the best texture and flavor. I love Granny Smith, Gala, and Golden Delicious, but use what you’ve got or what’s in season.
- Start the filling with zest and juice. Zest a little lemon right into a roomy skillet for bright citrus oils, then squeeze in fresh lemon juice. This sets the foundation and prevents browning.
- Peel, core, and slice apples thinly. If you work one at a time and stir each into the lemony pan, they stay vibrant and don’t go mushy. Thin slices cook evenly but still hold their shape.
- Cook down the fruit. Add brown sugar, granulated sugar, flour, salt, cinnamon, nutmeg, and a pinch of cardamom if you’re feeling adventurous. Gently stir everything to coat without breaking up the apples. Cover and simmer, stirring every few minutes so nothing scorches. What you’re after: fork-tender apples that keep their body, no mystery mush.
- Stir in vanilla. When your kitchen smells amazing and the apples look glossy and slightly translucent (try a bite—this is your al dente moment), stir in vanilla off the heat for that deep bakery essence.
- Chill the filling. Pour the whole caramel-coated mess onto a rimmed baking sheet. Spreading the apples out lets them cool quickly—just pop them in the fridge or, if you’re pressed for time, the freezer. This step ensures your bottom crust stays crisp, not steamed.
- Roll out the dough. Give one sheet of pie dough a gentle roll and fit it into a deep pie dish, letting the edges hang over for now.
- Add the cooled filling. Scrape every last spoonful (and all that caramel) into the crust—no scrimping! Pack apples all the way to the edges.
- Top it off. Roll out the second sheet of dough. Lay it on top or make a simple lattice—totally your call. Fold and crimp the edges however you like. If you go with a solid top, don’t forget to cut a few vents for steam.
- Chill again. Stick the assembled pie back in the fridge (or freezer for a quick blast) until the dough is nice and cool. This guarantees super flaky layers.
- Heat up the oven and your baking sheet. Place a sturdy baking sheet in the oven and give it a long preheat. Baking the pie on an already-hot tray boosts that golden crisp bottom crust.
- Brush and sprinkle. Right before baking, swish the crust with milk or egg wash—milk for a matte golden look, egg for glassy shine, or a bit of both. Finish with a generous sprinkle of raw sugar for crunch.
- Bake in two stages. Start with a blasting-hot oven to set the crust, then drop the heat partway through so the apples finish cooking and the sugars caramelize. If the edges start to darken fast, shield them with a DIY foil ring.
- Cool—really, cool. Let your apple pie hang out on a rack for several hours. Yes, it’s torture, but it’s what lets the filling thicken and the slices cut cleanly, not in a soupy mess.
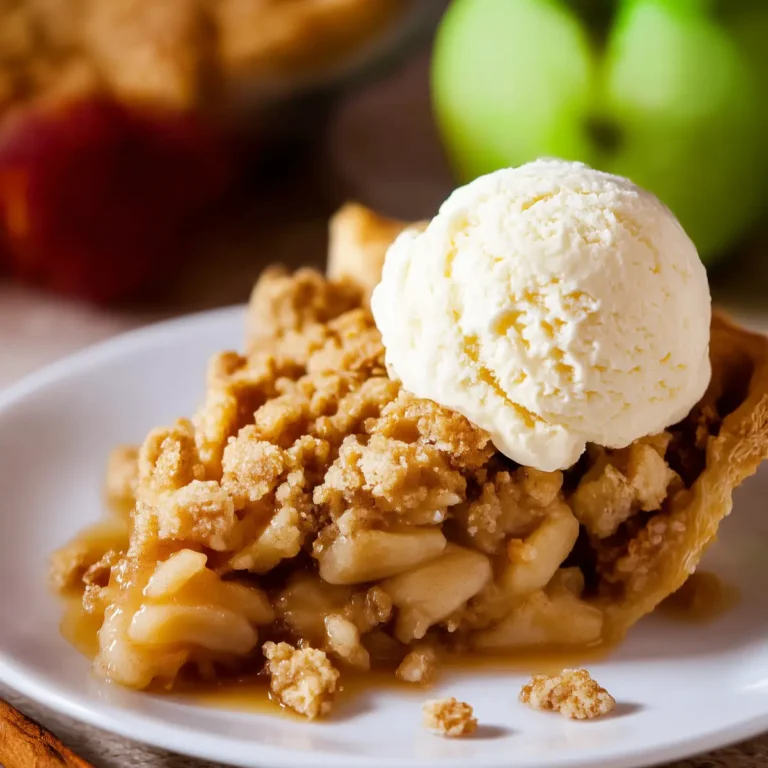
- Serve. When completely cooled, slice big wedges and, if you ask me, always serve with a scoop of vanilla ice cream or an extra drizzle of caramel. Nothing fancy required, just pure comfort.
Apple Pie Tips to Avoid Soggy Bottoms and Watery Fillings
Let’s talk about those little tweaks that separate a sad apple pie from a spectacular one. First, fully chill your filling before piling it in the crust. Warm apples = melted butter = soggy base. No one wants that. A hot, pre-heated baking tray helps crisp up the bottom even more, keeping everything sturdy enough to hold generous servings.
When crimping, don’t rush—tight, even crimps keep juices tucked safely inside. And whether you brush the top with milk, egg, or both, a sprinkle of raw sugar right before baking gives that magical bakery-style finish. If your crust starts to brown faster than the filling is bubbling, just tent the edges with foil to protect them from burning.
If you’re baking ahead, let your apple pie cool completely on a rack before storing—it holds its texture better and cuts cleaner. You can leave it, covered, at room temp for a couple days, or pop it in the fridge for longer keeping. If you ever end up with a runny filling, it’s almost always from slicing too soon—patience is your secret weapon for clean, luscious wedges.
Fun Ways to Serve or Tweak Your Apple Pie
Classic’s always a hit, but sometimes it’s just as fun to put your spin on things. Try swapping out some of your apples for pears or adding a handful of dried cranberries for a tart surprise. Love spices? Play around with ginger, allspice, or star anise—just a pinch transforms that familiar apple pie into something new.
Serving-wise, it’s hard to beat hot pie with vanilla ice cream, but don’t underestimate a drizzle of caramel or a dollop of whipped cream. Around the holidays, a little sharp cheddar melted on top is old-school delicious (trust—salty cheese plus sweet apples is iconic comfort food).
For a crowd, you can do mini pies in muffin tins, or roll the filling in pastry and make hand pies for lunchbox treats. If you want to prep ahead, the filling and dough can be made in advance and chilled separately, then assembled the day you plan to bake. This makes holiday brunches or big family dinners a breeze.
FAQs about Apple Pie
Can I make apple pie ahead of time?
Absolutely. You can bake your apple pie a day or two in advance. After it’s completely cooled, keep it loosely covered at room temperature if you’ll eat it soon, or refrigerate for longer freshness. Let it come to room temperature before slicing for the best texture.
What’s the best way to reheat leftover apple pie?
To bring back that fresh-baked taste and crisp crust, warm slices on a baking tray in a moderate oven for several minutes. If reheating a whole pie, cover lightly with foil so the top doesn’t overbrown, and bake until warmed through.
How do I freeze apple pie?
An unbaked apple pie freezes beautifully: assemble the pie, wrap it tightly in plastic and foil, and freeze until solid. Bake straight from the freezer, adding extra time in the oven. If freezing leftover baked pie, cool completely first, then wrap and freeze individual slices for grab-and-go treats.
Can I use a store-bought crust for apple pie?
You can use a store-bought pie dough if you’re short on time, but homemade crust gives the best flavor and will survive all that luscious filling without getting soggy. If you do go for a ready-made crust, aim for one labeled “deep dish” so there’s room for all those apples.
There’s just something deeply satisfying about pulling a homemade apple pie from the oven—the whiff of cinnamon, the sparkle of sugar, that bubbling filling just waiting to spill out. Whether you stick with tradition or try a new twist, every slice is a little act of nostalgia and comfort. Pile it high with cold vanilla ice cream, serve up a thick wedge, and settle in for the kind of homey dessert that never really goes out of style.
More Delicious Recipes
- Irish Apple Cake with Custard Sauce: This dessert features apples as the star ingredient, similar to apple pie, with a delightful custard element.
- Irish Soda Bread with Cranberries and Raisins: Perfect for serving alongside apple pie, this bread brings a sweet and fruity flavor that complements apple desserts well.
- Cherry Cobbler Muffins: Like apple pie, these muffins have a warm, fruity filling, making them another comforting dessert option.
Best Recipe for Apple Pie
Ingredients
Equipment
Method
- Choose your apples. You need 5 pounds of apples for this recipe, which is about 11 large apples. I like to use a mix of apples for the best flavor. For this pie I used Granny Smith, Gala, and Golden Delicious.
- Make the filling: Use a microplane grater to zest 1/4 teaspoon lemon peel into a 12 inch high sided skillet.
- Add the juice from half the lemon to the skillet, about 2 tablespoons.
- Use a potato peeler or this handy apple peeler to peel the apples. Slice the apples into 1/8 inch pieces. Check out the photos above to see my method for slicing apples. I like to peel and slice one apple at a time so that they don't get brown; I peel one apple, then stop and slice it, add it to the lemon juice, and then move on to peeling the next apple. Stir the apples in the pan occasionally to coat everything with lemon juice.
- Once you have all the apples peeled and sliced in the pan, set it over medium heat on the stove.
- Add 3/4 cup packed brown sugar, 3/4 cup granulated sugar, 5 tablespoons flour, 1/4 teaspoon salt, 1 and 1/2 teaspoons cinnamon, 3/4 teaspoon nutmeg, and 1/2 teaspoon cardamom. Stir it together gently so you don't break all the apples.
- Once the mixture is all moistened and you don't see patches of flour or cinnamon, set a timer for 20 minutes. Cover the mixture with a lid but don't walk away. Stick around and stir the mixture every 3 minutes or so, Replacing the lid each time. Cook for 20 minutes, until the apples are fork tender but still hold their shape. The apples will not soften more while baking in the oven. So have a taste and see if you want to cook a longer or shorter time. Only you can know your apple al dente perfection level. If your apples start to stick to the pan, add 1 tablespoon water as needed; use sparingly.
- Remove the pan from heat and stir in 1 teaspoon vanilla.
- Transfer the apple pie filling (including the brown caramel gooeyness) to a half sheet pan, or any pan with a lip. Spread the apples all the way to the edges. Cool the apple pie filling completely by placing it in the fridge or the freezer, it only takes 30 minutes or so. (If you have plenty of time, you can just leave the apples in the pan to cool down; it will take a couple hours.)
- Roll out your pie dough and place in a deep 9 inch pie dish, with the excess hanging over the edges. See my pie crust post for lots of photos and details.
- Use a rubber spatula to scrape all the chilled apple pie filling into the pie dish. Don't forget to scrape in every last bit of the gooey filling.
- Top your pie with the other pie crust. Follow this recipe for How to Make a Lattice Pie Crust, if you like. It's so pretty and not as hard as you think. You can also just toss the crust on whole. It's going to taste delicious either way! See my pie crust recipe for details on topping with a whole crust.
- Fold the edges in and crimp however you like. If you didn't do a lattice, make sure to vent your pie by poking the top a few times with a sharp knife.
- Place the whole pie in the fridge or freezer for about 20-30 minutes, for a really flaky crust.
- Place a baking sheet in the center rack of your oven and preheat to 425 degrees F. Let it heat up for at least 20-25 minutes to make sure it's really hot.
- Right before putting it in the oven, brush the crust of your pie all over with milk or egg, or both. I like to use 1 tablespoon milk beat together with 1 tablespoon beaten egg that I have leftover from making my homemade pie crust. You can just use milk if you don't have beaten egg lying around. Milk will help your pie crust brown but will stay matte; egg will add gloss and shine to your pie crust.
- Sprinkle the whole pie with raw sugar, or regular sugar is fine too.
- Place the chilled pie onto the baking sheet in the oven and let bake for 15 minutes. The crust on the edge should be turning light brown.
- Meanwhile, get a square of tin foil that is the same size as your pie. Fold it in half, then in half again. Cut out the center. Open it up again. You should have a square of foil with a circle cut out of the center.
- Reduce the heat to 350 degrees F. Remove the pie from the oven and place the foil on top. Loosely crimp it around the crust on the edge. This will protect it from burning.
- Don't forget to lower the oven temperature to 350. Place the pie back on the baking sheet in the oven and bake at 350 for 40-45 more minutes.
- You will know the pie is done when the edges are brown and the center is light golden brown. If you did a lattice crust, you should see the filling bubbling away nicely.
- Let the pie cool on a wire rack for about 4 hours. I know, this is killer. But if you cut into it now, the juices will be lava hot and way too liquid-y. You have to wait for it to cool to room temperature to get the right texture for the filling.
- Once the pie is completely cool, slice and serve! My husband Eric considers it a crime to serve this without vanilla ice cream, and I tend to agree. Treat yoself right. Add in some caramel sauce for a really decadent treat!
- Store the pie on the counter for up to 2 days, covered with plastic wrap. After that transfer it to the fridge.