If you’ve ever tried to juggle holiday baking alongside everything else Easter throws at you—egg hunts, brunch prep, kids running wild—then you know the struggle is real. That’s where Easter Bunny Bark steps in and saves the day. It’s as simple as stirring together a few ingredients, letting the colors pop, and watching your guests’ faces light up when they spot these whimsical, candy-studded treats on your table. No oven, no fuss, just pure sweet fun.
For me, this is the kind of treat that always reminds me of childhood Easter baskets—pastel colors everywhere, chocolate-smudged fingers, and the best kind of sugary chaos. But the grown-up twist? It takes only minutes to put together, and you can crank out enough for a whole crowd before your coffee even goes cold. The snap of smooth, glossy white chocolate with the irresistible crunch of M&M’s sprinkled through is so satisfying, you might end up sneaking a piece before they even make it to the serving plate.
Why Easter Bunny Bark Steals the Show
You know those recipes that instantly add festivity to your table without taking over your day? Easter Bunny Bark nails it. It’s the magical intersection of low effort and high wow-factor—think adorable bunny shapes, candies in sunset-pastel hues, and the kind of smooth chocolate bark that practically sparkles in the spring sunshine.
Every bite offers a satisfying crunch and a burst of color, which makes it a hit with kids and grownups. You don’t need special baking skills, only a few pantry finds and a bit of eager anticipation. In just a short time, you’ll have cheerful, handcrafted candy that’s holiday-ready—no stress, just fun. If you want edible Easter décor or a gift that’s guaranteed to make someone smile, this is it.
The Essentials Behind Easter Bunny Bark
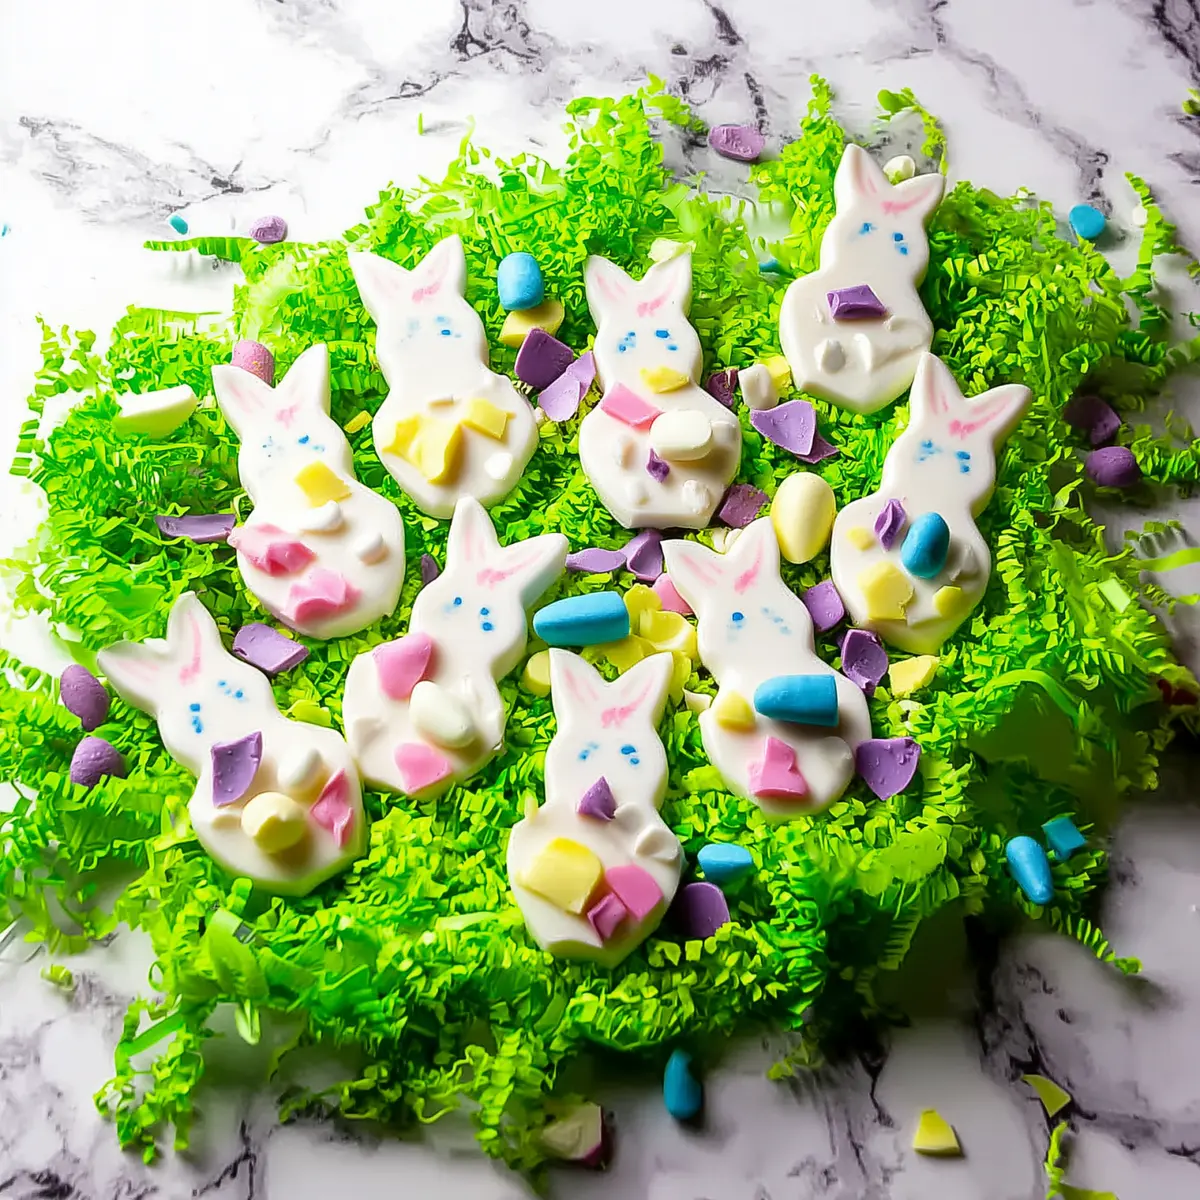
- silicone pan: The silicone bunny mold is what gives each piece its signature shape—plus it makes popping out the bark almost effortless once set.
- Disposable piping bag: This is your secret weapon for getting silky-smooth melted chocolate right where it belongs, cleanly and exactly.
- Pastel colored M&M’s: The heart of every good Easter treat—these bring lively color and a classic, crunchy pop to each bite. Try a mix of pink, blue, green, yellow, and purple for a playful finish.
- Bright white candy melting wafers: These melt down into a glossy, creamy base that tastes like pure nostalgia and ties everything together.
See the recipe card below for the full list of ingredients and measurements.
Easy Swaps and Candy Curveballs
Let’s say you peek in the pantry and realize you’re missing a key piece for your Easter Bunny Bark. Don’t stress—this is a recipe built for creativity. Swap pastel M&M’s for other candy-coated chocolates or even bright jelly beans for a chewy twist. If you can’t find white melting wafers, white chocolate chips will work just as smoothly (just keep an eye on them, as they can scorch quickly in the microwave).
No disposable piping bag? A zip-top bag with a snipped corner is an old-school trick that gets the job done in seconds. And if you can’t track down a bunny-shaped mold, any fun silicone cavity mold with spring vibes gives you a treat that’s just as delightful. The biggest key is to keep the shapes cheerful and the colors bold—Easter bark is all about joy in every bite.
Making Easter Bunny Bark: Simple Steps
- Start by melting your candy wafers in the piping bag. The low-and-slow approach in the microwave keeps everything glossy and smooth. Knead the bag gently between bursts so you don’t end up with pesky lumps stuck at the bottom.
- Drop a mix of colorful M&M’s into the base of each bunny mold. There’s no need to arrange them perfectly—random orientation gives each bark piece a unique, handmade look (and they taste just as good whichever way is up!).
- Snip off the tip of your piping bag and gently squeeze bright, warm chocolate into each cavity, just covering the candies. Give the mold a gentle tap on the counter; this spreads the chocolate evenly and sends any sneaky air bubbles packing.
- Let the bark set until firm. There’s something oddly satisfying about popping glossy, candy-studded shapes from a flexible mold—no sticking, no stress, just perfect little bunnies every time.
- Repeat the candy and chocolate layering until you’ve filled your pan or run out of patience (honestly, it’s such a breeze you’ll want to keep going). Once you’ve finished, you’ve got a platter of sweet, crispy, white-chocolate bark that’s pretty much impossible to resist.
Easter Bark Tips & Secrets for Success
The trick to super-smooth Easter Bunny Bark is patience with your chocolate. Microwave slowly and gently—rushed heating leads to clumps and scorched spots. If you want your bark extra glossy, let the wafers rest a minute and stir before piping, which smooths out bubbles and gives that perfect, shiny finish.
Don’t worry about candy placement; random is your friend here. If your kitchen runs warm, let your bark set in the fridge for faster hardening and extra snap. Clean up is a dream thanks to silicone molds—just peel the bark right out. Store finished bark in a cool, dry spot in an airtight tin, where it’ll stay crisp and pretty for days (if it lasts that long).
Serving, Pairings, and Clever Variations
Easter Bunny Bark loves to be a centerpiece. Pile the bunnies on pastel tissue in baskets, serve on a platter surrounded by bright eggs, or wrap as party favors for brunch guests. It’s the easiest way to add fun to any spring gathering—just a pop of color and crunch next to coffee or tea.
If you’re feeling adventurous, try mixing up the base: dark chocolate, strawberry melts, or even swirl two colors for a marbled effect. Sprinkle in toasted coconut, mini marshmallows, or chopped nuts for adults who want a more complex bite. This bark also freezes beautifully—stash extras in a sealed bag, and you’ve got an instant homemade treat on hand for any springtime craving.
FAQs about Easter Bunny Bark
Can I use other types of chocolate for Easter Bunny Bark?
Yes, you can substitute white candy melts with white chocolate chips, milk, or dark chocolate for a different flavor profile. Just melt slowly and watch for scorching, since real chocolate can seize up faster than candy melts.
Is this recipe safe for children to help with?
Absolutely, Easter Bunny Bark is perfect for little hands to join in—just supervise melting and handling the hot piping bag. The candy arranging is fun and safe for all ages, making it a great family activity.
How do I keep the bark from sticking to the mold?
Using a silicone mold prevents almost all sticking. If you ever have trouble, let the bark chill till fully set, then gently flex the mold to pop the shapes out cleanly—no knife or fancy technique required.
Can I prepare Easter Bunny Bark ahead of time?
Definitely! You can make it days before your event and store it in an airtight container in a cool, dry place. It holds its texture and color beautifully, so it’s perfect for prepping in advance.
Final Thoughts on Easter Bunny Bark
Whether you’re planning a big Easter bash or looking for a sweet, low-stress way to brighten up your holiday table, Easter Bunny Bark really delivers. It’s festive, unfussy, and flexible—the kind of treat that wins everyone over, from toddlers to grandparents.
The best part? You get all the joy of homemade candy and creative freedom, without spending hours in the kitchen. Whip up a batch, share the fun, and savor the crunch—this bark is bound to be the star of your spring celebrations year after year.
More Delicious Recipes
- Easter Egg Fruit Pizza: This colorful dessert resonates with Easter themes, featuring vibrant fruits that echo the festive vibe of Easter Bunny Bark.
- Loaded Leprechaun Popcorn: A fun and colorful snack that adds a sweet twist to any celebration, much like the whimsical Easter Bunny Bark.
- St Paddy’s Mint Cheesecake Cups: These delightful cheesecake cups bring a festive flair and creamy sweetness, making them a perfect pairing with your Easter treats.
Easter Bunny Bark
Ingredients
Equipment
Method
- Add 1 cup white candy melting wafers to disposable piping bag. Microwave in 1 minute intervals at 50% power until completely melted. (See Tip 1)
- Add 1 of each color pastel colored M&M's to each cavity of bunny silicone pan. Don't worry about the orientation - some will lay flat; others will be on their sides.
- Snip off tip of piping bag. Pipe bright white candy melts into each cavity just barely covering the M&M's. Tap pan gently to evenly distribute candy coating.
- Allow to harden; remove from pan.
- Repeat process with additional melted bright white candy melts and M&M's.
- Yield: 24 Easter Bunny Bark pieces. (See Tip 2)