When you want a playful, dreamy dessert that captures all the whimsy of a summer fair, nothing beats the magic of homemade Cotton Candy Fudge. With its marbled pastel swirls and gently nostalgic flavor, this treat is guaranteed to wow both kids and grown-ups alike. Even better? You’ll have a pan ready in well under half an hour of hands-on time—no need for special skills or candy thermometers, just a sense of fun and a sweet tooth.
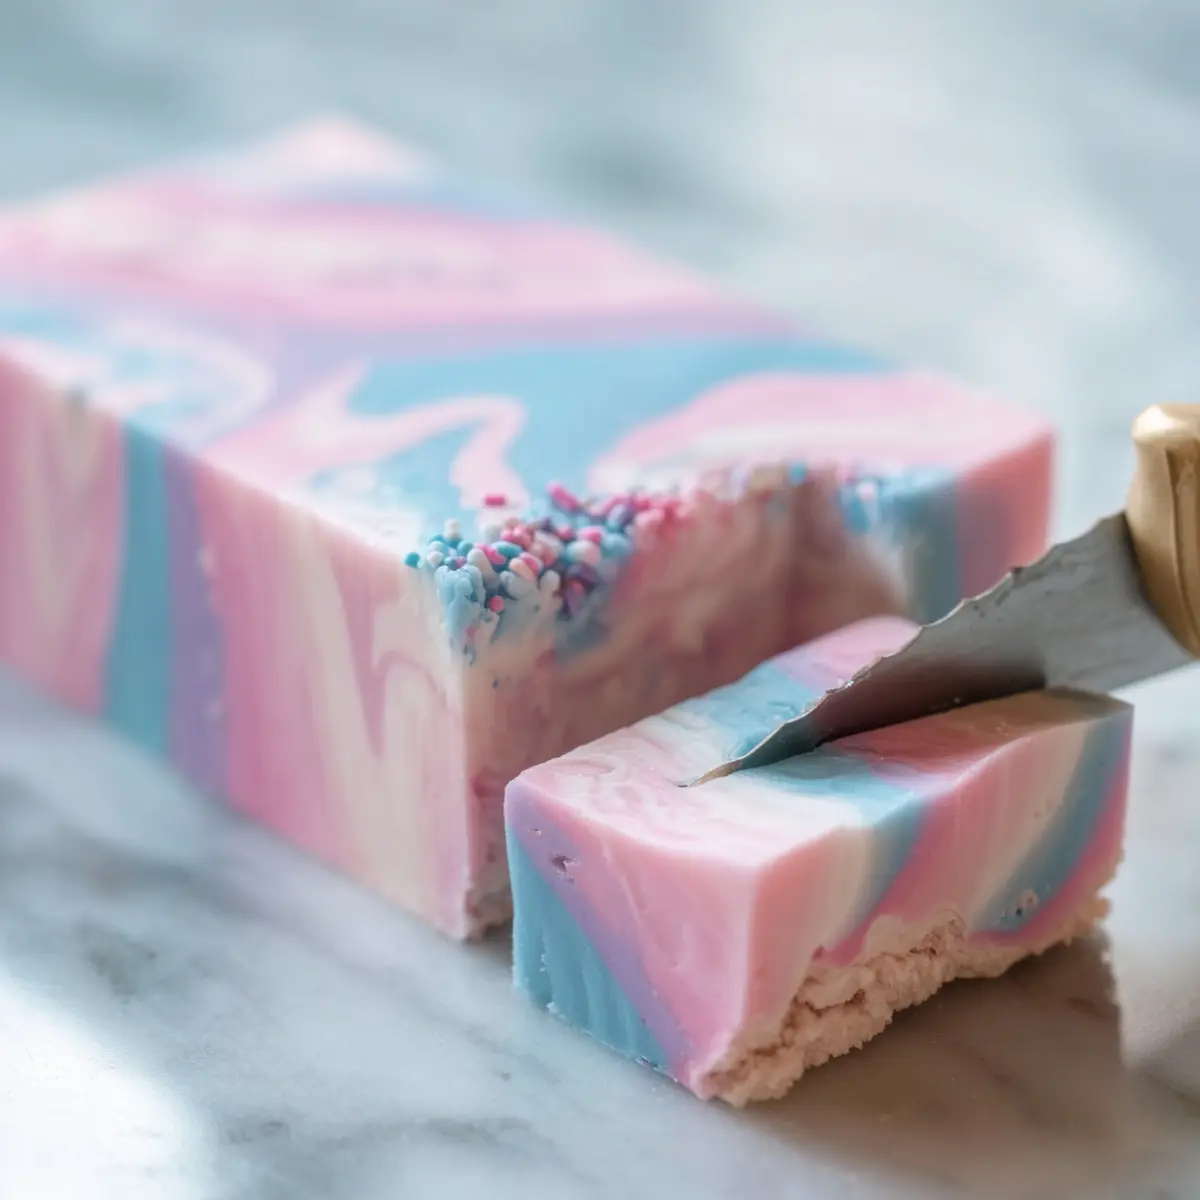
There’s something about the soft, creamy bite of this fudge that brings back memories of county fairs, bright balloons, and sticky fingers. The recipe couldn’t be much simpler, but the finished fudge looks like it took serious effort—vivid pinks and blues dancing together, just waiting to be cut into little squares of joy.
Easy tools for stunning cotton candy fudge
You don’t need a candy thermometer or fancy equipment for this fudge. Here’s what you’ll grab before you start swirling those beautiful colors:
- 8×8-inch baking pan – The perfect size for thick, satisfyingly square pieces.
- Parchment paper – Makes lifting out the fudge so easy, with minimal mess.
- Microwave-safe bowl – For gently melting everything together. You can use a stovetop pot if you prefer.
- Spatula or large spoon – For smooth mixing and scraping every last bit from your bowl.
- Butter knife or skewer – Your marbling tool, creating gorgeous swirls in seconds.
- Measuring spoons – To help you get that flavor just right.
- Two medium bowls – For dividing and tinting your pastel mixtures.
- Sharp knife – For crisp, accurate cuts—warming it under water makes slicing even tidier.
Pastel swirls: ingredient guide for cotton candy fudge
- White chocolate chips – The creamy, sweet base that sets this fudge apart from anything store-bought.
- Sweetened condensed milk – Adds that signature fudgy texture and richness—don’t skip it.
- Butter – Boosts smoothness and gives each bite a luxurious melt.
- Cotton candy flavoring (or raspberry + vanilla extract) – The heart of the recipe; brings that unmistakable fairground nostalgia.
- Fine sea salt – Just a pinch sharpens and balances the sweetness.
- Pink gel food coloring – For that classic blush-pink look you associate with cotton candy.
- Blue gel food coloring – Adds the playful blue that makes the fudge pop.
- Mini marshmallows, chopped cotton candy, or pastel sprinkles (optional) – Fun toppings to make your fudge feel extra festive or party-ready.
See the recipe card below for the full list of ingredients and measurements.
Bring the magic to life: cotton candy fudge step-by-step
- Prepare your pan. Line your 8×8-inch baking pan with parchment paper, leaving an overhang so you can lift the fudge out later. Lightly grease the parchment for extra insurance—trust me, you’ll thank yourself at cleanup time.
- Melt your base. In a big microwave-safe bowl, combine your white chocolate chips, sweetened condensed milk, and butter. Heat in 20–30 second bursts, stirring between each, until the mixture is smooth and glossy. The white chocolate should fully melt and everything will look creamy. If you’d rather not use the microwave, melt gently on the stove over low heat, stirring constantly until smooth.
- Add the magic. Stir in the cotton candy flavoring (or the raspberry and vanilla extracts) and a pinch of fine sea salt. Make sure the flavor is evenly mixed through the fudge base—you’ll smell that sweet, nostalgic aroma instantly.
- Divide and color. Pour half the mixture into one bowl and half in another. Tint one bowl with a tiny bit of pink gel food coloring and the other bowl with blue. Stir just until the color is even—you want pale, pastel tones that look playful and inviting.
- Create the swirl. Spoon big alternating dollops of pink and blue fudge into the prepared pan, creating a patchwork of color. Take a butter knife or skewer and gently swirl the colors together, making marbled patterns. Don’t overmix, or you’ll lose those distinct swirls.
- Add toppings (optional). Press a sprinkle of mini marshmallows or pastel sprinkles over the top if you love that extra pop of texture. Avoid actual cotton candy as a topping before chilling—it melts quickly against the moist fudge.
- Chill to set. Slide your pan into the fridge and let the fudge firm up for 2–3 hours. If you want super-clean squares, give it a bit more time. The surface will be matte and it’ll feel set right through to the touch.
- Slice and serve. Use your parchment overhang to easily lift the fudge onto a cutting board. Warm a sharp knife under hot water, dry it, then slice into even squares. Each one should show off those magical pink and blue swirls. Serve slightly chilled, or at a cool room temperature for the creamiest texture.
Tips, troubleshooting, and how to get it perfect
Cotton Candy Fudge is pretty forgiving, but here are some handy tips to keep it silky, vibrant, and swirly—never grainy or muddy:
- White chocolate seize-up: If your base looks lumpy or thick during melting, you may have overheated it. Just add a tablespoon of sweetened condensed milk and stir gently; the heat should loosen things back up.
- Bleeding colors: Too much swirling will blend the pink and blue together into a grayish pastel. For crisp stripes and pretty contrasts, be gentle. A single pass with the knife or skewer is usually enough.
- Sticky fudge: Make sure the fudge is cold and properly firm before cutting. Wiping and warming your knife before every slice makes for beautiful, clean edges.
- Marbled swirls not showing: If you add too much food coloring or overmix, the colors can get muddy. Start with just a dab of gel coloring and stop swirling when it looks dreamy.
- Toppings sinking: Wait until your fudge has cooled for a bit in the pan, then gently press sprinkles or marshmallows into the slightly set surface. This keeps them from disappearing beneath the fudge.
And remember—if you accidentally go a bit heavy-handed on the colors or lose your swirl, your fudge will still taste delicious!
Pairings and creative variations for cotton candy fudge
While Cotton Candy Fudge is a superstar on its own, you can make it the centerpiece of a colorful dessert spread. Here’s how to take things further:
- Party platters: Surround your fudge with pastel macarons, frosted cupcakes, or bowls of rainbow fruit for a festive birthday buffet.
- Sweet & salty: Offer pretzels, popcorn, or even salted peanuts alongside. The salty crunch contrasts beautifully with the fudge’s creamy sweetness.
- Sprinkle fun: Swap in rainbow or metallic sprinkles for a bolder look. For baby showers or themed celebrations, use color-coordinated sprinkles that match your event.
- Make it fruity: Use just raspberry extract instead of cotton candy flavoring, doubling up for a jammy twist. Or try a mix of vanilla and orange extract for a creamsicle spin.
- Holiday magic: For Easter, tint small sections yellow or green for a springtime feel. At Christmas, add edible glitter or nonpareils for frosty sparkle.
If you have fudge left over, tuck individual squares into cellophane bags for gifts or party favors—it’s always a hit at bake sales and showers.
FAQs about Cotton Candy Fudge
How do I store Cotton Candy Fudge to keep it fresh?
Store Cotton Candy Fudge in an airtight container in the fridge for up to one week. Layer pieces with parchment or wax paper to prevent sticking and keep the swirls crisp. For best texture, serve slightly chilled.
Can I freeze Cotton Candy Fudge for later?
You can freeze Cotton Candy Fudge if you need to make it ahead. Wrap it tightly in plastic wrap and place in an airtight container. Thaw in the fridge overnight before serving—the color and texture will still be delicious!
What can I use if I can’t find cotton candy flavoring?
If you can’t find the classic flavoring, use half raspberry extract and half vanilla extract instead. This combo brings a similar sweet nostalgia and makes the fudge taste just as dreamy and whimsical.
One last bite: cotton candy fudge leaves a smile
The first bite of this creamy, pastel-streaked fudge is pure delight—soft, sweet, and just a little bit magical, with the kind of melt-in-your-mouth texture that everyone remembers. Cotton Candy Fudge doesn’t just taste fantastic, it instantly brings the party wherever it goes. Serve it at celebrations or slip a piece into a lunchbox, and watch faces light up with joy. Go on and swirl up a batch—fun and flavor are guaranteed.
More Tasty Ideas
- St. Patrick’s Day Mint Blossom Cookies: These cookies feature a delightful minty flavor that can complement the sweet nostalgia of cotton candy fudge.
- Loaded Leprechaun Popcorn: This colorful popcorn snack is perfect for a festive treat alongside your cotton candy fudge and adds playful textures.
- St. Paddy’s Mint Cheesecake Cups: These creamy cheesecake cups with mint flavor make a fun pairing with the sweet cotton candy fudge.
Easy Cotton Candy Fudge Recipe - A Fun, Festive Treat
Ingredients
Equipment
Method
- Prep the Pan: Line an 8x8-inch baking pan with parchment paper, leaving overhang on two sides for easy lifting. Lightly grease the parchment.
- Melt the Base: In a large microwave-safe bowl, combine white chocolate chips, sweetened condensed milk, and butter. Microwave in 20–30 second bursts, stirring well after each, until smooth and fully melted. This usually takes 1½–2 minutes total. Alternatively, melt gently on the stovetop over low heat, stirring constantly.
- Flavor It: Stir in the cotton candy flavoring (or the raspberry and vanilla) and a pinch of salt. Mix until fully incorporated.
- Divide and Tint: Split the mixture into two bowls. Tint one bowl with a tiny bit of pink gel food coloring and the other with blue. Start with a toothpick’s worth of gel and add more if needed. You want soft pastel shades.
- Swirl the Colors: Spoon large dollops of pink and blue fudge into the prepared pan, alternating colors. Use a butter knife or skewer to gently swirl the colors together. Don’t overmix or you’ll lose the marble effect.
- Add Toppings (Optional): Sprinkle mini marshmallows or pastel sprinkles on top and gently press them in. Avoid adding actual cotton candy now—it melts on contact with moisture.
- Set the Fudge: Refrigerate for 2–3 hours, or until firm. For cleaner cuts, chill a bit longer.
- Slice and Serve: Lift the fudge out using the parchment overhang. Warm a sharp knife under hot water, wipe dry, and cut into 1-inch squares. Serve slightly chilled or at cool room temperature.