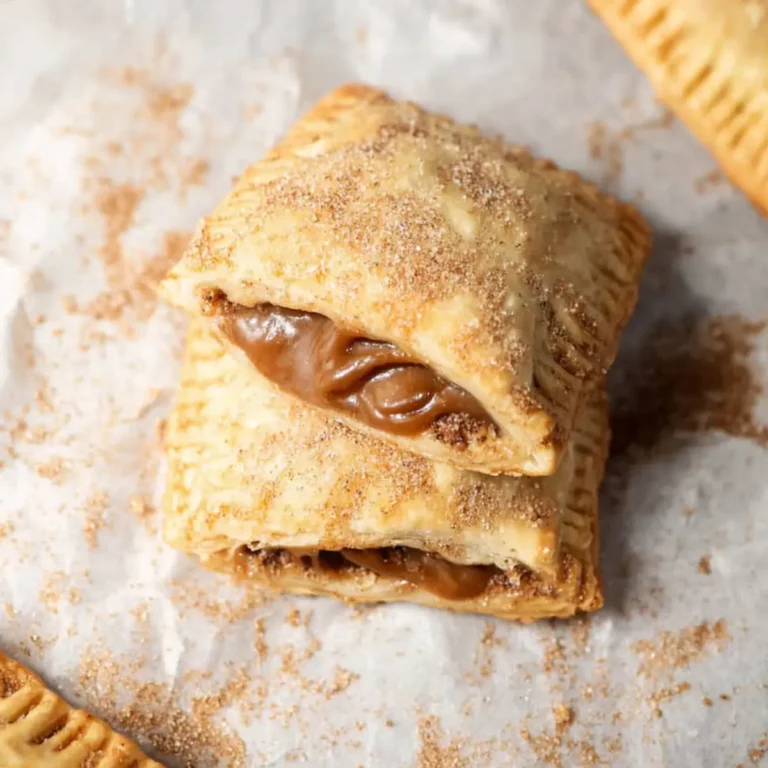
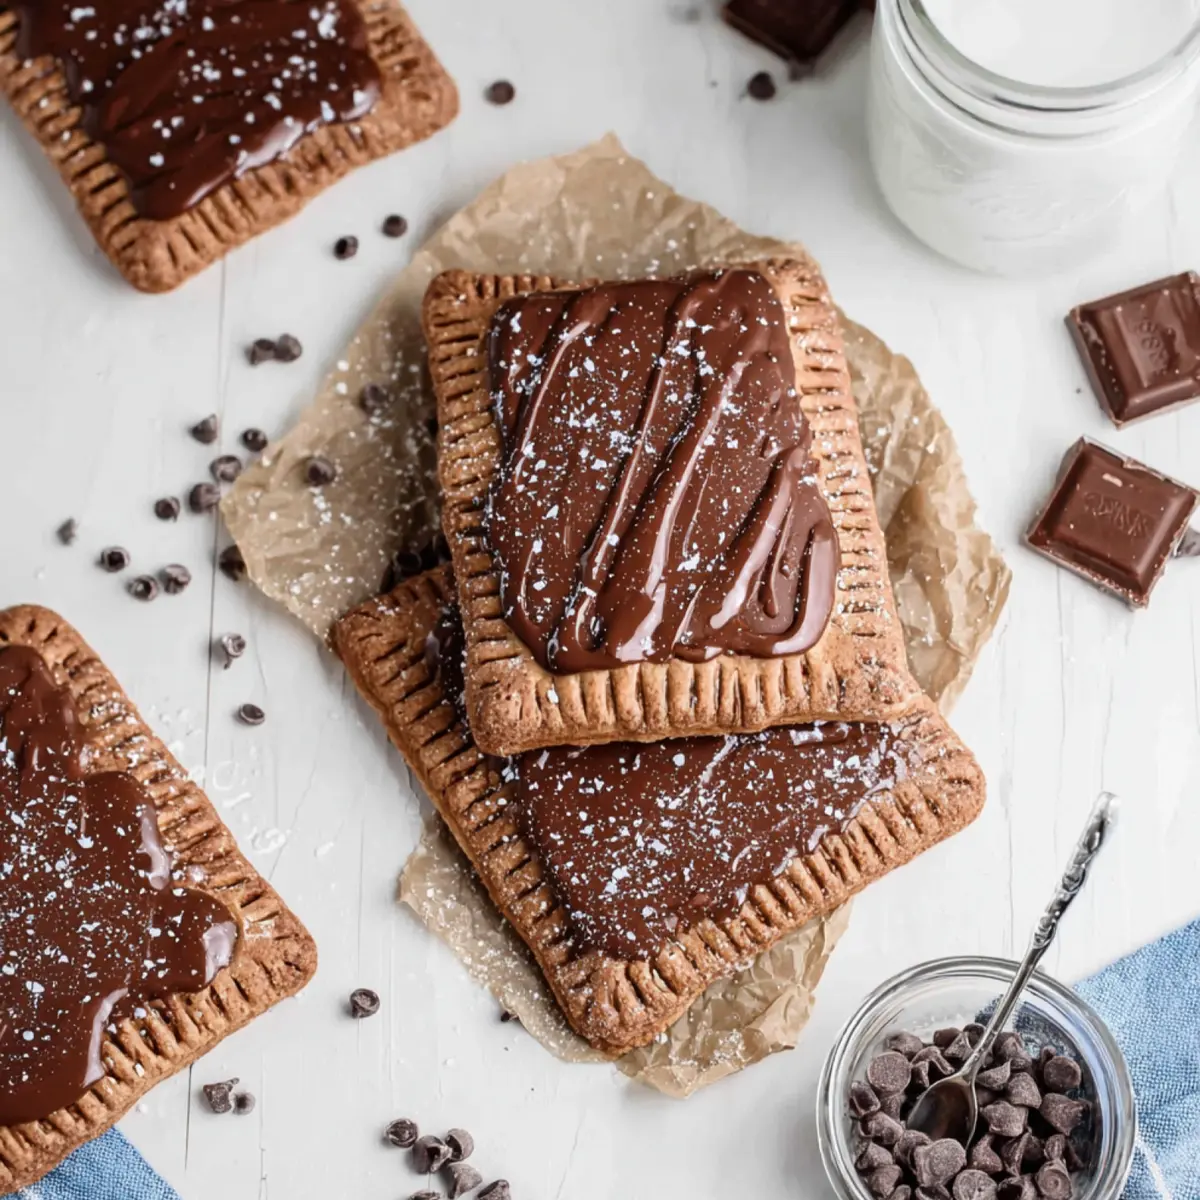
Few things in the world compare to the comfort of biting into a homemade treat straight from the oven — rich chocolate aroma wafting through the kitchen, that first shattering bite revealing a fudgy, gooey core. If you grew up on toaster pastries, these Chocolate Pop Tarts bring all the nostalgic joy but leave the boxed taste behind. Each one is loaded with luscious fudge filling, wrapped in tender chocolate pastry, and crowned with a glossy chocolate icing.
What makes this recipe so special is the combination of rich chocolate in every single layer. You get deep, almost brownie-like flavor, with a texture that’s at the same time flaky around the edges and decadently soft inside. The coarse sugar or flaked salt on top adds the perfect finish — a little crunch or a hit of contrast to that sweet icing. If you’re looking for a baking adventure that doubles as the ultimate breakfast treat or an indulgent snack, this is exactly where you should start.
The baking experience: Chocolate Pop Tarts at home
There’s something magical about making Chocolate Pop Tarts completely from scratch. The dough comes together soft and supple, ready to hug that ultra-chocolaty fudge filling. As they bake, an irresistible scent fills the air — deep, cocoa-rich, and inviting. And when you finally break one open, the glossy fudge makes it clear: these are pure chocolate indulgence, not your average store-bought snack.
Honestly, I can never resist sampling a warm one right after icing. The way the pastry gives way to melty chocolate is my favorite kind of kitchen reward. Whether you’re baking on a rainy Sunday, prepping breakfast for a crew, or just spoiling yourself, making Chocolate Pop Tarts at home feels especially satisfying.
The essential tools for homemade fudge-filled pastries
To whip up these Chocolate Pop Tarts, you don’t need anything fancy — just these trusty basics found in most kitchens:
- Small saucepan – For simmering the fudge filling until it’s glossy and thick.
- Food processor (or hands!) – To work butter into the dough quickly; hands do the trick for traditionalists.
- Rolling pin – For rolling the pastry thin and even, so every bite is flaky.
- Sharp knife or pastry cutter – To slice those neat, perfect rectangles for sandwiching the fudge.
- Baking sheets – Lined with parchment for easy cleanup and perfect bottoms.
- Fork – For crimping the pastry edges, keeping all that chocolate goodness inside.
- Medium mixing bowl – To whip up the smooth chocolate icing for the final drizzle.
- Pastry brush – For brushing the egg wash along the borders to seal your tarts.
- Whisk – Essential for lump-free chocolate icing.
- Measuring cups and spoons – Precision matters for the very best texture.
Layers of flavor inside every ingredient
Each ingredient plays a starring role in these Chocolate Pop Tarts. Here’s how they all come together for an unforgettable pastry:
- cocoa powder – The heart of the chocolate flavor, both in the filling and the dough; gives a rich, bittersweet depth.
- Heavy cream – Makes the fudge filling silky and ultra-luxurious.
- Semi-sweet chocolate chips – Bring sweetness and a fudgy texture to the center.
- Salted butter (cubed or cold) – Ensures a tender, flaky pastry while adding a subtle savory backdrop.
- Vanilla extract – Warmth and balance, rounding out the chocolate notes.
- All-purpose flour – The sturdy backbone of the pastry, helping everything hold together.
- Granulated sugar – A hint of sweetness to lift the pastry.
- Egg (beaten, for brushing) – Seals the pop tarts, locking the filling inside as they bake.
- Confectioner’s sugar – Creates a velvety icing to glaze the tops.
- Milk chocolate (melted) – Blends into the frosting for extra creaminess.
- Coarse salt or sugar – Sprinkled over the top for crunch or a delicious salty contrast.
See the recipe card below for the full list of ingredients and measurements.
How to craft perfectly gooey Chocolate Pop Tarts
- Simmer the fudge filling. In a small saucepan, stir together the cocoa powder, heavy cream, and half the chocolate chips. Set over medium heat and cook for 5–8 minutes, stirring non-stop. Stop when the chocolate is fully melted and the mixture thickens enough to coat the back of a spoon like warm pudding.
- Finish the filling. Remove the pan from the heat. Add the remaining chocolate chips, cubed butter, and vanilla. Stir until smooth and glossy. Pop the filling in the fridge for at least 30 minutes, until it’s thick and scoopable.
- Make the chocolate pastry dough. In a food processor, combine the flour, cocoa powder, granulated sugar, and cold butter. Pulse together until you get pea-sized crumbles. Slowly add cold water, 1 tablespoon at a time, until the dough just comes together. If working by hand, rub the butter into the dry mix until it looks like coarse crumbs and then gently mix in water.
- Roll and shape. Turn the dough onto a floured surface and roll out to about 3 mm thickness. Slice into rectangles, roughly 10 x 7.5 cm for sturdy pop tarts.
- Fill and seal. Place a tablespoon of chilled fudge filling on half the rectangles, leaving a small border all around. Brush the edges with beaten egg, place another dough rectangle on top, and press closed. Use a fork to crimp the edges securely—you want that pop tart embrace to be tight!
- Chill before baking. Arrange the filled tarts on parchment-lined baking sheets. Cover and chill in the fridge for 1 hour or in the freezer for about 20 minutes. This keeps the pastry perfectly flaky while baking.
- Bake. Preheat your oven to 200°C. Bake the pop tarts for 15–20 minutes. The edges should look dry and set, while the filling might bubble slightly and even escape a little—that’s normal and just makes them look rustic.
- Cool completely. Transfer the pop tarts to a wire rack and let them cool thoroughly before icing. The filling will set up beautifully as they cool.
- Make the glaze. In a medium bowl, whisk the confectioner’s sugar, cocoa powder, vanilla, and a bit of water until smooth. Stir in the melted milk chocolate. Thin with a touch more water if needed: you want a glossy, spreadable consistency that will set as it sits.
- Frost and finish. Spoon or spread a thin layer of frosting over each cooled pop tart. Let sit 10 minutes so it starts to harden. For a finishing touch, sprinkle coarse sugar or flaky salt for crunch or a hit of contrast.
- Let the glaze set. Place the tarts back on a baking sheet and let them stand uncovered for an hour or two, until the glaze is firm to the touch and won’t smudge. Now you’re ready for that first glorious bite.
Avoiding crumbles: tips and troubleshooting for chocolate tarts
Making Chocolate Pop Tarts can feel intimidating, but a few pointers will set you up for flawless results. If your dough feels too crumbly, add water gradually—just until it comes together. Overworking the dough can make it tough, so be gentle and stop mixing as soon as it forms a ball.
If you find the filling seeps out during baking, that’s actually pretty normal for homemade pop tarts—just don’t overstuff and be sure to crimp those edges well. If they lose their shape, try chilling them longer before baking; cold dough means a crisp result.
Your icing too thick? Stir in a touch of water—a little goes a long way. Too runny? Add a sprinkle of confectioner’s sugar to thicken it up. And don’t worry if your pop tarts aren’t uniform — that rustic, homemade look is truly part of their charm.
Pairings and fun variations to make it your own
These Chocolate Pop Tarts are rich enough to stand on their own, but pairing them with a glass of cold milk or hot coffee really highlights their chocolatey depths. Serve them for brunch with fresh berries for a bright, tangy contrast, or as part of a dessert spread with vanilla ice cream for maximum indulgence.
For fun variations, try swirling a spoonful of peanut butter or Nutella into the fudge filling before sealing. Swap the coarse salt on top for colorful sprinkles to make them more festive—kids especially love that nod to the classic boxed look.
You could even add a hint of orange zest to the filling for a grown-up twist, or use white chocolate chips in the glaze for a marbled effect. However you riff, these pop tarts are a cozy canvas for your best chocolate cravings.
FAQs about Chocolate Pop Tarts
Can I freeze homemade Chocolate Pop Tarts?
Yes, you can! Once completely cooled and glazed, place the Chocolate Pop Tarts on a tray and freeze until solid. Then transfer to a sealed container or zip bag. Thaw them at room temperature or pop them in a toaster oven to refresh.
What’s the best way to store leftover Chocolate Pop Tarts?
Store leftover Chocolate Pop Tarts in an airtight container at room temperature for up to two days, or in the fridge for up to a week. If you want to keep the pastry crisp, lay parchment between layers so they don’t stick together.
Can I use different fillings or make the dough gluten-free?
Absolutely! The chocolate fudge is rich and classic, but you can swap in fruit jams or nut butters if you like. For gluten-free Chocolate Pop Tarts, try your favorite 1:1 gluten-free flour blend in place of all-purpose—it’ll work well with the buttery dough.
One bite of Chocolate Pop Tarts is never enough
Nothing prepares you for that first, tender bite: flaky chocolate pastry, velvety fudge center, a sweet crackle of glaze. You get nostalgia, bakery-quality freshness, and pure chocolate joy all in one. When you make Chocolate Pop Tarts from scratch, you bring a bit of childhood magic to your morning — or, honestly, a perfect excuse to sneak one as an afternoon pick-me-up. Enjoy them warm, with the filling still slightly soft, or pack them up for whenever you crave something truly chocolatey and comforting.
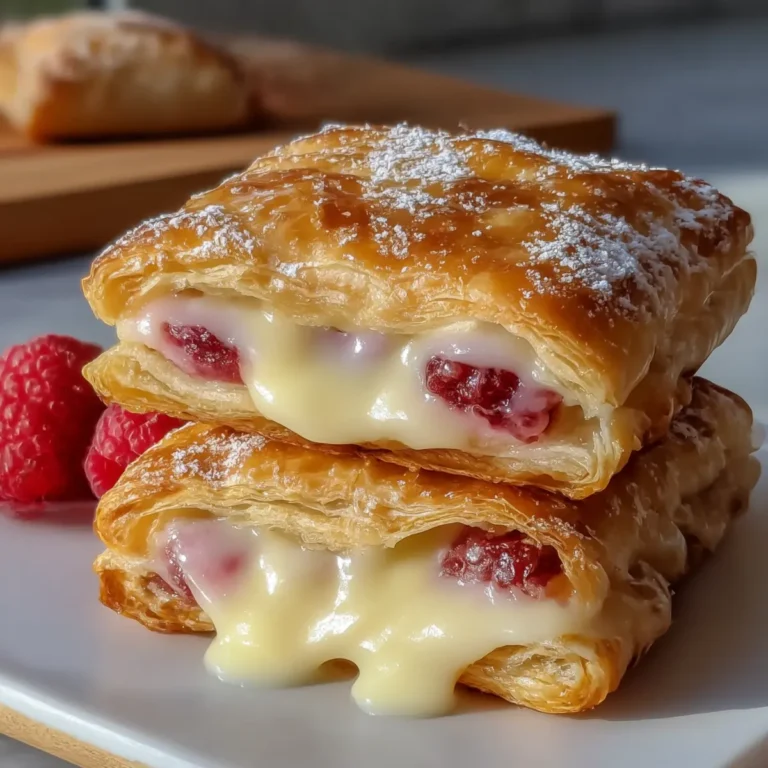
More Delicious Recipes
- Peppermint Hot Chocolate: This rich and creamy beverage is a perfect companion to the indulgent flavor of Chocolate Pop Tarts.
- Easy Breakfast Quiche: A delicious breakfast option that pairs well with sweet treats for a rounded morning meal.
- Air Fryer Garlic Bread: This savory side is great for balancing the sweetness of Chocolate Pop Tarts during a brunch spread.
Chocolate Pop Tarts
Ingredients
Equipment
Method
- To make the chocolate fudge filling: In a small saucepan, stir together the cocoa powder, heavy cream, and 3/4 cup chocolate chips.
- Set over medium heat and cook, stirring, for 5-8 minutes, until the chocolate is melted and the sauce has thickened slightly.
- Remove from heat, stir in the remaining 3/4 cup chocolate chips, the butter, and vanilla until smooth. Transfer to the fridge to cool and thicken, at least 30 minutes.
- Meanwhile, make the dough. In a food processor, combine the flour, cocoa powder, sugar, and butter.
- Pulse until the mix clumps together to forms pea-size balls.
- Add 1/2 cup cold water, 1 tablespoon at a time until the dough comes together and forms a ball. If the dough feels dry, add 1-2 tablespoons additional water.
- If you don’t have a food processor, you can also do this by hand. Just rub the butter into the dry ingredients using your fingers until you have pea-sized balls.
- Turn the dough out onto a floured surface. Roll out into a 1/8-inch thickness.
- Cut the dough into rectangles, about 4 x 3 inches.
- Place a tablespoon of the chilled chocolate fudge on one half of the rectangles, leaving a 1/4 inch border.
- Brush the edges with the beaten egg. Lay the other half of the dough over the filling and seal the edges by crimping with the back of a fork.
- Repeat until you've used all the dough, you will have leftover fudge.
- Place the pop tarts on parchment-lined baking sheets. Cover the baking sheets and place in the fridge for 1 hour or the freezer for 20 minutes.
- Preheat the oven to 400 degrees F. Bake the pop tarts for 15-20 minutes. The pop tarts will still leak a little. Cool completely before frosting.
- Make the frosting: In a medium bowl, whisk together the powdered sugar, cocoa powder, vanilla, and 3 tablespoons water until smooth. Stir in the melted chocolate. If your frosting is too thick, thin with 1-2 tablespoons additional water.
- Spoon a thin layer of the frosting on top of the cooled pop-tarts. Allow frosting to harden 10 minutes. Sprinkle with coarse sugar or salt.
- Place on a baking sheet and allow the pop tarts to harden, uncovered, about 2 hours.