There’s a certain kind of anticipation that comes with pulling a homemade Buster Bar Ice Cream Cake from the freezer—the kind that makes kids press their noses to the glass and adults “accidentally” wander by the dessert table a little too often. The first slice always gets me: the knife glides through that thick fudge ripple, the cookies crunch softly beneath, and a little cloud of vanilla-sweet cold hangs in the air when you serve it up. This cake isn’t just another frozen treat; it’s a layered masterpiece with just the right balance of creamy, salty, crunchy, and chocolatey goodness—absolutely essential for backyard birthdays, end-of-school bashes, or summer nights when you want something nostalgic and over-the-top.
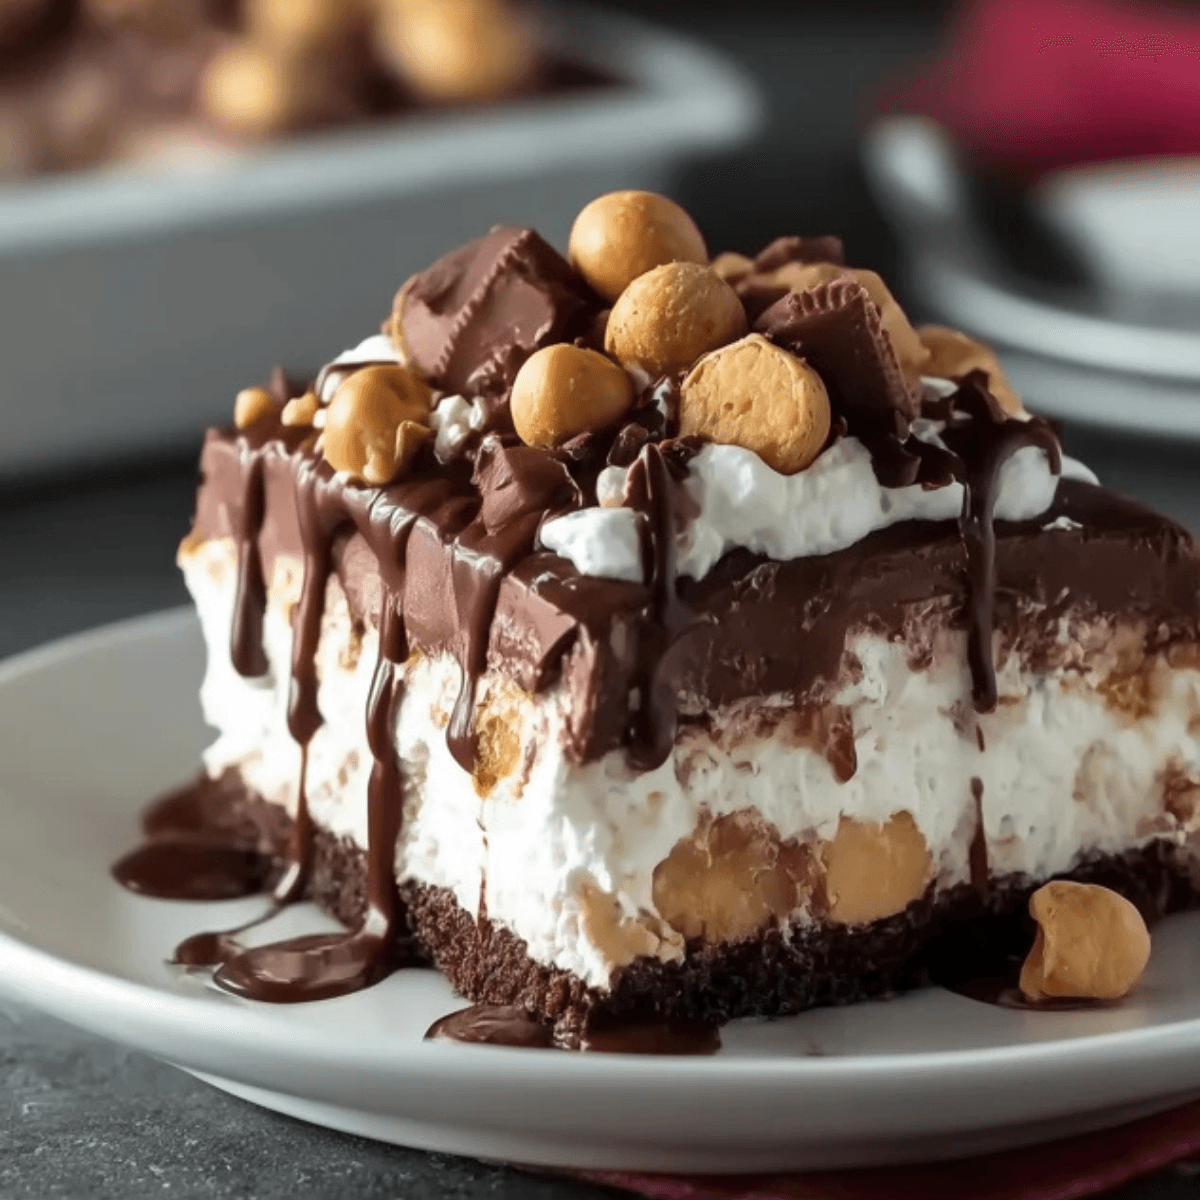
Table of Contents
What Makes This Buster Bar Ice Cream Cake So Irresistible
There’s no denying the nostalgic magic that Buster Bar Ice Cream Cake brings to a table. It’s inspired by the classic Dairy Queen treat, but made at home you get more control over each lavish layer—the smooth vanilla ice cream, the gooey fudge that somehow stays soft even when frozen, the crumbly chocolate cookie crust, and roasted peanuts that bring just the right pop of salt.
A good ice cream cake should be all about contrasts: cold and creamy one moment, shatteringly crunchy the next, with ribbons of rich chocolate weaving through every bite. When you sink your fork in, you get a cross-section that’s as beautiful as it is tempting—dark crumb, pale creamy middle, glossy fudge, and golden peanuts scattered like confetti. Even if you’re not usually someone who swoons over frozen desserts, this one’s got a way of changing minds.
The Ingredients That Give This Cake Its Signature Layers
Every slice of this Buster Bar Ice Cream Cake is a parade of classic flavors, all made from familiar ingredients you can grab at nearly any grocery store. Each one pulls its weight for flavor, texture, or that nostalgic “ice cream shop” vibe.
- Chocolate wafer cookies – These create that deep, crumbly crust that stands up to freezing but melts tenderly when you eat it. You can swap for chocolate sandwich cookies (minus the filling) if you prefer a sweeter profile.
- Butter – Richness for the crust and fudge sauce. Its flavor keeps the chocolate from tasting flat, and the fat ensures everything freezes into perfect sliceable layers.
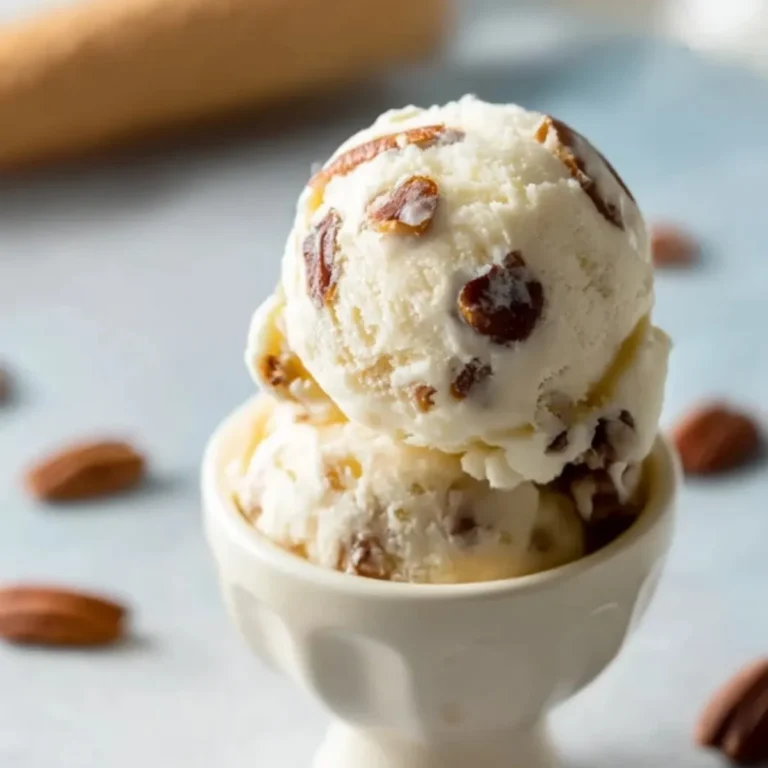
- Vanilla ice cream – Classic, creamy, and smooth. If you love other flavors (like coffee, peanut butter, or chocolate ripple), they absolutely work here too.
- Dry roasted peanuts – The salty, nutty crunch that sets Buster Bar desserts apart. Feel free to use honey roasted for a sweeter touch, or go with almonds if peanuts aren’t your thing.
- Semisweet chocolate chips – Bring the fudge layer’s signature richness; dark chocolate can be used for an even bolder flavor.
- Sweetened condensed milk – This thickens and sweetens the fudge sauce, helping it set just right without turning brittle in the freezer.
- Heavy cream – Rounds out the sauce and gives it that lush, spoonable texture even when cold.
- Light corn syrup – Prevents the fudge from crystallizing so it stays glossy and easy to slice through.
- Vanilla extract – Adds that little boost of warmth and aromatics to the fudge and ice cream; pure vanilla is best if you have it.
See the recipe card below for the full list of ingredients and measurements.
The Simple Steps to Building Buster Bar Ice Cream Cake at Home
Building a Buster Bar Ice Cream Cake takes a little patience (mostly waiting on the freezer), but each step is simple and deeply satisfying. You’ll find yourself sneaking tastes of the fudge or smoothing the ice cream just a little too carefully—it’s all part of the fun.
- Start by blitzing your chocolate wafer cookies to fine crumbs, then stir them together with melted butter. Press this mixture firmly into the base of a springform pan for that foundation layer—be sure to get into the corners. Freeze the crust until it feels solid to the touch.
- Next, make the fudge sauce: blend chocolate chips, sweetened condensed milk, more butter, heavy cream, and corn syrup in a saucepan over medium heat. Stir, watch chocolate melt, and inhale the deep, cocoa aroma. When it’s shiny and smooth, remove from heat and stir in the vanilla extract. Let it cool down to just above room temperature—warm enough to pour, but not so hot that it melts your ice cream.
- Scoop and spread half of the vanilla ice cream over the icy crust. Work gently so you don’t tear the crust up. Sprinkle a heavy handful of chopped peanuts across the ice cream, then pour on a layer of cooled fudge sauce. The sauce will want to swirl a bit, but a gentle hand will help it cover evenly. Freeze for half an hour.
- Repeat the whole layering process: another blanket of ice cream, more peanuts, and another pour of fudge. Freeze again to set these top layers.
- Finish off with any remaining fudge smoothed over the top. If you’re feeling fancy, scatter a few extra peanuts for crunch and curb appeal. Tuck the whole thing back in the freezer, this time overnight so the layers are firm, distinct, and easy to slice.
- Before serving, slide a knife around the inside edge of the springform, release the cake, and let it sit briefly so slicing is smooth. Each piece should reveal the dreamiest of cross-sections—dark crumb, pale ice cream, glossy fudge, golden nuts.
Secrets for That Perfect Balance of Creamy, Crunchy, and Fudgy
Getting the ideal Buster Bar Ice Cream Cake is all about layering thoughtfully and playing with temperature along the way. The crust should be packed down enough to hold firm, but never so hard that you struggle with the fork—think “packed brown sugar,” not concrete. Soften your ice cream just until it’s spreadable; too soft, and it’ll leak into odd corners, too cold and it won’t layer smoothly.
As for the fudge, patience is everything. Letting it cool to just above room temp ensures it flows (not floods) over each layer, settling in dreamy ripples without melting your frozen base. Don’t rush the freezing steps! Each short chill between layers prevents everything from sliding around or morphing into a single, muddled layer. And before you slice, a few minutes at room temperature transforms the experience, letting each bite be silky and yielding rather than rock-hard and icy.
Serving, Storing, and Twisting Your Buster Bar Ice Cream Cake
There’s something extra celebratory about delivering this cake, whole and towering, to a table—especially on a hot day when everyone’s craving a real treat. For neat slices, dip your knife in hot water and wipe between cuts, which helps you get that clean, bakery-style slice (plus a little extra showmanship!).
This Buster Bar Ice Cream Cake keeps beautifully in the freezer for several days, tightly wrapped or covered to block out any freezer funk. Leftovers (if you’re lucky enough to have them) are perfect for impromptu desserts or late-night spoonfuls straight from the pan. Want to riff on the original? Swap peanuts for almonds, try a swirl of caramel in the fudge, or use coffee or chocolate ice cream for a fresh take. If you’re working ahead, you can build the whole cake up to a week before your event—just hold off on any delicate decorative toppings until closer to serving.
FAQs about Buster Bar Ice Cream Cake
Can I make Buster Bar Ice Cream Cake with different ice cream flavors?
Absolutely; feel free to use chocolate, coffee, caramel, or even peanut butter ice cream as a fun spin on the classic. Just keep in mind that the ice cream should be softly spoonable for easy layering, no matter which flavor you choose.
What’s the best way to store leftover Buster Bar Ice Cream Cake?
Wrap leftover slices tightly in plastic or place them in an airtight container before freezing again. This keeps the cake from picking up unwanted flavors or freezer burn, and it should stay fresh for up to a week.
Do I need a springform pan for this ice cream cake, or can I use a regular baking dish?
A springform pan makes unmolding and slicing much easier, but you can use a regular dish lined with parchment paper. Just lift the cake out carefully before cutting and serving.
How far in advance can I assemble and freeze the Buster Bar Ice Cream Cake?
You can build and freeze the cake up to a week ahead. For best texture, keep it tightly covered, and add any final toppings (like extra fudge or peanuts) closer to the day you’ll serve it.
My fudge layer turned out too firm—what went wrong?
If your fudge is particularly stiff, it likely cooked for too long or cooled too much before layering. Try to cook it just until smooth and shiny, cool it only to room temperature, and consider adding a splash of cream if it’s very thick before adding to the cake.
The first bite always transports you—right back to sticky summer evenings, backyard bursts of laughter, and the joyful quiet of everyone savoring something cold and sweet. Making Buster Bar Ice Cream Cake from scratch brings that “ice cream shop” joy home, complete with creamy swirls, fudgy drips, and plenty of chocolate crunch. If you’re craving a chilled treat that’s a little nostalgic, or simply want to see a table full of smiles, this is the dessert you’ll want to keep in your freezer all season long.
More Delicious Recipes
- Cookies and Cream Ice Cream: This creamy ice cream flavor complements the rich layers of the Buster Bar Ice Cream Cake with its crunchy bits of cookie.
- Blueberry Ice Cream: A refreshing twist that adds vibrant fruitiness, perfect for enhancing summer desserts.
- Peanut Butter Banana Chocolate Chip Oatmeal Bars: These bars feature similar nutty and chocolatey flavors that pair well as a delightful treat alongside your ice cream cake.
Buster Bar Ice Cream Cake
Ingredients
Equipment
Method
- In a food processor, blend the chocolate cookies into crumbs. Combine with melted butter and press the mixture into the bottom of a 9-inch springform pan to form a crust. Freeze until firm.
- While the crust chills, combine chocolate chips, sweetened condensed milk, 1/2 cup butter, heavy cream, and corn syrup in a medium saucepan over medium heat. Stir constantly until smooth and shiny. Remove from heat and stir in the vanilla extract. Cool to room temperature.
- Spread half of the softened ice cream evenly over the frozen crust. Sprinkle half of the chopped peanuts on top, followed by a layer of the cooled fudge sauce. Freeze for 30 minutes.
- Repeat the layers with the remaining ice cream, peanuts, and fudge. Freeze again for 30 minutes.
- Pour any remaining fudge sauce over the top layer and smooth it out. Optional: sprinkle additional peanuts over the top.
- Freeze the cake overnight or at least 8 hours, until completely set.
- When ready to serve, remove the cake from the springform pan and let sit for a few minutes to slightly soften before slicing.