There’s something special about the treats that come out during the holidays. They’re not just desserts—they’re memories, traditions, and little moments of joy shared with the people who matter most. That’s exactly what you get with Thanksgiving Pilgrim Hat Cookies. These adorable, bite-sized goodies are easy to make, fun to decorate, and perfect for everything from school parties to festive family tables. You don’t need a degree in baking or a pantry full of rare ingredients. Just a few simple components, a microwave, and a few creative hands—and you’ll have a tray full of delightful treats ready in under 30 minutes.
If you’re looking for a no-bake Thanksgiving dessert that’s family-friendly and guaranteed to impress, you’ve just found it. Let’s walk through everything you need to know to create these charming Pilgrim Hat Cookies from scratch, even if you’ve never made holiday desserts before.
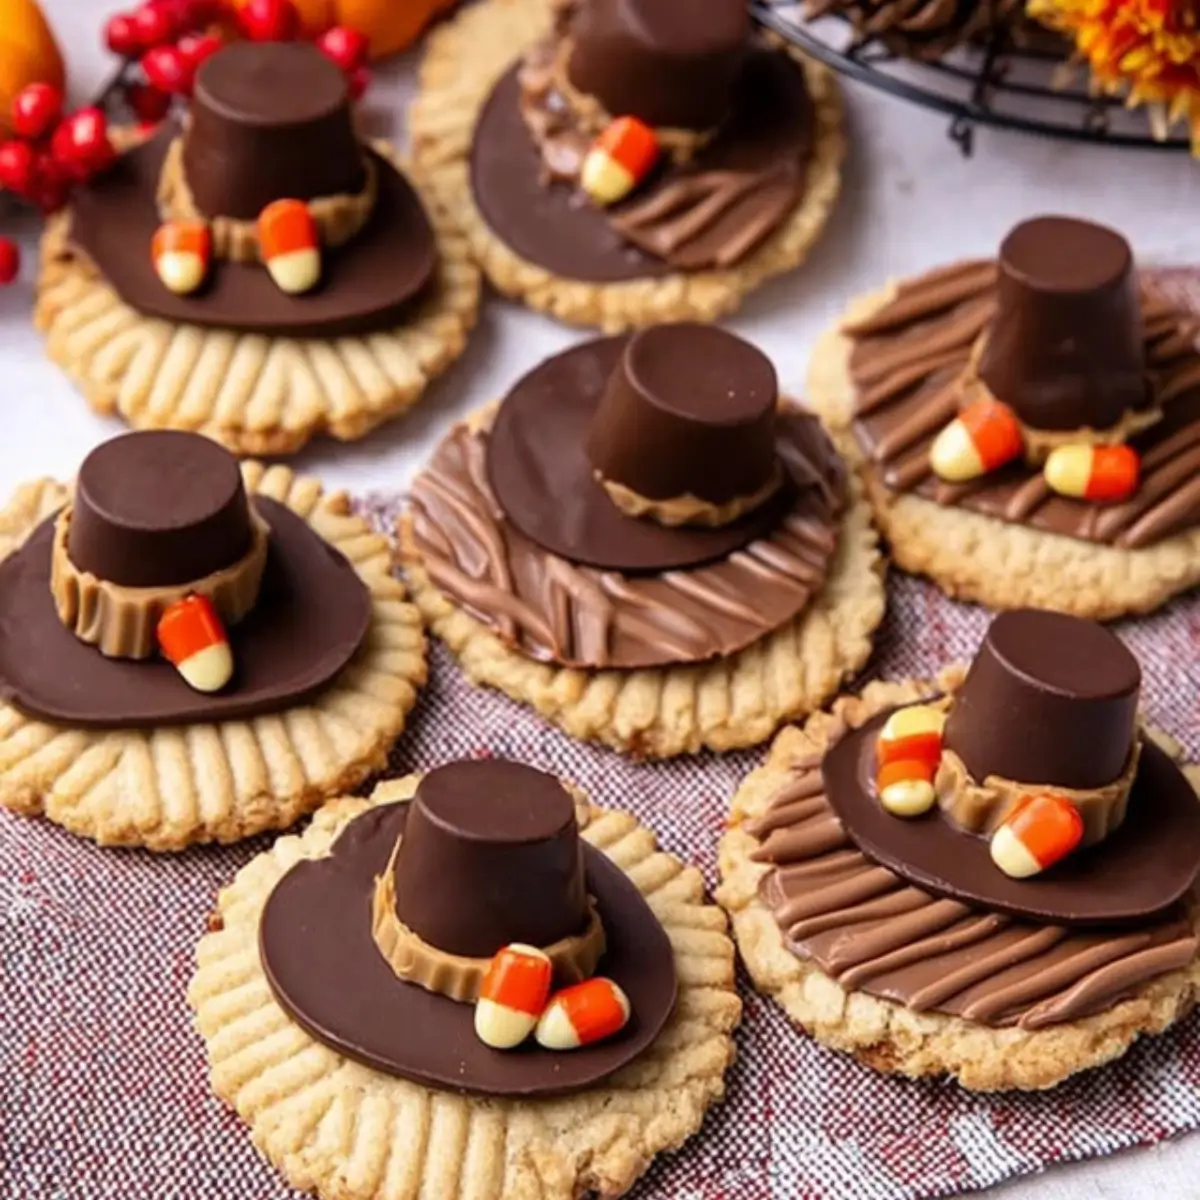
Table of Contents
Why You’ll Love These Pilgrim Hat Cookies
You’ll be surprised how quickly these cookies become your go-to Thanksgiving dessert. Here’s why they stand out:
- No baking required – You won’t need to preheat your oven or break out your baking pans.
- Kid-friendly fun – Kids love helping with the decoration process, especially placing the M&M buckles.
- Minimal cleanup – With a little parchment paper and a few mixing bowls, you’ll be done cleaning in no time.
- Eye-catching presentation – These cookies look great on dessert trays and buffet tables.
- Easy to store and transport – Perfect for bake sales, potlucks, or gifting.
This isn’t just a recipe—it’s a holiday activity disguised as a dessert. You’ll create memories while whipping up a snack everyone will love.
Ingredients for Thanksgiving Pilgrim Hat Cookies
You don’t need to go on a grocery hunt for these. In fact, there’s a good chance you already have most of the ingredients in your kitchen. Here’s what you’ll need:
- ½ cup smooth peanut butter
- 1 cup white chocolate chips
- 24 fudge-striped cookies (use the kind with the chocolate stripes on one side)
- 24 Reese’s dark chocolate miniature cups
- Mini M&Ms in red, orange, and yellow (for the hat buckles)
Smooth peanut butter works best here because it melts more easily and creates a clean, creamy finish. White chocolate adds sweetness and holds everything together like edible glue.
How to Make Thanksgiving Pilgrim Hat Cookies
This is where the magic happens. The steps are simple and straightforward, and you’ll likely find yourself repeating this recipe every year once you see how easy—and fun—it is.
Step 1: Prepare Your Workspace
Start by lining a large baking tray or cutting board with parchment paper. This makes assembly easier and cleanup a breeze.
Step 2: Melt the Peanut Butter and Chocolate
In a microwave-safe bowl, combine the white chocolate chips and peanut butter. Use the defrost setting or 50% power and heat in short bursts, stirring between each round. Keep going until the mixture is smooth and creamy. This should only take a few minutes.
Step 3: Cool and Pipe
Once melted, transfer the mixture to a piping bag or a zip-top plastic bag with the tip cut off. Let it cool for about 5 minutes so it thickens slightly. This helps keep the mixture from running when you assemble the hats.
Step 4: Assemble the Hat Base
Take each fudge-striped cookie and place it stripe-side down on the parchment paper. Pipe a small circle of the peanut butter-chocolate mixture in the center of the cookie.
Step 5: Add the Reese’s Cup
Place a Reese’s miniature cup upside down (large side down) on top of the piped mixture. Gently press it down so the mixture spreads around the base like a hat band.
Step 6: Create the Buckle
Take a mini M&M and press it into the front of the peanut butter band. This forms the buckle of the hat and adds that charming, colorful touch.
Step 7: Let the Cookies Set
Allow the cookies to set at room temperature or place them in the refrigerator for about 10–15 minutes to speed up the process. Once they’re firm, they’re ready to serve or store.
Tips for Perfect Pilgrim Hat Cookies
- Use fresh Reese’s cups to prevent crumbling.
- Melt slowly to avoid burning the white chocolate.
- Let the mixture cool slightly before piping to avoid a runny mess.
- Don’t skip chilling if you want them to hold up for parties or transport.
- Store in a cool, dry place for up to three days. A sealed container works best.
Fun Variations You Can Try
If you want to switch things up or add a personal touch, here are a few fun variations you can try:
- Chocolate swap: Use milk or dark chocolate chips instead of white chocolate for a richer taste.
- Different “hat bands”: Try Nutella or cookie butter instead of peanut butter.
- Frosting flair: Add a swirl of colored frosting to make them even more festive.
- Sprinkle magic: Use gold or fall-themed sprinkles instead of M&Ms for the buckle.
- Dairy-free option: Use dairy-free chocolate chips and a peanut butter alternative to suit dietary needs.
Feel free to get creative. These cookies are just as much about the decorating as they are about the flavor.
FAQ About Thanksgiving Pilgrim Hat Cookies
What if I don’t have a piping bag?
No problem. You can use a regular sandwich bag and cut a tiny hole in one corner. It gives you control over the piping and is easy to toss when you’re done.
Can I make these ahead of time?
Yes, you can. These cookies hold up well for a few days. Just be sure to store them in an airtight container in a cool, dry place. You can also refrigerate them to keep them firm longer.
What if someone has a peanut allergy?
You can swap the peanut butter for sunflower seed butter or cookie butter, and choose peanut-free chocolate alternatives. Many brands now offer allergy-friendly chocolates that work just as well.
Conclusion
Thanksgiving Pilgrim Hat Cookies aren’t just another seasonal treat—they’re a creative, heartwarming way to bring your family and friends together. From the moment you melt the first chocolate chip to the final placement of a tiny M&M buckle, this recipe invites laughter, hands-on fun, and the kind of joy that defines the holidays.
Whether you’re crafting these cookies with kids or making a batch for a party, you’ll find that the process is just as rewarding as the result. These hats may be small, but they carry the warmth and charm of the season in every bite.
Now it’s your turn. Gather your ingredients, clear a little counter space, and create your own batch of Thanksgiving Pilgrim Hat Cookies. Don’t be surprised if they become part of your family’s holiday traditions year after year.
More Tasty Ideas
- Snowball Oreo Cookie Balls: These no-bake Oreo cookie balls are dipped in white chocolate and dusted with coconut to create a festive treat. Just like the Pilgrim Hat Cookies, they’re fun to assemble and make a delightful addition to any holiday dessert table.
- Oreo Balls for Christmas: With their chocolatey center and decorative coatings, these Oreo balls are perfect for any holiday celebration. They offer the same playful and kid-friendly vibe as the Pilgrim Hat Cookies, with a focus on easy, no-bake fun.
- Christmas Fudge Recipe: This rich, creamy chocolate fudge is simple to make and endlessly customizable. Its smooth texture and decadent flavor make it a great companion to any sweet treat platter featuring whimsical cookies or candy creations.
Thanksgiving Pilgrim Hat Cookies

These Thanksgiving Pilgrim Hat Cookies are an easy, no-bake dessert made with peanut butter, white chocolate, fudge-striped cookies, and miniature Reese’s cups. They’re festive, fun to make with kids, and perfect for classroom parties or Thanksgiving gatherings.
- Prep Time: 20 minutes
- Cook Time: 0 minutes
- Total Time: 20 minutes
- Yield: 24 cookies
- Category: Dessert
- Method: No-Bake
- Cuisine: American
- Diet: Vegetarian
Ingredients
- 1/2 cup smooth peanut butter
- 1 cup white chocolate chips
- 24 fudge-striped cookies
- 24 Reese’s dark chocolate miniature cups
- Red, orange, and yellow mini M&Ms
Instructions
- Line a large baking tray or cutting board with parchment paper.
- In a microwave-safe bowl, melt the peanut butter and white chocolate chips on a low or defrost setting, stirring often until smooth.
- Transfer the mixture into a piping bag and let it cool for about 5 minutes.
- Place the fudge-striped cookies striped side down on the parchment paper.
- Snip the tip of the piping bag and pipe a small circle of the melted mixture into the center of each cookie.
- Place a Reese’s miniature cup upside down on top of the piped mixture and press gently to create a “hat band.”
- Press a mini M&M onto the hat band to form a buckle.
- Let the cookies set completely. Chill in the refrigerator for 15 minutes if needed.
Notes
- Use smooth peanut butter for best melting results and a creamy texture.
- Chill the assembled cookies to help them set quickly and firmly.
- Store in an airtight container at room temperature or in the fridge for up to 3 days.