There’s something undeniably magical about Halloween. The chill in the air, pumpkins glowing on porches, the sound of crunching leaves underfoot, and children running around in costumes all set the perfect stage for festive fun. While Halloween is known for candy, nothing makes your table stand out more than homemade desserts that combine creativity and flavor. That’s where Halloween cakesicles step in. These spooky yet adorable treats are the perfect blend of cake pops and chocolate bars, making them an instant crowd-pleaser. If you want to wow your guests, surprise your kids, or even prepare gifts for neighbors, Halloween cakesicles are the treat you need to try this season.
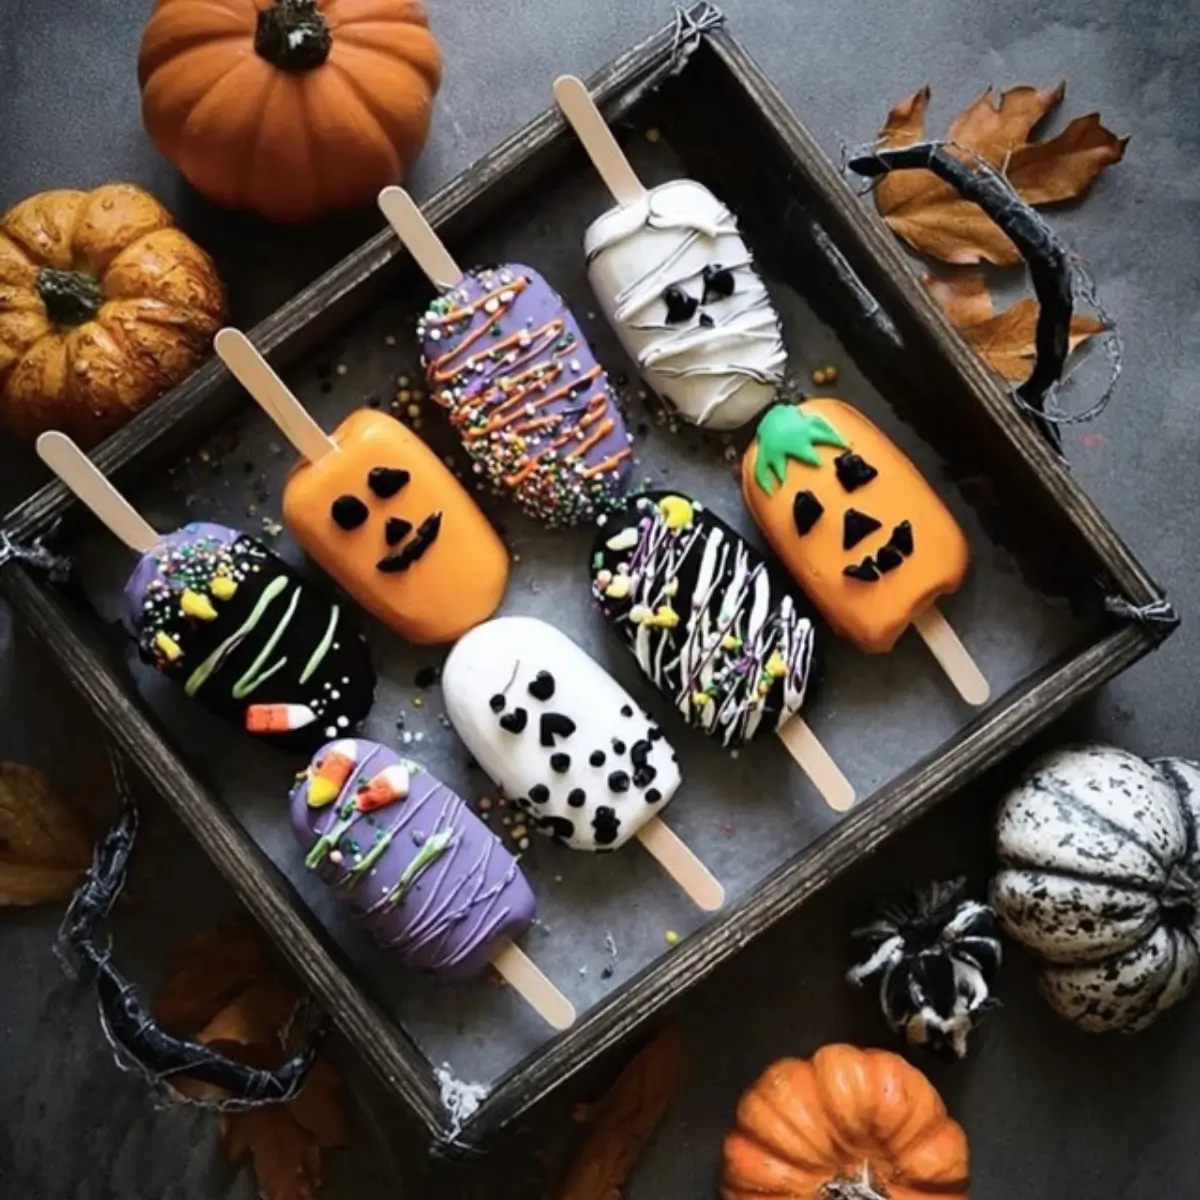
Table of Contents
What Are Halloween Cakesicles?
Halloween cakesicles are a fun twist on the classic cake pop. Instead of rolling cake and frosting into a ball, you press the mixture into a popsicle mold, insert a stick, and coat it with melted chocolate or candy melts. The result is a dessert that looks like a popsicle but delivers a rich, cakey bite.
These treats are especially popular during Halloween because they’re so easy to customize. You can create spooky ghosts, pumpkins, mummies, or even creepy monsters with just a bit of melted chocolate and candy eyes. Whether you’re hosting a party or need a hands-on activity for kids, cakesicles give you plenty of room for creativity.
Keywords to keep in mind here include Halloween cakesicles, spooky cakesicles, and Halloween cake popsicles. These phrases are often searched by people looking for festive dessert ideas, which makes them essential for optimizing your recipe.
Ingredients You’ll Need for Halloween Cakesicles
Before diving into the decorating fun, you’ll want to gather your ingredients. Luckily, most of them are pantry staples or easy to find at your local grocery store.
Basic Cake and Frosting Mix
- One baked cake of your choice (chocolate, vanilla, or red velvet work best)
- About 1 cup of frosting (buttercream or cream cheese frosting pairs well)
Coating and Decoration
- Candy melts in white, orange, green, and black, or simply use white/dark chocolate
- Popsicle sticks
- Halloween sprinkles
- Candy eyes
- Edible glitter (optional)
You can play around with flavors and colors to match your theme. For example, using red velvet cake creates a “bloody” effect, while vanilla cake with white candy coating is perfect for ghosts.
Step-by-Step Halloween Cakesicles Recipe
Step 1 – Bake and Prepare the Cake
Start by baking your cake flavor of choice. Once it has cooled completely, crumble it into fine crumbs. This texture helps the frosting blend evenly and prevents lumps in your cakesicles.
Step 2 – Mix Cake with Frosting
Add frosting to your cake crumbs a spoonful at a time. The goal is to achieve a dough-like texture that holds together without being too sticky. If you add too much frosting, the mixture can become overly soft, making it difficult to mold.
Step 3 – Shape and Insert Sticks
Press the cake-and-frosting mixture firmly into your silicone cakesicle mold. Insert popsicle sticks into the bottom and smooth out the surface with a spatula. Place the filled molds in the refrigerator for about 30 minutes to firm up.
Step 4 – Coat with Chocolate
Melt your chocolate or candy melts in a microwave-safe bowl, stirring every 20 seconds until smooth. Carefully dip each chilled cakesicle into the melted chocolate, ensuring full coverage. Allow the excess chocolate to drip off before placing the cakesicle on parchment paper to set.
Step 5 – Decorate Spookily
This is where you can get creative. Use candy melts and sprinkles to bring your cakesicles to life. Drizzle white chocolate across a dark base for a mummy look, add orange candy melts with green details for pumpkins, or go wild with bright colors and candy eyes for monster cakesicles. The possibilities are endless, and every design adds a personal touch to your Halloween celebration.
Decoration Ideas for Spooky Cakesicles
The fun of Halloween cakesicles is that they double as both dessert and decoration. Here are some simple yet striking ideas:
- Ghost Cakesicles: Coat with white candy melts and add black dots for eyes.
- Pumpkin Cakesicles: Use orange candy melts and create stems with green frosting or melted chocolate.
- Mummy Cakesicles: Drizzle thin white chocolate strips across the top and place candy eyes between the lines.
- Monster Cakesicles: Use vibrant colors like green or purple and top with candy eyes for a playful twist.
These designs don’t require professional skills, which means anyone can join in and create their own unique treat.
Tips for Perfect Halloween Cakesicles
Getting your cakesicles just right takes a little practice, but these tips will make the process smoother:
- Use silicone molds for easy release without breaking the cakesicles.
- Chill before dipping to keep the cake firm and prevent crumbs from mixing with the coating.
- Don’t overheat your chocolate, as it can seize up. Melt slowly and stir often.
- Keep designs simple if working with kids, as complicated decorations can get messy.
- Store properly in the fridge in an airtight container to maintain freshness.
With these tricks, you’ll have cakesicles that not only taste delicious but also look picture-perfect.
FAQ About Halloween Cakesicles
How long do Halloween cakesicles last?
When stored in an airtight container in the refrigerator, cakesicles last up to five days. If you want to prepare them in advance, you can also freeze them for longer storage.
Can I make Halloween cakesicles ahead of time?
Yes, you can prepare the cake-and-frosting mixture a day or two before. Decorate the cakesicles closer to your event to keep the coating looking fresh and vibrant.
What’s the best chocolate for Halloween cakesicles?
Candy melts are the easiest to work with since they melt smoothly and come in festive colors. However, tempered chocolate provides a shinier and more professional finish if you’re aiming for that bakery-style look.
Conclusion
Halloween cakesicles are more than just a dessert—they’re a centerpiece for your fall festivities. They bring creativity, flavor, and fun all in one bite-sized package. With endless decoration ideas and flavors to try, you can personalize each cakesicle to match your Halloween theme. Whether you’re preparing them for a spooky party, sharing them with neighbors, or making them with your children, these treats are sure to delight.
If you’ve been searching for a dessert that’s simple, festive, and guaranteed to impress, it’s time to try Halloween cakesicles. Gather your ingredients, roll up your sleeves, and let your imagination run wild. Your Halloween table will never look the same again.
More Relevant Recipes
- Pumpkin Spice Sourdough Bread: This cozy bread blends the earthy tang of sourdough with warm pumpkin spice flavors, making it a delightful companion to festive Halloween treats like cakesicles. Perfect for breakfast or an autumn snack.
- Pumpkin Crumb Cake Muffins: With a tender pumpkin base and a sweet crumb topping, these muffins echo the fall flavors that pair beautifully with Halloween desserts. They’re ideal for serving alongside spooky-themed sweets.
- Jalapeno Popper Mummies: While savory, these playful Halloween appetizers align perfectly with the holiday theme. Wrapped in crescent dough to look like mummies, they bring the same whimsical spirit as Halloween cakesicles to your party spread.
Halloween Cakesicles
Halloween cakesicles are a festive twist on traditional cake pops, shaped like popsicles and coated in chocolate. They’re decorated with spooky designs such as ghosts, pumpkins, and mummies, making them a fun and creative dessert for Halloween parties.
- Prep Time: 30 minutes
- Cook Time: 30 minutes
- Total Time: 60 minutes
- Yield: 12 cakesicles
- Category: Dessert
- Method: No-Bake with Decoration
- Cuisine: American
- Diet: Vegetarian
Ingredients
- 1 baked 9-inch round cake (chocolate, vanilla, or red velvet)
- 1 cup frosting (buttercream or cream cheese)
- 2 cups candy melts or chocolate (white, dark, or colored)
- 1 tablespoon vegetable oil (optional, to thin chocolate)
- 12 popsicle sticks
- 1/4 cup Halloween sprinkles
- 12 candy eyes
- 1 teaspoon edible glitter (optional)
Instructions
- Bake a cake of your choice and allow it to cool completely.
- Crumble the cake into fine crumbs in a large bowl.
- Add frosting gradually and mix until the texture resembles dough that holds together.
- Press the mixture firmly into silicone cakesicle molds, smoothing the tops.
- Insert popsicle sticks into each mold and refrigerate for 30 minutes until firm.
- Melt candy melts or chocolate in a microwave-safe bowl, stirring every 20 seconds until smooth.
- Dip each chilled cakesicle into the melted coating, covering completely.
- Decorate with sprinkles, candy eyes, and additional drizzles to create ghost, pumpkin, or mummy designs.
- Allow cakesicles to set until the coating hardens before serving.
Notes
- Silicone molds ensure cakesicles release easily without breaking.
- Chilling before dipping prevents crumbs from mixing into the coating.
- Red velvet cake works well for a Halloween-inspired look.
- Store in the refrigerator in an airtight container for up to 5 days.