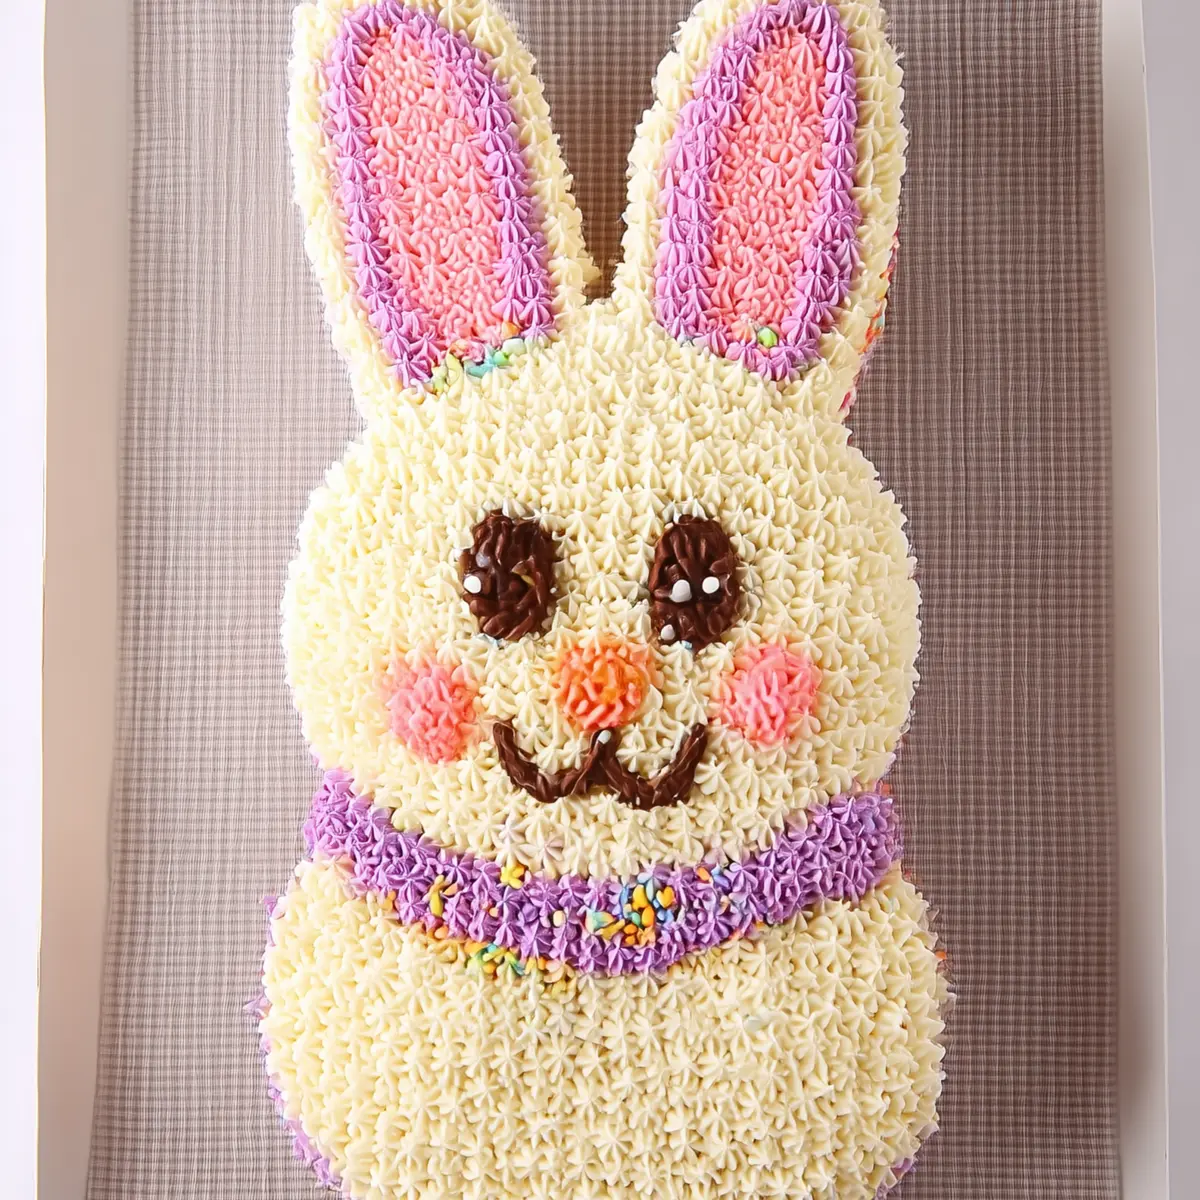
If there’s one showstopper that brings instant joy to the table at Easter, it’s got to be an Easter Bunny Cut Up Cake. Whimsical, festive, and strikingly cute, this beginner-friendly take on the classic bunny cake transforms two simple round layers into a cheery bunny face with just a couple of cuts. No need to be a pastry pro—the star fill frosting technique makes decorating as approachable as baking it. Whether you’re baking with little helpers or surprising them as they run in from a backyard egg hunt, this is the kind of cake that turns a dessert into a memory.
The moment you start slicing, the sweet aroma of butter and pure vanilla fills the kitchen, mingling with that unmistakable sense of celebration. I love how quickly blank cake rounds turn into bunny ears, a fluffy face, and a pastel bowtie—every detail begging for a sprinkle or two. This is the Easter centerpiece that truly brings everyone together, laughter and finger-licking included.
Gear to Bring Your Easter Bunny Cake to Life
- Hand or stand mixer – Makes whipping up buttercream simple and smooth.
- Pastry bags – For piping all those cheerful stars and facial details.
- Small round writing tip (Tip #3) – Perfect for shaping the bunny’s sweet face.
- Star tip (Tip #17) – Creates the textured star look in all the frosting work.
- Toothpick – Handy for tracing outlines of the nose and inner ears.
- Cake board or tray – Essential for assembling your bunny safely.
- Aluminum foil or parchment paper – Keeps your work surface tidy and makes moving pieces easy.
Meet the Easter Bunny Cut Up Cake Ingredients
- cake mix – The fluffy base for your bunny, ready for any flavor mood—chocolate, vanilla, even carrot.
- Unsalted butter, room temperature – Makes your frosting creamy and rich for those classic star swirls.
- Powdered sugar – Brings the silky sweetness that makes your bunny shine.
- Vanilla extract – Adds warmth and depth to your buttercream.
- Almond extract – Gives a hint of sophistication, but feel free to omit if you want pure vanilla.
- Salt – Balances all the sweet flavors beautifully.
- Milk or cream – A splash turns your buttercream just spreadable enough for easy piping.
- Food coloring (pink, brown/black, green, purple, or your pick) – Makes that bunny pop with personality; use gel or liquid colors for the brightest results.
- Additional sprinkles or decorations – The playful finishing touch; toss on as many as you like.
See the recipe card below for the full list of ingredients and measurements.
How to Create This Easter Bunny Cut Up Cake Step by Step
- Shape the bunny. Cut one of your baked and cooled round cakes to form the bunny’s ears and bowtie. Arrange all pieces—the main face, two ears, and bowtie—on a cake board or tray lined with aluminum foil or parchment. Step back and check that the bunny’s shape is just right before you frost.
- Whip up the frosting. In a bowl, use your stand or hand mixer to blend butter, powdered sugar, vanilla extract, almond extract, and salt. Add milk or cream gradually until the frosting looks silky and spreads easily. It should feel pillowy and smooth—not runny, not too stiff.
- Tint your frosting for the bunny’s features. Scoop about 1/3 cup of frosting into a small bowl. Color with drops of brown or black food coloring until you reach the depth you want for eyes, mouth, and whiskers.
- Draw the face. Fit a pastry bag with a small writing tip (Tip #3), fill with your colored frosting, and pipe on the bunny’s expressive facial features. Channel your inner artist while outlining eyes, nose, and mouth—don’t stress about perfection.
- Trace outlines for color spots. Using a toothpick, lightly trace where the bunny’s nose and the pink centers of the ears will go. These outlines help you decorate confidently and keep your colors crisp.
- Frost with stars. Fill a clean pastry bag with white frosting and attach the star tip (#17). Hold the bag upright and pipe tightly spaced stars to cover the face and the outer portions of the ears—all those little stars create extra cuteness. Leave the traced areas bare for the moment.
- Add pink details. Tint a small amount of frosting pink and use it, with the same star tip, to fill in the nose and the center of each ear. Now your bunny looks extra playful!
- Decorate the bowtie. Color the remaining frosting any shade you like for the bowtie—classic pastel works, or go bold for fun. Pipe stars all over the bowtie and its edges. If you want, create a bare round section in the middle and fill it with extra frosting and generous sprinkles.
Tips, Troubleshooting, and Common Mistakes for Bunny Cakes
Worried about your bunny coming out more “abstract art” than adorable centerpiece? You’re not alone! Here’s how to sidestep classic cake hiccups and ensure every piece is a delight:
- Cakes cracking while cutting: Make sure your rounds are fully cooled—you’ll get swagger and clean edges. If a piece does break, just patch it with frosting. No one will ever know.
- Frosting too runny or stiff: If your buttercream slides off, whip in a little more powdered sugar. If it’s too dense, add a few more drops of milk or cream and beat again. Frosting should pipe easily and hold its shape.
- Uneven star piping: Practice first on a plate if you’ve never piped stars. Keep your pastry bag perpendicular to the surface and use gentle, even pressure.
- Color bleed: Use gel food color for the brightest, cleanest hues. Let colored frosting sit for a few minutes—sometimes the shade deepens as it rests.
- Assembly mishaps: Lay out every piece before you frost or decorate. It takes away the guesswork and helps you envision your bunny before setting anything in stone (or, well, buttercream).
Remember, any little “imperfection” just becomes more personality for your bunny. The most memorable cakes are often the ones with charm!
Pairing Ideas and Creative Easter Bunny Cake Variations
This Easter Bunny Cut Up Cake is so festive on its own but really shines as the sweet finale to a springtime brunch or afternoon tea. Serve slices alongside bowls of pastel jellybeans, fresh berries, or a light lemon fruit salad. If you’re hosting, strong coffee, milk, or an icy citrus punch are all lovely complements.
- Kid-friendly fun: Let children pick their own food coloring for the bowtie and handle the sprinkles—every cake becomes a family masterpiece.
- Flavor swap: Try a chocolate or carrot base instead of vanilla, or experiment with strawberry cake for a more vibrant bunny.
- Gluten-free twist: Substitute a gluten-free cake mix to accommodate all guests at your gathering.
- Extra festive: Add edible glitter or press in extra bunny whiskers with licorice strings for a playful finish.
FAQs about Easter Bunny Cut Up Cake
Can I make the Easter Bunny Cut Up Cake in advance?
Absolutely! You can bake the cake rounds a day in advance and assemble the bunny the next day. Store baked cakes, tightly wrapped, at room temperature. For a frosted cake, cover and store in the fridge. Bring to room temp before serving for softest texture.
What’s the best way to store leftover Easter Bunny Cut Up Cake?
Leftover bunny cake can be covered and stored in the refrigerator for a few days. If you have smaller pieces, place them in an airtight container. Let the slices sit out a bit before eating so the frosting softens nicely.
Can I freeze the bunny cake after assembling and decorating?
It’s best to freeze the unfrosted cake rounds if you want to prep ahead. Once decorated, freezing may cause condensation and color bleed. For best results, assemble and decorate the day you plan to serve, or store components separately in the freezer, well-wrapped.
Celebrate Big with This Easy Easter Bunny Cut Up Cake
From the moment the bunny face comes together, this Easter Bunny Cut Up Cake turns a simple gathering into a sweet celebration. The playful star-frosted details, soft vanilla aroma, and cheerful colors always bring a round of smiles. I love sneaking the first slice from an ear; there’s something about the soft crumb and creamy buttercream that tastes like pure joy. Whatever flavors and colors you choose, one thing’s for sure: this cake is all about sharing, stories, and a little touch of springtime magic.
More Delicious Recipes
- Easter Egg Fruit Pizza: This festive fruit pizza offers a colorful and delicious way to celebrate Easter just like the bunny cake.
- Andes Mint Chocolate Cupcakes: These delightful cupcakes make for a sweet treat that complements the playful spirit of the Easter Bunny Cut Up Cake.
- Green Velvet Cupcakes with Cream Cheese Frosting: Perfect for spring gatherings, these vibrant cupcakes are a fun addition to any Easter dessert table.
Beginner Easter Bunny Cut Up Cake
Ingredients
Equipment
Method
- Use the photos in the blog post to cut one of the cake rounds into ears and a bowtie as shown. Arrange cake pieces on a cake board or baking sheet covered with aluminum foil or parchment.
- Use a hand or stand mixer to blend together the butter, powdered sugar, vanilla extract, almond extract, and salt. Add the milk or cream a little at a time until frosting isn't too thick and spreads easily.
- Measure out about 1/3 cup of the frosting into a small bowl and add drops of black or brown food coloring until desired color is reached.
- Use a pastry bag fitted with a small round writing tip - such as Tip #3 - and pipe facial features using the brown/black frosting.
- Use a toothpick to trace out the shape of the nose and what will be the interior (pink) part of the ears.
- Use a clean pastry bag fitted with star tip #17 and fill the bag with the white frosting. Hold the bag at 90 degrees from the cake and pipe close-fitting stars across the entire cake layer with the face, and also the outer parts of the ears, leaving the inner part you marked off bare.
- Measure out a small amount of remaining white frosting and color it pink. Use a clean piping bag fitted with the same #17 tip and pipe stars into the nose shape and into the center of the ears.
- Color remaining frosting as desired for the bowtie and pipe stars across the top and sides of the cake. You may choose to leave a circular section in the middle bare to spread with frosting and top with sprinkles.