Halloween is that special time of year when imagination takes over your kitchen, and simple ingredients turn into delightful little pieces of edible art. You can almost feel the excitement in the air — the rustle of costumes, the scent of sugar and chocolate, and the laughter of friends and family sharing treats. Among the many Halloween desserts that capture this spirit, Halloween cake pops stand out as one of the most charming. They’re small, colorful, and full of character, combining the joy of baking with the fun of decoration. Whether you’re hosting a spooky bash or just want to surprise your kids with something creative, these festive treats bring a splash of color and sweetness to your celebration.
Making Halloween cake pops is more than following a recipe — it’s about creating memories. As you stir, shape, and decorate, you’re crafting something that’s both delicious and expressive. The process itself invites creativity, allowing you to turn every cake pop into a miniature work of art. If you’ve ever wanted a dessert that’s simple to make yet impressive to display, this recipe will give you everything you need to make it happen.
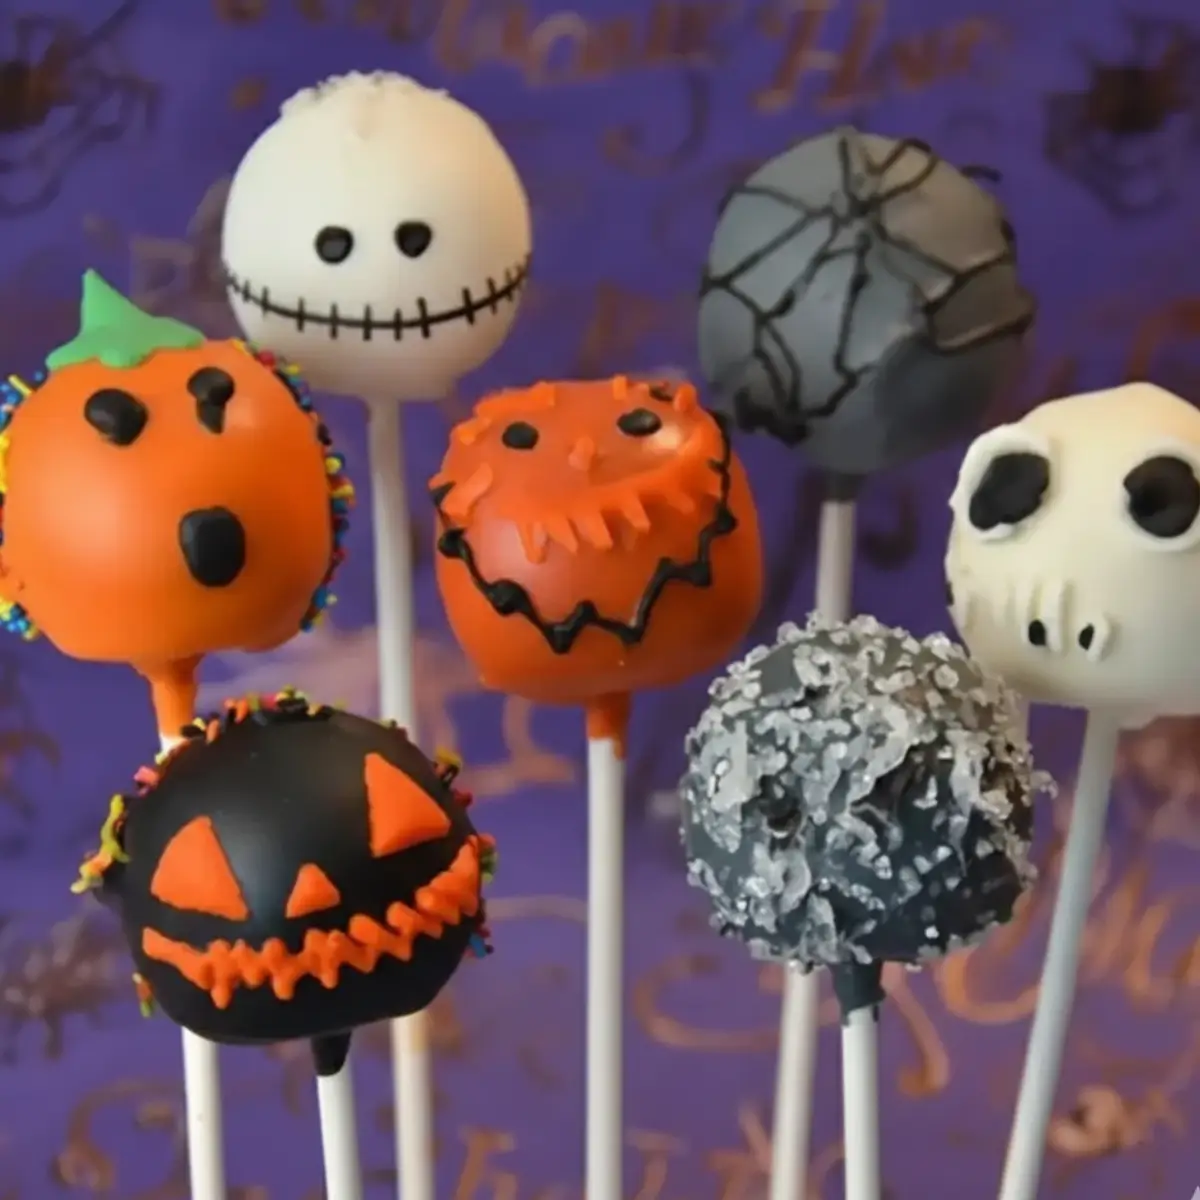
Table of Contents
What Are Halloween Cake Pops?
If you’ve never made cake pops before, think of them as tiny cakes on sticks — soft inside, coated in chocolate or candy on the outside, and decorated with a playful Halloween twist. For this recipe, you’ll start with a yogurt-based cake batter that bakes into light, fluffy spheres. The fun begins once you color the batter in festive orange and purple, dip the baked balls in melted candy coating, and finish them off with edible decorations.
The result? A sweet, bite-sized treat that’s visually stunning and irresistibly good. Halloween cake pops aren’t just desserts — they’re conversation starters, table centerpieces, and edible crafts that appeal to all ages.
Why You’ll Love Making Them
- Simple yet impressive: You don’t need advanced baking skills to make them look professional.
- Perfect for parties: Their size and presentation make them ideal for sharing.
- Creative freedom: You can design them to look like pumpkins, ghosts, or any spooky idea that comes to mind.
- Kid-friendly activity: Decorating is an engaging way to involve children in the kitchen.
- Colorful and festive: The mix of orange, purple, and white instantly captures the Halloween spirit.
Ingredients You’ll Need
To make these Halloween cake pops, you’ll only need a few basic ingredients, most of which are likely already in your pantry.
For the Cake Pops
- 4 eggs
- 1 pot of yogurt (use the pot as your measuring unit)
- 2 pots of sugar
- 3 pots of flour
- ½ packet of baking powder
- ½ pot of oil
- 1 tablespoon vanilla powder
- Orange and purple food coloring
- 1 cake pop mold
For the Decoration
- 400 g candy melts (white or colored) or white chocolate
- Liquid or gel food coloring
- Colored sugar (orange or black)
- Edible decorations like sugar eyes, sprinkles, or icing pens
Every ingredient serves a purpose here. The yogurt keeps the cake moist, the food coloring brings Halloween flair, and the candy coating gives each pop a shiny, polished finish.
How to Make Halloween Cake Pops Step-by-Step
Step 1 – Prepare the Cake Batter
Preheat your oven to 180°C (350°F). In a large mixing bowl, whisk together the eggs, yogurt, sugar, and vanilla powder until the mixture becomes smooth and slightly frothy. Add the flour and baking powder, stirring until combined, and finally mix in the oil to achieve a silky texture.
Divide the batter into two equal portions. Add orange coloring to one half and purple to the other, stirring until the colors are evenly distributed. These two tones will create a visually stunning assortment of cake pops once baked.
Step 2 – Bake the Cake Pops
Lightly grease your cake pop mold and fill each cavity with the colored batter. Close the mold and bake for about 15 minutes. Once done, remove from the oven and allow the cake pops to cool completely before decorating. If you have leftover batter, repeat the process until all is used.
Step 3 – Melt and Prepare the Coating
To prepare the coating, melt the candy melts or white chocolate using a double boiler. Stir until smooth and glossy. If the mixture feels too thick, add a few drops of vegetable oil to improve consistency. Separate portions of the melted candy if you’d like to tint them with different colors.
Step 4 – Assemble and Decorate
Take each cooled cake pop and insert a lollipop stick dipped in melted candy melt halfway into the center of the cake ball. This helps anchor the stick securely. Then, roll the entire cake pop in the candy coating until evenly covered. Tap off any excess coating gently.
Now comes the most creative part — decorating. You can roll the freshly coated pops in colored sugar, add candy eyes for spooky faces, or wait until they set and use a small food brush to paint designs with food coloring. Place each finished pop into a styrofoam block to dry and set completely.
Expert Tips for Perfect Halloween Cake Pops
- Plan your designs ahead: Sketch or visualize your decorations before starting. It helps you choose the right colors and details.
- Keep the cake pops cool but not cold: If they’re too cold when dipped, the coating may crack.
- Add oil for smooth coating: A few drops of vegetable oil keep the melted candy from thickening too quickly.
- Use quality candy melts or white chocolate: It makes all the difference in appearance and taste.
- Let kids join in: Decorating together adds fun and personality to each creation.
These small adjustments ensure your cake pops look smooth, stay intact, and have that professional touch while still being homemade.
Creative Decoration Ideas for Halloween
Pumpkin Cake Pops
Coat the cake pops in orange candy melts and use a small piece of green candy or icing for the stem. Add a smiling or spooky face with a fine brush or edible marker.
Ghost Cake Pops
Dip the cake balls in white candy coating and add small black dots for eyes. A wavy drizzle of extra coating can make them look more ghostlike.
Monster Cake Pops
Cover in purple or green candy melts, then add candy eyes, colored sprinkles, and jagged mouths for a fun monster look.
Mummy Cake Pops
Once dipped in white chocolate, drizzle more white coating over the top using a piping bag to mimic bandages. Add two eyes peeking through to complete the mummy effect.
Each design brings its own charm and personality, transforming your dessert table into a playful Halloween display.
Storage and Make-Ahead Tips
Halloween cake pops are easy to prepare in stages. You can bake the cake balls one day in advance and store them in the refrigerator, covered, until you’re ready to decorate. Once coated and decorated, let them dry completely, then keep them at room temperature in a cool, dry place for up to three days. Avoid refrigerating decorated pops, as moisture can cause the candy coating to lose its smooth finish.
If you need to make them well in advance, freeze the uncoated cake balls for up to a month. When ready, thaw them overnight in the refrigerator and decorate the next day.
FAQ – All About Halloween Cake Pops
Can I make Halloween cake pops ahead of time?
Yes, you can prepare the cake balls a day or two before decorating. This gives them time to firm up, making them easier to handle during dipping and decorating.
Can I use chocolate instead of candy melts?
Absolutely. White chocolate or milk chocolate are great alternatives. Melt them slowly and add a little oil for a smooth consistency. Chocolate gives a richer flavor while maintaining that glossy finish.
How do I prevent cracks in the coating?
Temperature is the key. If the cake balls are too cold and the coating is too hot, it can cause cracks. Let the cake balls come to room temperature before dipping for a perfect, crack-free coating.
Bringing It All Together
Halloween cake pops are more than just a dessert; they’re a creative project wrapped in sweetness. You get to experiment with colors, textures, and decorations while creating treats that look as good as they taste. Every step — from mixing the batter to dipping and decorating — invites you to express your own style and imagination.
They’re perfect for parties, trick-or-treat tables, or as gifts for friends and family. You can keep the designs simple or go all out with elaborate details, but either way, they’ll stand out on any dessert spread. And the best part? Each bite combines the soft texture of cake with the satisfying crunch of candy coating, making them irresistible to everyone who tries them.
So, grab your ingredients, fire up the oven, and start creating your batch of Halloween cake pops. With a little time and creativity, you’ll have a tray of spooky, sweet treats that everyone will remember long after the last one disappears. Your Halloween celebration deserves something this delightful — and now you know exactly how to make it happen.
More Relevant Recipes
- Halloween Whoopie Pies: These soft, cake-like sandwich cookies filled with creamy frosting make a delightful Halloween treat. Their festive colors and sweet flavor profile pair perfectly with Halloween cake pops for a complete dessert table.
- Halloween Cakesicles: These spooky cake popsicles are made with moist cake filling coated in colorful chocolate. They share the same playful theme as Halloween cake pops and offer a creative, handheld dessert option for your party.
- Halloween Sugar Cookie Bars: These chewy, frosted cookie bars decorated in Halloween colors are easy to make and fun to customize. Their buttery sweetness and festive design complement Halloween cake pops beautifully on any dessert spread.
Halloween Cake Pops

Halloween Cake Pops are colorful, bite-sized cake balls coated with candy melts and decorated in spooky designs. Made from a light yogurt-based batter and vibrant food coloring, they’re perfect for festive Halloween parties or fun baking activities with kids.
- Prep Time: 25 minutes
- Cook Time: 10 minutes
- Total Time: 35 minutes
- Yield: Approximately 20 cake pops
- Category: Dessert
- Method: Baked
- Cuisine: Halloween
- Diet: Vegetarian
Ingredients
- 4 eggs
- 1 pot of yogurt (used as a measuring cup)
- 2 pots of sugar
- 3 pots of flour
- 1/2 packet of baking powder
- 1/2 pot of oil
- 1 tablespoon vanilla powder
- Orange and purple food coloring
- 400 g candy melts (white or colored)
- Liquid or gel food coloring (for tinting candy melts)
- Colored sugar (orange or black)
- Edible sugar decorations (optional)
- Vegetable oil (a few drops, optional for thinning coating)
Instructions
- Preheat the oven to 180°C (350°F).
- In a mixing bowl, whisk together the eggs, yogurt, sugar, and vanilla powder until smooth.
- Add the flour and baking powder, then mix in the oil until the batter is well combined.
- Divide the batter evenly into two bowls and add orange coloring to one and purple to the other.
- Fill the cavities of a cake pop mold with the colored batter, attach the top, and bake for about 15 minutes.
- Remove from the oven, allow to cool completely, and repeat until all batter is used.
- Melt the candy melts over a double boiler, adding a few drops of vegetable oil if needed for smoother consistency.
- Dip one end of each lollipop stick into the melted candy and insert it into a cooled cake ball.
- Coat the cake ball by rolling it in the melted candy and gently tapping off the excess.
- Decorate immediately with colored sugar or sprinkles, or allow to dry and paint designs using food coloring.
- Place the finished cake pops upright in a styrofoam block to dry completely before serving.
Notes
- You can substitute candy melts with white chocolate for a richer flavor.
- Let cake pops cool to room temperature before dipping to prevent cracking.
- Store at room temperature for up to 3 days or refrigerate the cake balls before decorating.
- Use a food-safe brush and gel coloring to create detailed Halloween designs.