There’s something undeniably fun about Halloween. It’s the one time of year where sugar highs are encouraged, creativity takes center stage, and no one questions a dessert that stares back at you with candy eyes. If you’re looking for a treat that’s equal parts spooky and sweet, Halloween Whoopie Pies are your go-to bake. They’re soft, flavorful, and just the right amount of creepy for your October celebrations.
What makes these treats truly special is how approachable they are. You don’t need professional baking skills or fancy equipment. You just need a love for seasonal flair, a little patience, and maybe a few little goblins around to help you decorate. In just about half an hour, you’ll have a tray of festive whoopie pies that look straight out of a Halloween party spread—because that’s exactly where they belong.

Table of Contents
What Are Halloween Whoopie Pies?
At their core, whoopie pies are two cake-like cookies sandwiched around a creamy filling. With Halloween Whoopie Pies, the concept stays the same but gets a frightfully fun makeover. You’re looking at soft chocolate rounds filled with a vanilla-based orange-colored cream, finished with black sprinkles, candy eyes, and whatever eerie decor your imagination allows.
They’re just the right mix of chewy, creamy, and rich. The color contrast—dark chocolate and bright orange—is visually stunning and perfectly on theme for Halloween parties, classroom treats, or your own weekend baking fun.
Ingredients and Tools You’ll Need
Before you dive in, make sure your kitchen is stocked with the essentials.
For the Cake Batter:
- 1 box of Devil’s Food chocolate cake mix (15.25 oz)
- ¾ cup of water
- ½ cup vegetable oil
- 3 large eggs
- 1 package chocolate instant pudding mix (4 servings)
For the Filling and Decorations:
- 2 tubs of vanilla ice cream (16 oz each)
- Orange gel food coloring
- Edible black glitter or sprinkles
- Powdered sugar (optional, for dusting)
- Candy eyes
- Black licorice (for fun shapes)
Tools:
- Mixing bowls
- Hand or stand mixer
- Baking sheets
- Silicone mats or parchment paper
- Cooling rack
- Piping bags (or ziplock bags with the corner snipped off)
- Spatula
How to Make Halloween Whoopie Pies
Step 1: Preheat the Oven
Set your oven to 350°F (180°C) so it’s ready to go as soon as your batter is prepped.
Step 2: Make the Batter
In a large bowl, combine your chocolate cake mix, pudding mix, water, oil, and eggs. Use a mixer on medium speed until the mixture is smooth and fully combined. The pudding adds extra moisture and richness, so don’t skip it.
Step 3: Portion the Cakes
Spoon 18 equal-sized dollops of batter onto your prepared baking sheets. If you’re making mini whoopie pies, go for 36 smaller rounds. Aim for uniform circles to ensure even baking and easy pairing later.
Step 4: Bake
Place the sheets in the oven and bake for 7 to 10 minutes. You’re looking for cakes that spring back when touched lightly in the center. Don’t overbake—they’ll firm up slightly as they cool.
Step 5: Cool Completely
Transfer the cakes to a cooling rack and wait until they’re fully cooled. Warm cakes will melt your filling, so patience is key here.
Step 6: Color the Filling
Scoop your vanilla ice cream into a mixing bowl and stir in a few drops of orange gel coloring. Mix thoroughly until the color is even. You want a vibrant orange that pops between the dark chocolate cookies.
Step 7: Assemble the Whoopie Pies
Pipe or spread the orange filling onto the flat side of one cake, then gently press another on top to create a sandwich. Don’t overfill—you want the cream to peek out, not pour out.
Step 8: Decorate
Now comes the fun part. Roll the edges in black edible glitter or sprinkles. Press candy eyes into the sides or top. Use strips of licorice to create spider legs or monster mouths. Let your imagination go wild.
Tips for Perfect Halloween Whoopie Pies
You don’t need to be a professional baker to get bakery-worthy results. Just keep these tips in mind:
- Use fresh ingredients. It might sound basic, but freshness makes a noticeable difference in both flavor and texture.
- Don’t overmix the batter. Mix just until everything is combined to avoid tough cakes.
- Let the cakes cool completely before adding the filling.
- Gel food coloring is your best friend here. It gives you bold color without altering the consistency or taste.
- Customize each pie. No two monsters need to look alike—have fun with candy, icing, and creative add-ons.
Common Mistakes to Avoid
Even simple recipes have their pitfalls. Here’s how to dodge the most common missteps:
- Overbaking: Your pies will dry out if left in the oven too long. Keep a close eye on them after the 7-minute mark.
- Measuring by eye: Use measuring cups and spoons for accurate results. Guesswork leads to inconsistencies.
- Decorating warm cakes: The filling will melt and spill if the cakes are still warm. Always cool completely.
- Choosing poor-quality food coloring: Some dyes have unpleasant aftertastes. Stick with gel-based options from trusted brands.
- Skipping the lining: Always use parchment or silicone mats. This prevents sticking and makes cleanup easier.
Serving Suggestions
You can tailor your presentation depending on your audience. Whether you’re prepping for a kids’ party or an adult gathering, these ideas will help set the mood:
For Halloween Parties:
- Arrange the pies on a black tray lined with spiderweb napkins.
- Add fake spiders or plastic eyeballs around the serving plate for effect.
For Kids:
- Create a DIY decorating station where kids can finish their own pies with sprinkles, eyes, and icing.
- Cut larger pies in half for easier handling.
For Adults:
- Serve alongside warm drinks like spiced cider or cappuccino.
- Pair with a dessert wine such as a light port or sweet red to complement the chocolate.
Storage and Reheating Tips
You might not have leftovers, but if you do, you’ll want to store them right to keep them tasting fresh.
Refrigerator:
Keep your whoopie pies in an airtight container for 3 to 5 days. Stack them with parchment between layers to avoid sticking.
Freezer:
Wrap each pie individually in plastic wrap, then place them in a freezer-safe bag or container. They’ll keep for up to 2 months. Let them thaw in the fridge for a few hours before serving.
Reheating:
- Oven: Warm at 350°F for about 5 minutes to refresh texture.
- Microwave: 10 to 15 seconds at medium power if you’re in a hurry.
- Stovetop: Reheat over low heat with a covered pan, flipping occasionally.
Frequently Asked Questions About Halloween Whoopie Pies
How do I make Halloween Whoopie Pies from scratch?
Start with a chocolate cake mix and pudding for the cake base. Bake into rounds, cool, then fill with orange-colored vanilla cream. Decorate with sprinkles, candy eyes, and anything festive.
Can I use different fillings or decorations?
Absolutely. You can swap the vanilla ice cream for cream cheese frosting, marshmallow fluff, or buttercream. Decorations can be themed for any holiday or personal preference.
How long do Halloween Whoopie Pies stay fresh?
Stored in the fridge, they’re good for up to 5 days. Freeze them individually for longer storage—up to two months with proper wrapping.
Final Thoughts
Halloween Whoopie Pies are more than just a dessert—they’re a hands-on experience, a creative outlet, and a delicious celebration of all things spooky. They’re easy enough for beginners but customizable enough to keep seasoned bakers entertained. Whether you’re throwing a monster mash, hosting a classroom party, or simply embracing your sweet tooth, these whoopie pies bring the magic of Halloween right to your kitchen.
So pull out that mixing bowl, let the orange food coloring flow, and create a batch of creepy, delightful treats that everyone will remember. Just don’t be surprised if they disappear before the ghosts and goblins arrive.
Now it’s your turn—grab your ingredients, call in the kids (or not), and make your own batch of Halloween Whoopie Pies. Your party table will thank you.
More Relevant Recipes
PrintHalloween Whoopie Pies
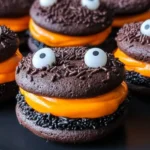
Halloween Whoopie Pies are soft, chocolatey cake sandwiches filled with vibrant orange vanilla cream and decorated with festive sprinkles and candy eyes. Perfect for Halloween parties, these sweet treats are easy to make and fun to customize for kids and adults alike.
- Prep Time: 20 minutes
- Cook Time: 10 minutes
- Total Time: 30 minutes
- Yield: 18 servings
- Category: Dessert
- Method: Baking
- Cuisine: American
- Diet: Vegetarian
Ingredients
- 1 box Devil’s Food chocolate cake mix (15.25 oz)
- 3/4 cup water
- 1/2 cup vegetable oil
- 3 large eggs
- 1 box instant chocolate pudding mix (4 servings)
- 2 tubs vanilla ice cream (16 oz each)
- Orange gel food coloring
- Edible black glitter or sprinkles
- Powdered sugar (optional)
- Black licorice (for decoration)
- Candy eyes
Instructions
- Preheat your oven to 350°F (180°C).
- In a large mixing bowl, combine the cake mix, water, oil, eggs, and pudding mix. Beat until the mixture is smooth and homogeneous.
- Spoon 18 evenly-sized dollops of batter onto parchment- or Silpat-lined baking sheets. Form them into circular shapes.
- Bake for 7 to 10 minutes, depending on the size of the cakes. They should spring back when lightly touched.
- Transfer to a cooling rack and allow to cool completely.
- In a separate bowl, mix vanilla ice cream with orange gel coloring until evenly tinted.
- Pipe the orange cream onto the flat side of one cake and sandwich it with another cake.
- Decorate the assembled whoopie pies with black sprinkles, candy eyes, licorice strips, or powdered sugar as desired.
Notes
- Use gel food coloring to avoid altering the texture or taste of the filling.
- Ensure cakes are completely cooled before assembling to prevent melting.
- Store assembled whoopie pies in an airtight container in the fridge for up to 5 days.
- For a firmer filling, let the ice cream soften slightly before coloring and piping.