The first time I made Chocolate Hot Cups was during a snowstorm that shut down our town for three days. I wanted something comforting yet playful—a treat that captured the warmth of homemade cocoa and the joy of holiday crafting. These edible cups did exactly that. Each one holds a surprise inside: cocoa powder and marshmallows nestled within a shell of glossy milk chocolate. Drop one into a mug of steaming milk, stir, and watch it transform into creamy, velvety hot chocolate. This recipe brings together indulgence, simplicity, and holiday wonder in every swirl.
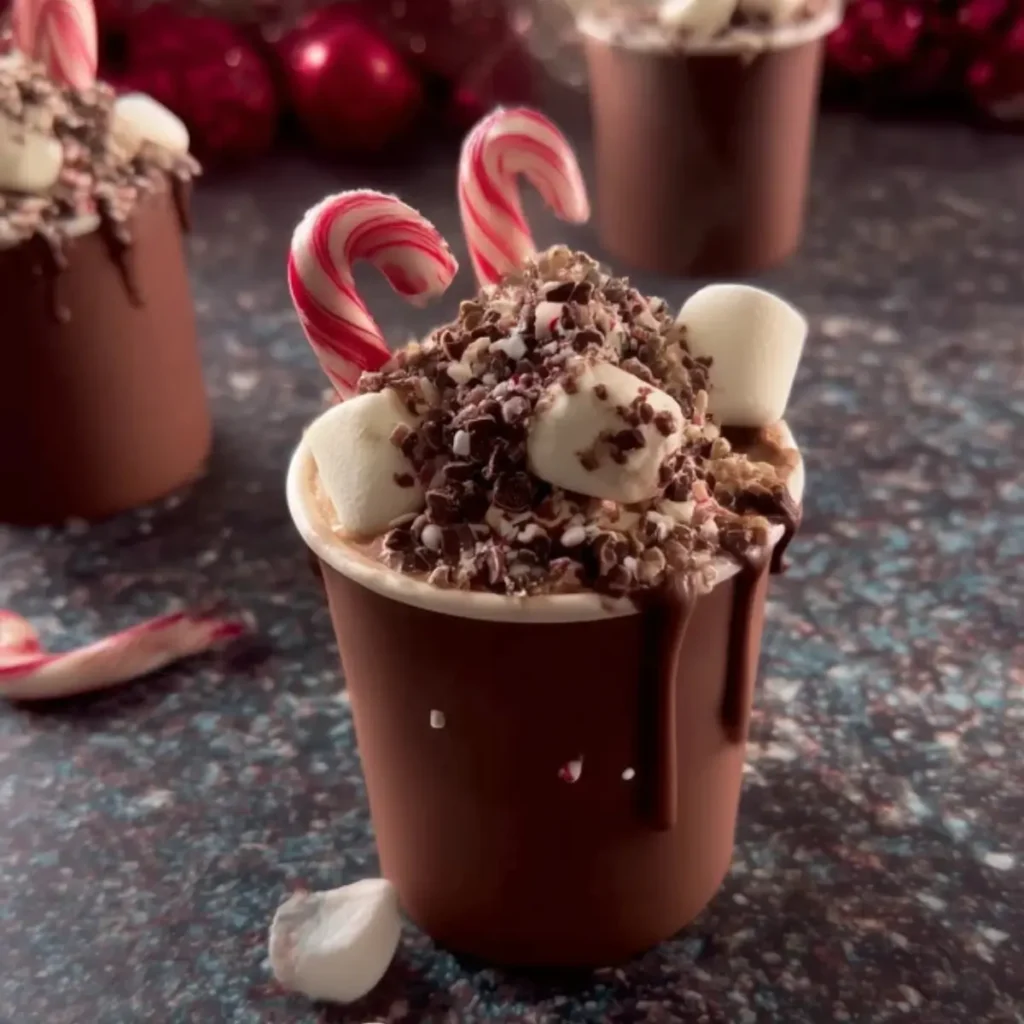
Table of Contents
Recipe Overview & Why You’ll Love It
Chocolate Hot Cups are more than just a drink—they’re a full sensory experience. You’ll love how easily they come together, requiring no baking and only basic pantry ingredients. The smooth milk chocolate shell gives way to rich cocoa, while the candy cane melts just enough to infuse each sip with peppermint sweetness. Whether you’re making them for a cozy night in or as edible Christmas gifts, these cups deliver a balance of texture and flavor that’s impossible to resist. Unlike commercial cocoa bombs, these stay sturdy, melt evenly, and taste freshly made every time.
Ingredients & Substitutions
Each Chocolate Hot Cup uses simple ingredients you can find year-round. The real magic lies in how they combine to create both structure and flavor.
Core Ingredients (makes 6–8 cups)
- 6–8 small disposable cups (4 oz / 120 ml each)
- 2 cups (340 g) milk chocolate, melted
- 12–16 tsp unsweetened cocoa powder (2 tsp per cup)
- ½ cup (30 g) mini marshmallows
- 3–4 tsp granulated sugar (for decoration)
- 6–8 small candy canes
Smart Swaps & Variations
- Chocolate type: Replace milk chocolate with dark or semi-sweet chocolate if you prefer deeper flavor or less sugar. White chocolate makes for a snow-themed version.
- Dairy-free: Use vegan chocolate and plant-based marshmallows.
- Cocoa blend: Mix in cinnamon, nutmeg, or instant espresso powder for a flavor twist.
- Toppings: Use crushed peppermint candies, gold sugar, or edible glitter for decoration.
Equipment You’ll Need
You don’t need special molds to make Chocolate Hot Cups—just a few household tools.
- 6–8 small disposable paper or plastic cups
- Microwave-safe bowl or double boiler
- Spoon or silicone spatula
- Small piping bag or plastic sandwich bag (for drizzle)
- Baking tray lined with parchment paper
- Cooling rack or refrigerator space for setting
Step-by-Step Instructions
Follow these steps carefully to get sturdy, glossy Chocolate Hot Cups that hold up beautifully in hot milk.
Step 1 – Melt and Swirl
Chop the chocolate into small, even pieces so it melts smoothly. Place it in a microwave-safe bowl and heat on low power (20-second bursts), stirring between each, or melt gently in a double boiler. Pour about 1 tablespoon of melted chocolate into each disposable cup. Swirl the cup so the chocolate coats the entire interior evenly. Let it set in the refrigerator for about 10 minutes. Repeat this process once more for a thicker shell that won’t crack when filled.
Step 2 – Release and Reinforce
Once firm, gently squeeze and peel away the disposable cups. If you notice thin spots, brush on a little extra melted chocolate and chill again for 5 minutes. The goal is a stable, leak-proof chocolate cup with a smooth inner surface.
Step 3 – Add Cocoa and Candy
Place each cup upright on a tray. Spoon 2 teaspoons of unsweetened cocoa powder into the bottom. Before the chocolate hardens completely, insert a candy cane into one side as a handle or stir stick. If the chocolate has already set, reheat a small amount and use it as edible glue to secure the candy cane in place.
Step 4 – Finish and Decorate
Add 1 tablespoon of mini marshmallows on top of the cocoa. Drizzle with a thin stream of melted chocolate to help them stick. Sprinkle a pinch of granulated sugar over each for a sparkling finish. If you’d like a thicker rim, dip the top edges of the cups in extra melted chocolate and let them set for 10 minutes.
Step 5 – Serve or Gift
To serve, place one Chocolate Hot Cup into a mug and pour in about 1 cup (240 ml) of steaming milk at 175°F (80°C). Wait 30 seconds, then stir with the candy cane until the chocolate melts into the milk. The result: silky, homemade hot chocolate with a hint of peppermint.
Why This Recipe Works
The success of these Chocolate Hot Cups lies in their simple layering method. Double-coating ensures each cup can withstand the heat of milk without collapsing. The swirl technique spreads the chocolate evenly, eliminating weak spots. Using mini marshmallows instead of large ones keeps proportions balanced—they melt gradually, creating a creamy top layer rather than overwhelming the drink. The candy cane serves both as decoration and as a natural peppermint stirrer, enhancing flavor as it dissolves. Every element serves a purpose, and that’s what makes this method foolproof.
Pro Tips & Variations
For glossy, professional-looking cups, temper your chocolate by melting two-thirds, then stirring in the remaining third off-heat until smooth. This prevents dull finishes or streaking. Chill each layer fully before adding the next to keep edges neat. Try adding a teaspoon of caramel, peanut butter, or hazelnut spread to the bottom before sealing for flavor variety. To scale up, double all ingredients and work in batches—one 100 g bar of chocolate makes about three cups. You can even make miniature versions in shot cups for party favors.
Make-Ahead, Storage & Freezing
Chocolate Hot Cups are perfect for advance prep. Store them in an airtight container at room temperature for up to 1 week if your kitchen stays below 68°F (20°C). For longer storage, refrigerate them for up to 2 weeks or freeze for up to 2 months. To freeze, wrap each in parchment and seal in a freezer-safe box. Thaw overnight in the fridge before gifting or using—this prevents condensation from dulling the surface. Avoid humidity; moisture can cause sugar bloom on the chocolate.
Serving Suggestions & Pairings
Chocolate Hot Cups shine during holiday gatherings but also make delightful winter treats anytime. Serve them after dinner alongside sugar cookies, biscotti, or peppermint bark. They pair beautifully with shortbread or cinnamon rolls at brunch. For presentation, tie each in clear cellophane with ribbon and gift tags. Pair with a small bottle of flavored syrup or a jar of homemade whipped cream for a complete hot cocoa kit.
Dietary Notes & Allergen Considerations
Chocolate Hot Cups are naturally gluten-free if you use certified GF cocoa and chocolate. To make them dairy-free, swap in vegan chocolate and marshmallows. Because they contain no flour or nuts, they’re a safer choice for mixed groups with allergies. Always check candy cane labels for cross-contamination if gifting to those with sensitivities.
Troubleshooting & Common Mistakes
- Cups crack when unmolding: The chocolate layer was too thin or cooled unevenly. Apply a second coat and chill longer.
- Candy cane falls over: Insert it while the chocolate is semi-set—too soon and it sinks; too late and it won’t adhere.
- Chocolate looks dull: Overheating or moisture exposure. Melt slowly and avoid refrigerating uncovered.
- Marshmallows slide off: Let the drizzle cool slightly before adding; warm chocolate won’t hold toppings.
FAQs
How do I make Chocolate Hot Cups hold their shape?
Double-coat the cups and chill fully between layers. A thicker shell prevents cracking and keeps the cups sturdy even when filled with hot milk.
Can I prepare Chocolate Hot Cups ahead of Christmas?
Absolutely. They store well for up to two weeks in the fridge or two months in the freezer. For gifting, make them a few days in advance and keep them sealed to preserve shine.
How do I use Chocolate Hot Cups in milk?
Place one in a mug, pour in hot milk, wait half a minute, and stir with the candy cane. The shell melts gradually, releasing cocoa and marshmallows into a rich drink.
Can I make these without candy canes?
Yes. Paper straws or wooden stir sticks work too, though they won’t add the peppermint flavor. You can also serve the cups plain with a spoon.
What’s the best chocolate for melting?
Use high-quality bars or couverture chocolate with 30–45% cocoa solids. Avoid chocolate chips—they contain stabilizers that resist melting smoothly.
Conclusion
Chocolate Hot Cups capture everything joyful about winter: warmth, indulgence, and a touch of whimsy. They invite you to slow down, craft something beautiful, and share it with those you love. When you see the chocolate shell melt into creamy cocoa, you’re reminded that comfort can come from the simplest ingredients. Each cup is both a drink and a gift—one that encourages connection across the table, one swirl at a time. So melt some chocolate, swirl those cups, and make this recipe your own. Whether enjoyed fireside or wrapped in ribbon for someone special, Chocolate Hot Cups are a cozy tradition worth keeping every Christmas.
More Tasty Ideas
- Peppermint Hot Chocolate: Cozy up with this rich and creamy peppermint hot chocolate, made with real cocoa and a touch of refreshing mint. It’s the perfect winter drink to serve alongside your favorite cookies or Christmas treats.
- Chocolate Thumbprint Cookies: These soft, buttery cookies filled with smooth chocolate ganache are a delightful complement to a warm cup of cocoa. Perfect for holiday dessert tables or gifting during the festive season.
- Frosted Christmas Brownies: Celebrate the season with fudgy brownies topped with festive frosting and sprinkles. Their deep chocolate flavor pairs beautifully with rich drinks like hot chocolate or mocha lattes.
Chocolate Hot Cups

Christmas Chocolate Hot Cups are a festive homemade treat made from rich melted milk chocolate molded into edible cups and filled with cocoa powder, mini marshmallows, and candy canes. These chocolate cups are both decorative and functional — simply drop one into a mug of hot milk, stir, and enjoy instant hot chocolate. Perfect for gifting or serving at holiday gatherings.
- Prep Time: 20 minutes
- Cook Time: 10 minutes
- Total Time: 30 minutes
- Yield: 6 servings
- Category: Dessert
- Method: No Bake
- Cuisine: American
- Diet: Vegetarian
Ingredients
6 disposable cups (small size)
10 oz milk chocolate, melted
6 candy canes
12 tsp cocoa powder
1 cup mini marshmallows
2 tbsp granulated sugar
Instructions
- Slowly melt the milk chocolate in a double boiler or microwave on low power, stirring until smooth.
- Pour some melted chocolate into each disposable cup and swirl to coat the sides evenly.
- Let the chocolate set, then repeat the coating process once more to strengthen the cups.
- Carefully peel away the disposable cup molds once the chocolate has fully hardened.
- Pour a small amount of melted chocolate into the bottom of each chocolate cup and insert a candy cane as a stir stick. Allow it to dry and set.
- Add 2 teaspoons of cocoa powder into each cup and top with mini marshmallows.
- Drizzle a bit of melted chocolate over the marshmallows to help them stick in place.
- Decorate the rims and outer sides of the cups with melted chocolate and sprinkle with granulated sugar for a festive touch.
- To serve, place one chocolate cup in a mug of hot milk, let it melt slightly, then stir well to enjoy.
Notes
- Use dark or white chocolate instead of milk chocolate for a flavor twist.
- Decorate with edible glitter or crushed peppermint for extra holiday sparkle.
- Ensure the cups are fully set before removing the molds to avoid breakage.
- Store in a cool, dry place for up to one week.