I made these Frosted Christmas Brownies one December afternoon while scrambling to prep for a family gathering of over 30. I was knee-deep in casseroles and roast prep, but still needed a festive dessert that looked impressive and didn’t eat up precious oven time. Enter these brownies: minimal effort, maximum joy. They came together in under an hour, and even my toddler helped decorate. Since then, they’ve become our go-to holiday treat—fun, forgiving, and irresistibly festive.

Table of Contents
Recipe Overview & Why You’ll Love It
Frosted Christmas Brownies are the dessert equivalent of a holiday miracle: fast, foolproof, and bursting with cheer. You start with a rich, thick double batch of boxed brownie mix and transform it with vibrantly colored frosting and charming edible decorations. The result is a visually showstopping treat that’s just as enjoyable to make as it is to eat.
These brownies are perfect for holiday parties, family movie nights, classroom celebrations, or cookie exchanges. Unlike complicated sugar cookies or tiered cakes, these require no advanced skills—just a steady hand and a little holiday spirit. You’ll love how easily they adapt to your style, whether you go all-in on the sprinkles or prefer clean, minimalist lines.
Ingredients & Substitutions
Brownie Base
- 2 boxes brownie mix (any brand)
- Ingredients per box instructions (usually eggs, oil, and water)
Using two boxes yields extra-thick, bakery-style brownies. You can scale down to one box for thinner results and a shorter bake time—just reduce everything by half. For dietary needs, opt for a gluten-free mix or plant-based version if available.
Frosting
- 1½ to 2 cups white frosting (store-bought or homemade)
- Red food coloring
- Green food coloring
Start with white frosting and tint it to your desired shades. Gel food coloring offers more vibrant color with less moisture. For a natural route, beet powder can substitute for red, and spirulina or matcha for green.
Decorations
- White pearl sprinkles
- Edible gold stars
You can also experiment with crushed peppermint, mini chocolate chips, shredded coconut (snow!), or colored sugar. These add texture and flavor, so feel free to get creative.
Equipment You’ll Need
You don’t need a fancy kitchen setup to make these Frosted Christmas Brownies. Here’s what’s essential:
- 9-inch springform pan (for a uniform round brownie)
- Mixing bowls – one large for batter, two small for frosting colors
- Rubber spatula or wooden spoon
- Toothpick – for checking doneness
- Cooling rack (optional, speeds up cooling)
- Piping bags and tips – or zip-top bags with snipped corners
- Cutting board and sharp knife – to slice clean triangles
Step-by-Step Instructions
Step 1 – Prep the Pan & Oven
Preheat your oven according to the brownie box instructions (typically 350°F / 175°C). Lightly spray a 9-inch springform pan with nonstick oil spray to ensure the brownies release easily.
Step 2 – Mix the Brownies
In a large bowl, combine both boxes of brownie mix along with the required eggs, oil, and water as listed on the packaging. Stir just until smooth—overmixing can make them tough.
Step 3 – Bake & Cool
Pour the batter into your prepared springform pan. Because it’s a double batch, expect to bake 40–55 minutes—longer than the box suggests. Start checking at 40 minutes. Insert a toothpick in the center; it should come out with just a few moist crumbs. Let the brownie cool completely in the pan before handling.
Step 4 – Slice into Triangles
Once cool, remove the brownie from the springform pan and place it on a large cutting board. Slice into 8 equal wedges. For cleaner cuts, use a sharp knife and wipe it between slices.
Step 5 – Color & Pipe Frosting
Divide your white frosting into three bowls: one remains white, one gets red food coloring, and one gets green. Adjust the shade to your liking—add coloring gradually. Spoon each color into separate piping bags fitted with your favorite tips.
Step 6 – Decorate
Now comes the fun part. For Christmas Tree Brownies, pipe green frosting as the tree base, then add white details for garlands and pearl sprinkles as ornaments. Finish with a gold star on top.
For Santa Hat Brownies, use red frosting to shape the hat and white to pipe the fluffy brim and pom-pom.
Step 7 – Serve or Store
Serve immediately or let frosting set before transferring to a serving tray. Store leftovers in an airtight container for up to 3 days at room temperature or 4 days in the fridge.
Why This Recipe Works
These Frosted Christmas Brownies work because they strike the perfect balance between ease and impact. Using a boxed mix ensures reliable texture and flavor while doubling it gives you bakery-worthy thickness.
The springform pan provides clean edges and an even bake, avoiding the dreaded undercooked center or hard crust. Coloring store-bought frosting keeps prep fast and stress-free, leaving you more time to enjoy decorating—or delegate it to kids, who love the hands-on element.
Finally, cutting the brownies into triangles allows for fun visual styling: trees, hats, even festive pennants if you get creative.
Pro Tips & Variations
- Flavor twist: Add 1 tsp espresso powder to the batter to enhance chocolate flavor.
- Extracts: Stir in peppermint or almond extract for seasonal flair.
- Toppings: Swap out sprinkles for mini M&Ms, snowflake candies, or chopped nuts.
- Scaling: Halve everything for a smaller batch using an 8×8 pan. To double, bake in a 13×9 or use two 9-inch rounds.
- Clean cuts: Dip your knife in hot water and wipe dry before each slice for perfect edges.
- Texture boost: Add ½ cup chopped chocolate or chocolate chips for a richer bite.
Make-Ahead, Storage & Freezing
You can bake the brownies up to 3 days ahead and frost them the day of serving. Store undecorated brownies tightly wrapped at room temp or refrigerate to extend freshness.
To freeze: wrap the unfrosted brownie slab tightly in plastic wrap and foil. Freeze for up to 1 month. Thaw overnight in the fridge before decorating.
Avoid freezing frosted brownies, as the texture of the frosting can change upon thawing.
Serving Suggestions & Pairings
These Frosted Christmas Brownies pair beautifully with:
- Hot chocolate, peppermint lattes, or spiced cider
- A dessert board featuring fudge, cookies, and truffles
- A platter garnished with fresh rosemary sprigs or candy cane bits
- Vanilla ice cream or whipped cream for a plated dessert version
They make a great gift or potluck contribution—just package them in festive tins or bakery boxes with parchment paper between layers.
Dietary Notes & Allergen Considerations
- Gluten-Free: Use certified GF brownie mix and frosting
- Dairy-Free: Choose dairy-free frosting and verify brownie mix ingredients
- Vegan: Use egg replacers (like flax eggs) and plant-based frosting, but results may vary
Always check individual product labels to confirm allergens and dietary compliance.
Troubleshooting & Common Mistakes
- Brownie too gooey: Bake longer—double batches take more time. Use the toothpick test.
- Frosting melts or slides: Ensure brownies are completely cool before decorating.
- Color not vibrant: Use gel food coloring and start with white frosting for best results.
- Cracked top: This is normal with brownies. Hide cracks under frosting or sprinkles.
- Uneven slices: Score the surface lightly with a knife before cutting fully.
FAQs
Can I make Frosted Christmas Brownies from scratch?
Absolutely. A homemade brownie recipe works just fine—just make sure the batter quantity equals about two standard box mixes to match the thickness.
How long do Frosted Christmas Brownies stay fresh?
They’ll stay fresh for 3 days at room temperature or up to 4 days refrigerated. Keep them in an airtight container to maintain moisture.
Do I need to use food coloring for Frosted Christmas Brownies?
Not necessarily. You can leave the frosting white for a “snowy” look or use natural dyes like beet or spinach powder for muted, earthy tones.
Can I freeze Frosted Christmas Brownies?
Freeze the unfrosted brownies tightly wrapped for up to one month. Thaw completely before adding frosting and decorations for best results.
How can I make Frosted Christmas Brownies without a springform pan?
You can use a 9×9 square pan instead. Bake times may vary slightly, and you can still cut the square into triangles or squares depending on your design.
Conclusion
Frosted Christmas Brownies are the holiday dessert that delivers on every front: easy to make, fun to decorate, and delightful to serve. Whether you’re baking with kids, prepping for a party, or just craving something sweet and seasonal, these brownies are a festive fix that fits your schedule.
Try them once and they’ll become a cherished part of your December baking rotation. Tweak the colors, play with the shapes, and make it your own—just don’t forget to share the joy (and maybe a few extras).
More Tasty Ideas
- Snowman Oreo Balls: These no-bake treats bring festive flair with their adorable snowman design and creamy Oreo center. Like Frosted Christmas Brownies, they’re easy to decorate and make a perfect hands-on holiday activity for kids and adults alike.
- Classic Yule Log (Bûche de Noël): A timeless holiday dessert, this rolled chocolate cake features a creamy filling and rich frosting, making it a showstopper for Christmas gatherings. Its chocolate-forward flavor and festive decoration style align beautifully with the spirit of Frosted Christmas Brownies.
- Little Debbie Christmas Tree Cake Truffles: These nostalgic truffles turn store-bought Christmas Tree Cakes into bite-sized desserts coated in white chocolate. They’re playful, indulgent, and echo the joyful simplicity of decorating brownies for the holidays.
Frosted Christmas Brownies That Steal the Holiday Spotlight
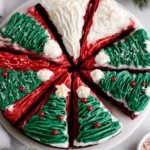
These Frosted Christmas Brownies are a fun and festive holiday dessert made from a double batch of boxed brownie mix and topped with colorful frosting and decorations. They’re perfect for Christmas parties, easy to make, and customizable with tree or Santa hat designs.
- Prep Time: 15 minutes
- Cook Time: 55 minutes
- Total Time: 70 minutes
- Yield: 8 brownies
- Category: Dessert
- Method: Baking
- Cuisine: American
- Diet: Vegetarian
Ingredients
- 2 boxes brownie mix
- 4 large eggs (or per box instructions)
- 1 cup vegetable oil (or per box instructions)
- 1/2 cup water (or per box instructions)
- 1 1/2 to 2 cups white frosting
- Red food coloring
- Green food coloring
- White pearl sprinkles
- Edible gold stars
Instructions
- Preheat the oven according to the brownie box instructions (typically 350°F / 175°C).
- Spray a 9-inch springform pan with nonstick spray.
- Mix both boxes of brownie mix with eggs, oil, and water as directed on the packaging until smooth.
- Pour the batter into the prepared pan and bake for 40–55 minutes, or until a toothpick inserted in the center comes out mostly clean.
- Allow the brownie to cool completely before removing from the springform pan.
- Place the cooled brownie on a cutting board and slice into 8 equal triangle wedges.
- Divide the white frosting into three bowls. Leave one white, color one with red food coloring, and one with green.
- Transfer each frosting color to its own piping bag with desired tips.
- Decorate brownies: use green frosting for Christmas trees with pearl sprinkles and gold stars, and red/white for Santa hats.
- Serve immediately or store in an airtight container until ready to serve.
Notes
- Use only one box of mix if you prefer thinner brownies and shorter bake time.
- Natural food dyes can be used as alternatives to red and green coloring.
- Let brownies cool fully before frosting to avoid melting.
- Substitute decorations based on availability or preference.