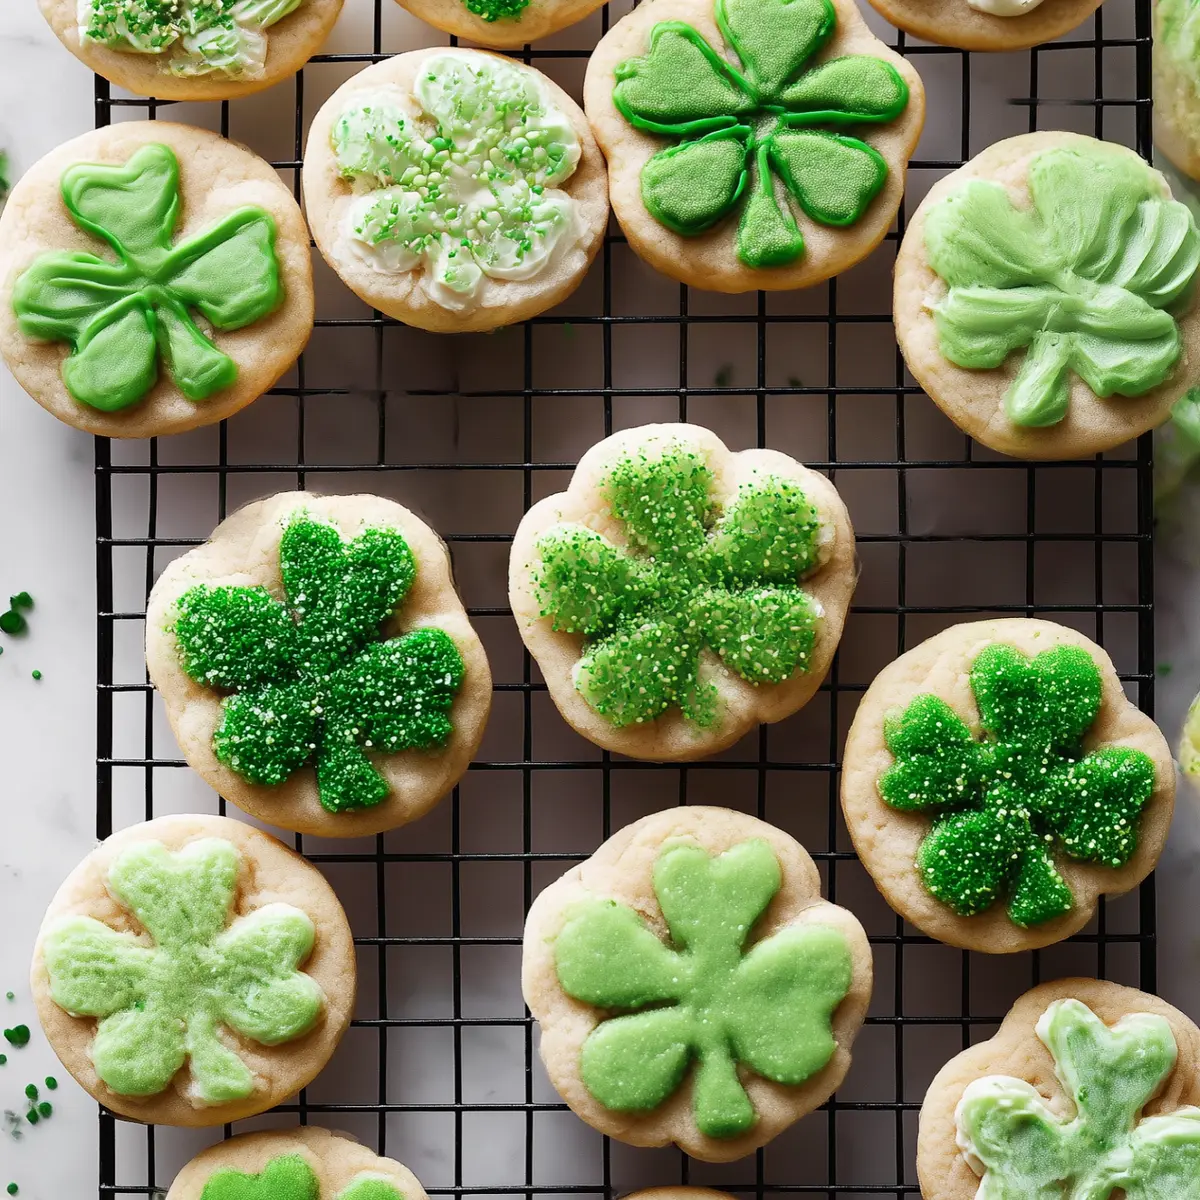
There’s something wonderfully festive and comforting about Vanilla Bean St. Patrick’s Day Cookies. The burst of real vanilla bean, the softness of the cookie, and the fun of decorating together make these cookies so much more than just another holiday treat. Whether you shape them into classic shamrocks or switch things up, these cookies are perfect for getting everyone in the St. Paddy’s Day spirit.
You get real, fragrant vanilla in both the cookie itself and in a creamy buttercream topping. The recipe is soft, buttery, and completely customizable—no need to be a pro decorator. It’s one of those projects where the kitchen fills with that magical scent of vanilla and sweet sugar, just as the oven works its magic. I promise, you’ll actually want to eat more than just one.
Vanilla bean cookies and the simple joy of baking
Baking Vanilla Bean St. Patrick’s Day Cookies isn’t just a way to whip up a treat—it’s about creating memories. Soft, buttery sugar cookies get a major upgrade from real vanilla bean specks, infused through both the base and a cloud-like buttercream. These are cookies that beg to be decorated, whether you’re all about bold green hearts and stems or prefer softer colors and fun sprinkles.
It’s a simple method, friendly to beginners but still satisfying for more experienced bakers. Even if you swap the shamrock shape for trees (or bunnies or anything else), it’s the flavor and texture—tender, rich, and vanilla-forward—that’ll make them your new go-to sugar cookie.
Ingredient list for celebratory cookies
- flour – the backbone for perfect structure and soft bite
- baking powder – gentle lift for cookie thickness
- salt – sharpens all the flavors in every bite
- unsalted butter, softened to room temperature – for that classic tender crumb
- granulated sugar – sweetness and a delicate golden finish
- seeds scraped from a vanilla bean – deeply aromatic, real vanilla flavor through and through
- large egg, at room temperature – binds and enriches the dough
- pure vanilla extract – doubles down on the comforting vanilla notes
- confectioners’ sugar, sifted – dissolves easily for creamy, dreamy frosting
- heavy cream, half-and-half, or whole milk – brings lusciousness to the buttercream
- salt, to taste – balances the frosting’s sweetness
- optional: gel food coloring – that festive pop of St. Patrick’s Day green
- optional: sprinkles – because cookies should always be fun
See the recipe card below for the full list of ingredients and measurements.
Making Vanilla Bean St. Patrick’s Day Cookies step by step
- Whisk together the flour, baking powder, and salt in a medium bowl until evenly combined and airy. Set aside.
- Cream the softened butter and granulated sugar in a large bowl with a stand or hand mixer, beating on high for about three minutes. The mixture should look pale and fluffy. Add vanilla bean seeds and keep mixing until every bit is incorporated and the butter is creamy, about one or two minutes.
- Beat in the egg and vanilla extract on high until combined—this is where that classic sugar cookie smell sneaks in and fills the kitchen. Scrape down the sides with a spatula to make sure nothing gets left behind.
- Add the dry ingredients to the wet, mixing on low just until everything comes together into a soft dough. If it’s sticky or hard to handle, add a tablespoon of extra flour. The dough should be soft, but not sticky to the touch.
- Divide the dough into two pieces. Set each on a lightly floured piece of parchment or silicone baking mat. Roll out each to about 6 mm thick. If things get sticky, dust a bit more flour on top and beneath.
- Dust one rolled dough with flour, cover with parchment paper, and carefully stack the second on top. Wrap the stack in plastic wrap or foil and chill in the fridge for at least one hour, or overnight for deeper flavor and best shape.
- Preheat your oven to 177°C and line two or three baking trays with parchment or silicone mats. Peel off the top dough and use a cookie cutter in any shape you like—shamrocks, rounds, trees, your call! Re-roll scraps to use every bit of dough.
- Arrange cookies 7 cm apart on the baking sheets. Bake for 11–12 minutes, watching for the faintest golden edge. Rotate trays halfway if your oven bakes unevenly. Let the cookies cool for 5 minutes on the tray before transferring to a wire rack.
- For the buttercream, beat softened butter with vanilla bean seeds on medium until creamy. Add sifted confectioners’ sugar, cream, and vanilla extract. Beat on low first to combine, then whip on medium-high for two minutes until extra smooth. Taste, then add a pinch of salt if it feels too sweet. For color, divide into bowls and swirl in gel food coloring as desired.
- Decorate cooled cookies with an offset spatula, knife, or piping bag. For two-toned effects, add plain and green frosting side by side in the bag. Swirl or pipe hearts as shamrock leaves, finish with a little line for the stem, then shower with sprinkles or leave them simple—your choice.
- Let buttercream set for a while. You can carefully stack frosted cookies, but expect a little squish. Store decorated cookies covered at room temperature for a day, or in the fridge for up to a week. Unfrosted cookies keep at room temp up to 5 days, or in the fridge for a week.
Tips, troubleshooting, and baking success
Even simple cookies have their quirks! If your Vanilla Bean St. Patrick’s Day Cookies spread too thin in the oven, it’s usually down to dough temperature. Always chill the dough thoroughly—at least an hour, preferably longer, especially if your kitchen runs warm. If the dough is sticky when rolling, don’t hesitate to dust with a bit more flour. Too much spreading? Bake a test cookie first to check.
For the buttercream, if it’s too sweet, a small pinch of salt makes a world of difference. If your frosting looks grainy, try whipping it an extra minute to smooth things out. And when decorating, let the cookies cool all the way to prevent melting the frosting—patience delivers neat designs and crisp edges.
Mistakes happen (I’ve forgotten to chill dough more times than I can count), but even a less-than-perfect cookie is still seriously delicious when you lean into the rich vanilla and smooth buttercream.
Festive pairings and creative cookie variations
These cookies are ready to anchor your St. Patrick’s Day dessert spread, but they’re flexible enough to work year-round. Pair Vanilla Bean St. Patrick’s Day Cookies with a mug of hot chocolate, a scoop of classic vanilla ice cream, or a platter of fresh, juicy berries. They’re also right at home beside a creamy Irish coffee or a citrusy black tea.
Feeling creative? Switch up the cookie cutter shapes for other holidays or let the kids pick their favorites. For a crunchy edge, sprinkle coarse sugar just before baking. Want a dairy-free version? Substitute non-dairy butter and plant milk in both cookie and frosting—vanilla flavor still shines through. If you crave extra sparkle, try gold sprinkles or mix in a drop of green gel color for dramatic, themed icing.
For grown-up gatherings, sandwich two cookies with a swirl of the buttercream, or dip half in melted chocolate for ultimate indulgence. Whatever twist you choose, the real vanilla flavor makes every variation feel extra special.
FAQs about Vanilla Bean St. Patrick’s Day Cookies
Can I freeze Vanilla Bean St. Patrick’s Day Cookies for later?
Absolutely! You can freeze the unbaked cookie dough (tightly wrapped), or even freeze the baked, undecorated cookies. Just thaw fully before decorating and serving—texture and flavor hold up beautifully.
How do I keep the shape of Vanilla Bean St. Patrick’s Day Cookies?
The key is chilling the dough and working quickly when cutting shapes. If you notice the dough getting warm or sticky, pop it back in the fridge for 10–15 minutes. Cold dough means sharp edges and perfect shamrocks every time.
What can I use instead of vanilla beans in this recipe?
If you don’t have real vanilla beans, simply use extra pure vanilla extract. While the specks won’t be visible, you’ll still get lovely vanilla flavor—just increase the extract slightly to taste.
Sweet final thoughts: St. Patrick’s Day treats to love
Warm-from-the-oven Vanilla Bean St. Patrick’s Day Cookies have a way of brightening even the rainiest March afternoon. The aroma of vanilla, the pleasure of decorating, and the sheer softness of every bite make these cookies a holiday tradition you’ll want to return to again and again. No matter the shape, they’re the kind of treat everyone reaches for—so don’t be surprised when the plate disappears faster than a pot of gold at the end of a rainbow. Enjoy every bite and have fun sharing the sweetness!
More Tasty Ideas
- Irish Cream Poke Cake: This festive cake complements St. Patrick’s Day flavors with Irish cream, making it a perfect pair with your cookies.
- St. Patrick’s Day Lucky Charms Rice Crispy Treats: These colorful treats add a fun, crunchy twist to your holiday dessert spread.
- Shamrock Mint Chocolate Pie: This chocolatey pie brings a minty freshness that pairs well with the sweet, buttery flavor of vanilla bean cookies.
Vanilla Bean St. Patrick's Day Cookies
Ingredients
Equipment
Method
- Whisk the flour, baking powder, and salt together in a medium bowl. Set aside.
- In a large bowl using a handheld or a stand mixer fitted with a paddle attachment, beat the butter and sugar together on high speed, about 3 minutes. Add the vanilla bean seeds and beat again until combined and butter is creamy, about 1-2 more minutes. Add the egg and vanilla extract and beat on high speed until combined, about 1 minute. Scrape down the sides and up the bottom of the bowl and beat again as needed to combine.
- Add the dry ingredients to the wet ingredients and beat on low speed until combined. Dough will be a bit soft. If the dough seems too soft and sticky for rolling, add 1 more Tablespoon of flour.
- Divide the dough into 2 equal portions. Place each portion on a piece of lightly floured parchment paper or a lightly floured silicone baking mat. With a lightly floured rolling pin, roll the dough out to about 1/4-inch thickness. Use more flour if the dough seems too sticky. The rolled-out dough can be any shape, as long as it is evenly 1/4-inch thick.
- Lightly dust one of the rolled-out doughs with flour. Place a piece of parchment on top. Place the 2nd rolled-out dough on top. Cover with plastic wrap or aluminum foil and then refrigerate for at least 1-2 hours and up to 2 days.
- Once chilled, preheat oven to 350°F (177°C). Line 2-3 large baking sheets with parchment paper or silicone baking mats. Carefully remove the top dough piece from the refrigerator. If it’s sticking to the bottom, run your hand under it to help remove it. Using a cookie cutter, cut the dough into shapes. Re-roll the remaining dough and continue cutting until all is used. Repeat with 2nd piece of dough.
- Arrange cookies on baking sheets 3 inches apart. Bake for 11-12 minutes or until lightly browned around the edges. If your oven has hot spots, rotate the baking sheet halfway through bake time. Allow cookies to cool on the baking sheet for 5 minutes and then transfer to a wire rack to cool completely before decorating.
- With a handheld or stand mixer fitted with a paddle attachment, beat the butter and vanilla bean seeds together on medium speed until butter is creamy, about 2 minutes. Add confectioners’ sugar, heavy cream, and vanilla extract. Beat on low speed for 30 seconds and then increase to medium-high speed and beat for 2 full minutes. Taste. Add a pinch of salt if frosting is too sweet. To color the frosting, divide the frosting between 2-3 bowls and stir in 1-2 tiny drops of gel food coloring.
- You can decorate the cookies with a knife, icing spatula, or use a piping bag and piping tip. Top with sprinkles, if desired.
- Frosting does not harden or crust very much, though you could gently stack 1 frosted cookie on top of another. Store frosted cookies covered at room temperature for up to 1 day or in the refrigerator for up to 1 week. Store unfrosted cookies covered at room temperature for up to 5 days or in the refrigerator for up to 1 week.