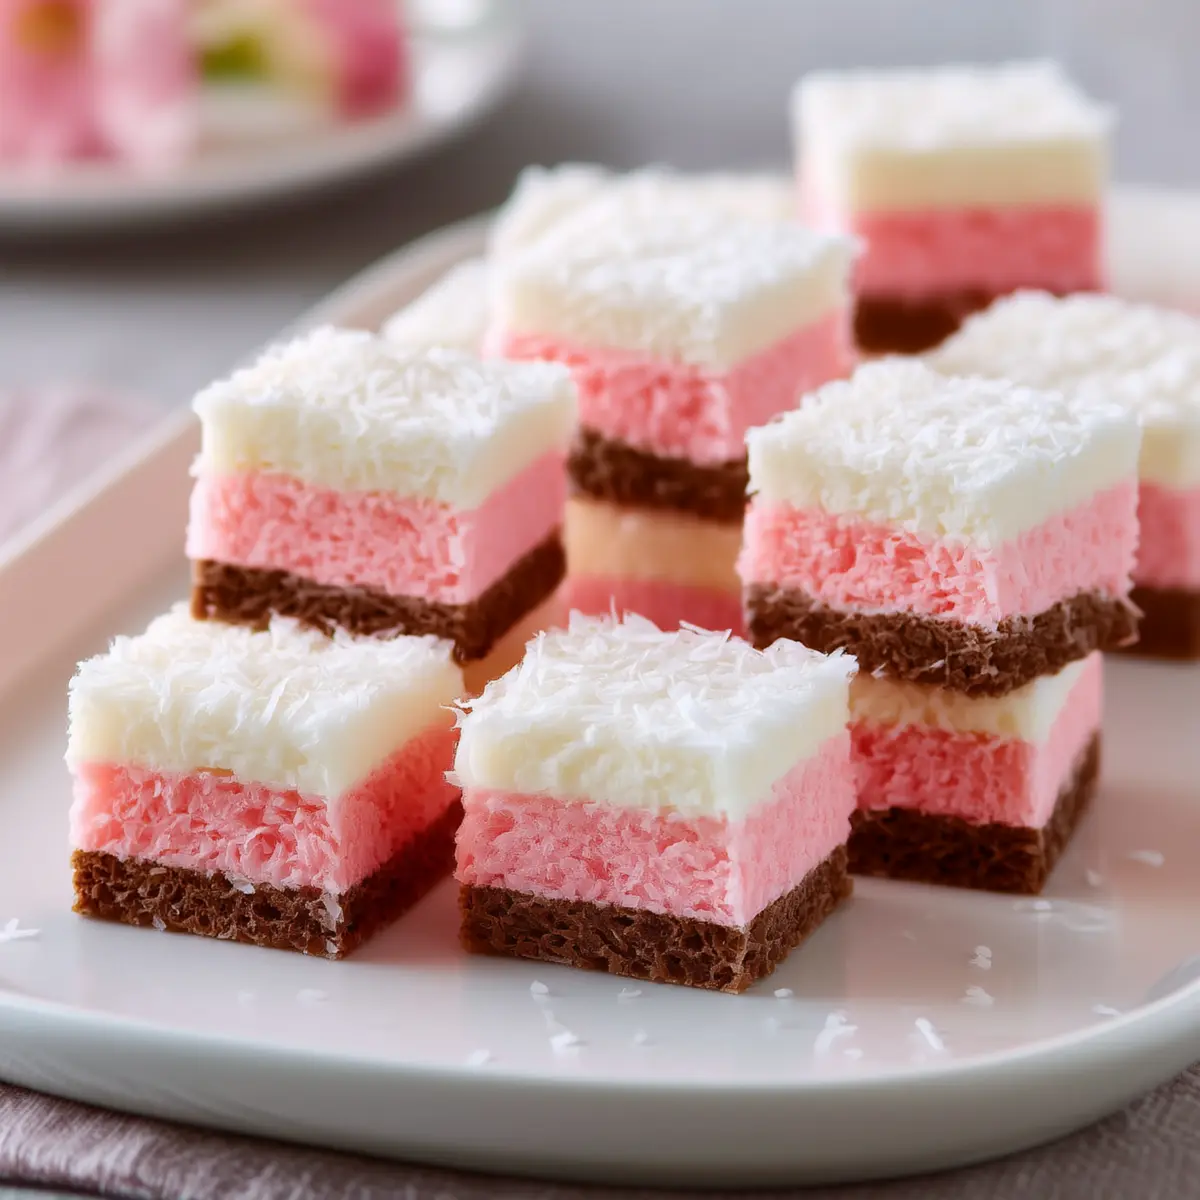
There’s something utterly joyful about slicing into a batch of Neapolitan Coconut Candy. Maybe it’s the playful pink, white, and brown stripes that remind you of old-fashioned ice cream trucks and childhood summers—those moments when dessert looked as exciting as it tasted. That first bite? It’s a swirl of creamy, chewy, and gently crunchy, with coconut’s sweet warmth threading through every layer. This candy isn’t only for nostalgia-soaked afternoons, either. I’ve brought it out for family parties, friendly gatherings, and those random days when only a pop of classic candy color will do. The aroma of melting chocolate and coconut, warming up the kitchen, hovers between comfort and decadence—subtle but hard to ignore. And when the layers come together? It’s almost too pretty to eat… almost.
When Neapolitan Coconut Candy Becomes a Showstopper
There’s nothing subtle about the first glimpse of this candy. It’s cut into neat, stripey blocks—each one layered with bright pink, snowy white, and bold cocoa brown. You set out a tray, and instantly, the room drifts over, drawn in by those cheerful colors (and the faint, toasted-coconut scent that signals something truly homemade). The first mouthful surprises every time: lush coconut meets soft chocolate, and a mellow hit of vanilla lingers as it melts away. This isn’t the sort of sweet you toss together without a nod to the moment; it turns a regular treat category inside out. Nostalgia meets kitchen craft meets, well, a bit of flair. If there’s ever a moment when candy deserves the center of the table, this is it.
The Ingredients That Give This Candy Its Signature Magic
- White chocolate bars – creates that creamy, rich base in the lightest layer and melts into the coconut without overwhelming it.
- milk chocolate – brings the distinct brown stripe and a soft, almost caramel sweetness you can’t miss. Switch for dark chocolate if you want a more grown-up edge.
- Sweetened condensed milk – the glue that ties everything together, thickening, sweetening, and giving gloss and chew by the spoonful.
- Unsalted butter – smoothes out the texture and makes every layer richer. If you only have salted butter, just dial back the added salt a little.
- Vanilla extract – lends the familiar gentle aroma that makes a candy taste “finished.” Pure vanilla makes a difference if you have it.
- Coarse salt – just a pinch balances out the sweetness and keeps things from going flat.
- Unsweetened coconut flakes – for grainy, toasty bite, these lay the foundation for everything coconutty in the mix.
- Sweetened coconut flakes – amps up both texture and the tropical flavor. Feel free to use all unsweetened and add extra sweetness if you want to tweak the overall taste.
See the recipe card below for the full list of ingredients and measurements.
Building Each Layer of Color and Flavor
Start by lining a pan with parchment—if you skip this, good luck getting everything out in one piece. Mixing kicks off with the base: you’ll warm butter with your condensed milk until the mix just starts to shimmer. That’s your cue to swirl in the vanilla and a pinch of coarse salt. Once it’s off the heat, you’ll stir in both the sweetened and unsweetened coconut flakes. The mixture should look thick, glossy, and hold its shape when you press it flat—sort of like sticky dough but lighter.
Now comes the fun. Split the coconut base into three bowls. For the white layer, leave it as is. For the pink: a dash of food coloring (go easy, you want vibrant, not neon!) gets folded in until the color is even. For the brown: melt milk chocolate over gentle heat—or give it quick bursts in a microwave—then blend well with the last bowl of coconut base until evenly cocoa-colored and silky.
Layering is next. Press the chocolate coconut blend into the bottom of your lined pan—work it into the corners and smooth the surface with a spatula or the back of a spoon. Next comes the white coconut layer, gently patting and smoothing it in, followed by the pink coconut layer on top. Take your time to ensure these layers stay even and distinct.
Once it’s all packed in, let the whole thing sit until firm—room temperature is fine, but popping it in the fridge will speed things along. When the block feels solid to the touch, lift it out by the parchment and slice into rectangles or squares. Each piece should show off all three layers, clean and colorful, and hold together but still yield when bitten.
The Texture and Flavor Journey in Every Piece
The moment you bite into Neapolitan Coconut Candy, it’s all about the feather-light crunch of coconut flakes against a melt-in-your-mouth creaminess from chocolate and butter. The white and pink layers are gently chewy, holding their shape but never feeling stiff. The brown layer stands out: that [milk chocolate](https://en.wikipedia.org/wiki/Milk_chocolate) sweetness, plus a hint of caramel from the condensed milk, blends right into the coconut’s subtle tropical vibe.
Each layer has a personality—the pink brings a playful sweetness, the white is plain coconut comfort, and the brown delivers mellow cocoa and stick-to-your-fingers nostalgia. Even the smell lingers: warm sugar, buttery coconut, and the faint, floral undertone of vanilla. Best of all, nothing cloys. It’s sweet, yes, but balanced by salt and the natural savor of coconut.
Troubleshooting, Tweaks, and Candy Success Secrets
Layered candy seems fussy, but a few tricks make it stress-free. First, be patient with the melting chocolate, keeping the heat gentle so nothing scorches. Press each layer in firmly—but don’t compress so much that it flattens out all texture. If your mixture feels too dry, mix in a bit more condensed milk until it’s pliable. Too sticky? A sprinkle of extra coconut flakes will help dry it out.
Want to swap things up? Try all unsweetened coconut for a less sugary treat, or dark chocolate instead of milk chocolate for depth. Add crushed freeze-dried strawberries to the pink layer for a grown-up twist, or infuse the white layer with a drop of almond or coconut extract. Storage is easy: wrap tightly and keep in an airtight container; the candy doesn’t freeze perfectly, but will hold in the fridge for a week.
For slicing that iconic stripe, a warm, sharp knife (run under hot water, then dried) keeps layers tidy. Dragging the knife slows things down, so commit to even, clean cuts straight down for the best results—don’t saw.
Serving Neapolitan Coconut Candy to Steal the Show
Let’s be honest: these striped squares do all the talking. Pile them high on a pretty platter for birthdays, holidays, tea parties, or just-because days. Pair with strong coffee or black tea—those bold flavors offset the sweetness beautifully. If it’s a casual dinner, slip them into favor boxes as an edible send-off. Around the winter holidays, I’ll stand over the counter, bagging up a dozen pieces at a time for homemade gifts. The vibrant colors make the simplest dessert table look intentional and festive.
Try tucking a small square into lunchboxes for a mid-day lift, or line the pieces in alternating rows for maximum visual drama at your next get-together. However you serve them, don’t be surprised when everyone asks if you bought them from a fancy old-school confectionery.
FAQs about Neapolitan Coconut Candy
How long will Neapolitan Coconut Candy stay fresh?
If stored in an airtight container at room temperature, Neapolitan Coconut Candy holds up well for 5–7 days. In hot or humid weather, stash it in the fridge to maintain its texture and keep the chocolate from softening.
Can I freeze Neapolitan Coconut Candy for later?
Freezing isn’t ideal—the coconut layers can become dry, and the chocolate may bloom or lose its pretty sheen. If you do need to freeze it, wrap pieces individually in wax paper and then place in a zip-top bag, but know that texture might suffer when thawed.
What can I use instead of sweetened coconut flakes?
You can swap in all unsweetened coconut and add extra sweetened condensed milk or a spoonful of sugar to taste. This gives you more control over the final sweetness while keeping the chewy texture you want.
Does Neapolitan Coconut Candy need to be refrigerated?
It’s fine to leave at room temperature if your kitchen is cool and dry, but refrigeration helps keep layers firm and colors vivid if you’re storing it for more than a day or two. Just bring the pieces to room temperature before serving for the best bite.
Few treats can spark conversation or nostalgia the way Neapolitan Coconut Candy does. Every boldly striped bite is equal parts familiar and whimsical—chewy coconut, chocolate, and soft vanilla tangled together in every square. Whether you serve it at parties or keep it for simple moments at home, this candy has a way of making any day feel like a little celebration. Let the colors and flavors brighten your table, and don’t be surprised if you find yourself reaching for a piece before it’s even cooled.
More Delicious Recipes
- St Paddy’s Mint Cheesecake Cups: These no-bake cheesecake cups are fun and colorful, similar to the vibrant layers of the Neapolitan Coconut Candy.
- Shamrock Mint Chocolate Pie: This pie combines mint and chocolate, mirroring the playful flavors found in the coconut candy.
- Mint Chocolate Chip Brownies: These fudgy brownies offer a delightful minty twist, reminiscent of the layered flavors in the coconut treat.
Neapolitan Coconut Candy Recipe - Tasty Dive
Ingredients
Equipment
Method
- Start by lining a pan with parchment—if you skip this, good luck getting everything out in one piece. Mixing kicks off with the base: you’ll warm butter with your condensed milk until the mix just starts to shimmer. That’s your cue to swirl in the vanilla and a pinch of coarse salt. Once it’s off the heat, you’ll stir in both the sweetened and unsweetened coconut flakes. The mixture should look thick, glossy, and hold its shape when you press it flat—sort of like sticky dough but lighter.
- Now comes the fun. Split the coconut base into three bowls. For the white layer, leave it as is. For the pink: a dash of food coloring (go easy, you want vibrant, not neon!) gets folded in until the color is even. For the brown: melt milk chocolate over gentle heat—or give it quick bursts in a microwave—then blend well with the last bowl of coconut base until evenly cocoa-colored and silky.
- Layering is next. Press the chocolate coconut blend into the bottom of your lined pan—work it into the corners and smooth the surface with a spatula or the back of a spoon. Next comes the white coconut layer, gently patting and smoothing it in, followed by the pink coconut layer on top. Take your time to ensure these layers stay even and distinct.
- Once it’s all packed in, let the whole thing sit until firm—room temperature is fine, but popping it in the fridge will speed things along. When the block feels solid to the touch, lift it out by the parchment and slice into rectangles or squares. Each piece should show off all three layers, clean and colorful, and hold together but still yield when bitten.