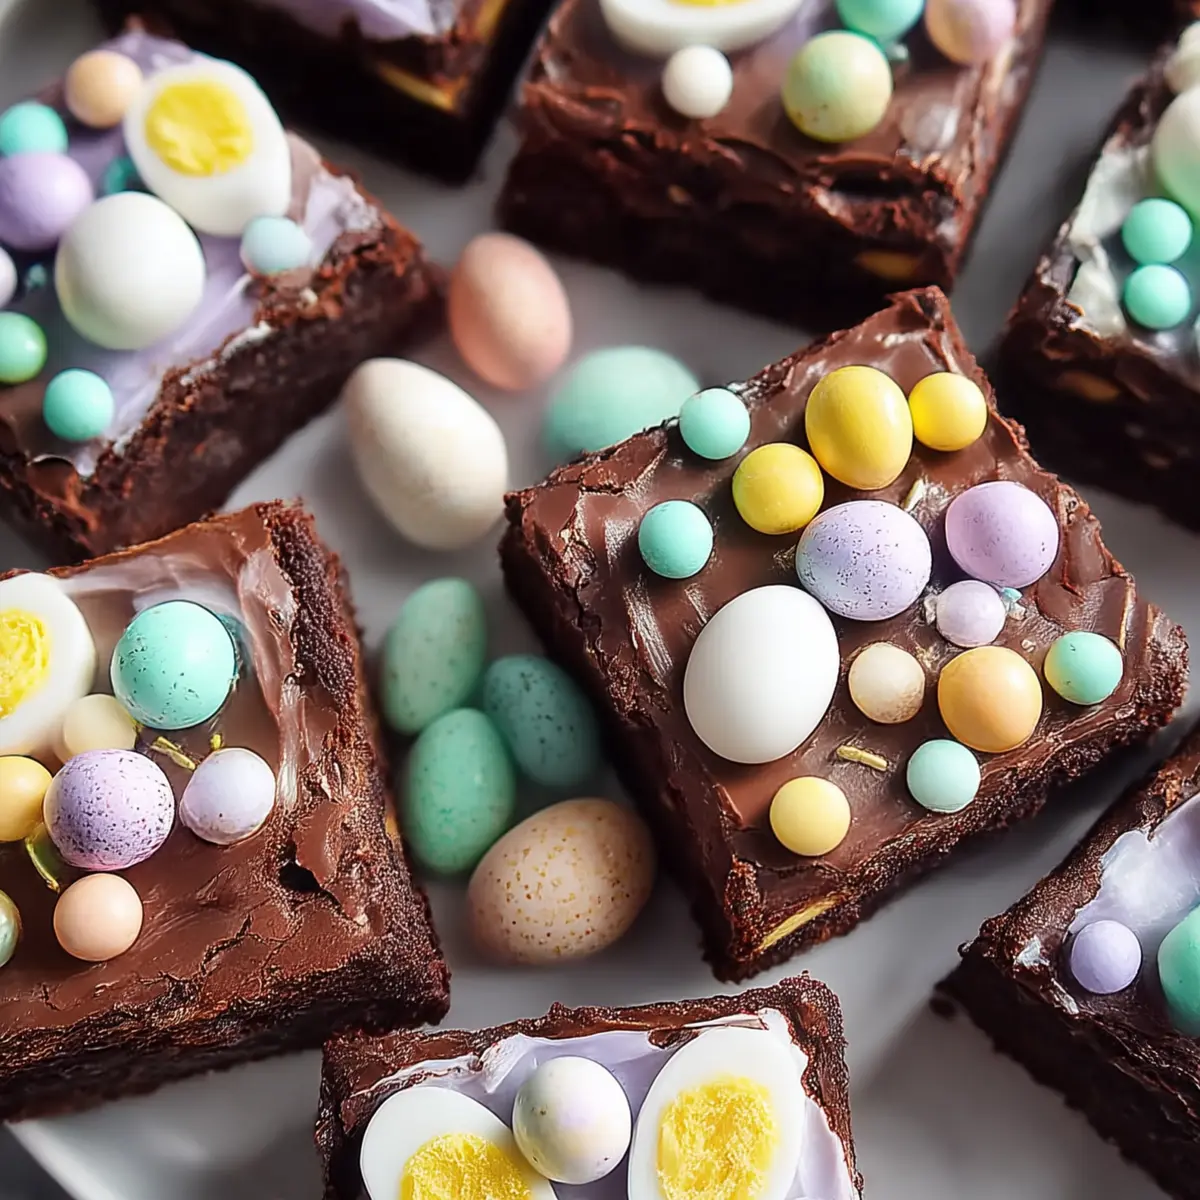
There’s nothing quite like the joy of baking FROSTED EASTER BROWNIES when spring rolls around and the air is filled with hints of flowers and sunlight. These brownies are more than just a sweet treat—they’re fudgy, pastel-frosted slices of celebration that manage to be both charming and impressively easy. Layered with dreamy buttercream and marbled colors reminiscent of painted eggs, each bite gives you deep chocolate comfort with a spectacular festive finish.
What I love most about these brownies is how they turn an ordinary afternoon into an occasion—perfect for sharing with friends, family, or simply brightening up your kitchen counter. Even if you’re new to baking, the process is simple and satisfying, and you’ll wind up with a tray of brownies that taste even better than they look.
Essential Tools for Perfectly Fudgy Frosted Easter Brownies
To get those crave-worthy, ooey-gooey Frosted Easter Brownies, you only need a handful of basic kitchen tools—no fancy gadgets required. Here’s what you’ll need to make the process smooth and enjoyable:
- 9×13-inch baking pan – The classic size ensures your brownies bake up tall and slice easily.
- Parchment paper – Makes it a breeze to lift the brownies out of the pan for clean, pretty edges.
- Large heatproof bowl – Essential for melting chocolate and butter together (double boiler style or microwave).
- Medium mixing bowl – For whisking your dry ingredients separately to guarantee an even blend.
- Stand mixer with paddle attachment – Creates that ultra-light, fluffy buttercream frosting with minimal fuss (a hand mixer works too!).
- Whisk, spatula, and offset spatula – For mixing, folding, spreading, and swirling batter and frosting.
- Wire cooling rack – Helps brownies cool evenly and quickly before frosting.
- Piping bags (optional) – Perfect if you want multicolored swirls or piped accents on top!
The Heart of These Brownies: Key Ingredients Explained
What truly sets these brownies apart is the combination of deep chocolatey goodness and cloud-like pastel frosting. Here’s a closer look at the role each ingredient plays:
- flour – The structure of your brownies, providing just enough bite without being chewy or dense.
- Granulated sugar – Adds sweetness and helps create that signature crackly brownie top.
- Light brown sugar – Brings a gentle caramel note and extra moisture, making brownies extra fudgy.
- Unsweetened cocoa powder – Delivers rich, intense chocolate flavor to balance out the sweetness.
- Bittersweet chocolate – Gives depth, making every bite taste decadently complex.
- Unsalted butter – Used in both the brownie and frosting, it keeps the crumb ultra-tender and the frosting lush and creamy.
- Eggs – Bind the ingredients and create a fudgy texture through gentle emulsion.
- Vanilla extract – Lifts the chocolate notes and rounds out the flavor, used in both brownie base and frosting.
- Espresso powder – Deepens the chocolate, intensifying flavor without tasting like coffee.
- Salt – Balances all the sweetness, so the brownies never feel overwhelming.
- Baking powder – Gives just a bit of rise for perfect cakey-meets-fudgy texture.
- Vegetable oil – Extra moisture for perfectly soft brownies with a tender crumb.
- Confectioners’ sugar – The backbone of the frosting, blending seamlessly for a silky finish.
- Heavy cream – Lightens and smooths the frosting for easy spreading and piping.
- Food coloring (pastel shades) – Brings cheery Easter vibes; choose your favorite soft spring hues.
See the recipe card below for the full list of ingredients and measurements.
Bake and Create: Frosted Easter Brownies Step-by-Step
Ready to get baking? Here’s how to achieve those perfect swirls and fudgy centers. If you’re like me, you’ll catch yourself lingering over the scent of melting chocolate as you go!
- Preheat your oven to 175°C and line a 9×13-inch baking pan with parchment paper, leaving some overhang to help with lifting the brownies out after baking. This keeps your edges neat and your brownies easy to remove.
- Melt the unsalted butter, bittersweet chocolate, and unsweetened cocoa powder together in a large heatproof bowl over a pot of simmering water for gentle, even melting. You want the mixture smooth and glossy—if you’re short on time, use the microwave in 30-second bursts, stirring between each.
- Remove from heat and stir in the granulated sugar and light brown sugar. Keep mixing until all the sugar is incorporated and the batter turns shiny and rich in color—no gritty bits left behind.
- Whisk in the eggs one at a time, making sure each is fully absorbed before adding the next. This creates a thick, silky batter. Stir in the vanilla extract and espresso powder now for that chocolatey depth (don’t skip the espresso, trust me—it gives magic without tasting like coffee).
- In a separate bowl, whisk together your flour, baking powder, and salt. Add these dry ingredients into your chocolate mix, folding gently with a spatula just until blended—no overmixing, or your brownies might turn dense instead of tender.
- Pour the luscious batter into your prepped pan, smoothing the top with an offset spatula. Bake for 25–30 minutes, just until a toothpick poked in the center comes out with moist crumbs (not wet batter). The edges will look set, but the very middle should remain a bit soft—this means fudginess awaits. Let brownies cool completely in the pan on a wire rack before frosting (patience is key!).
- Meanwhile, prepare your pastel frosting. In the bowl of a stand mixer fitted with the paddle, cream the softened unsalted butter until pale and creamy—2 to 3 minutes. Gradually beat in the confectioners’ sugar, one cup at a time, mixing first on low until it’s absorbed, then on medium-high until it’s smooth and fluffy. Add the vanilla and a pinch of salt, and with the mixer on low, drizzle in heavy cream a spoonful at a time until the frosting is soft, spreadable, and pillowy-light.
- Divide the frosting among several small bowls. Add a few drops of different pastel food colorings to each and stir gently until you have clouds of gentle color—think blush pink, pale blue, soft green, or sunny yellow.
- Once brownies are cool, spread a generous layer of frosting over the surface with an offset spatula. Or, for a creative twist, use piping bags to pipe different colors across the top, then swirl and marble them together with a spatula or the back of a spoon. Finish with a sprinkle of mini eggs or nonpareils for that Easter sparkle.
Troubleshooting Tips for Buttery, Fudgy Brownies with Pastel Frosting
Even the easiest bakes can have their sticky moments, so here are some helpful pointers to make sure your Frosted Easter Brownies are a dreamy success every time:
- Brownies tough or dry? Be careful not to overmix after adding the flour. Gentle folding gives you that fudgy magic—overworking the batter will lead to cakey results.
- Crumbly or underbaked center? Bake just until a toothpick comes out with moist crumbs. Brownies continue cooking a bit as they cool, so even if they look slightly underdone at the center, this is perfect for ultimate fudginess.
- Frosting too thick or grainy? Add heavy cream gradually until it’s smooth and spreadable. Always beat the butter well at the start so it’s light before adding sugar.
- Colors muddy or streaky? Mix each food coloring gently into the frosting and swirl them on the brownies in small sections to keep pastel hues bright and distinct.
- Brownies sticking to the pan? Parchment paper is your friend—leave a generous overhang for mess-free lifting.
- Frosting melting off? Wait until brownies are completely cool before frosting. Warm brownies will cause the buttercream to slide and lose shape.
Every baker has an “oops” moment—if you run into a snag, just take a breath. Often, the solution is as simple as chilling the tray, whisking a bit more cream, or slicing with a warm knife for tidier edges.
Pairings and Pastel Twists for Easter Brownie Magic
Frosted Easter Brownies are already the star of any spring spread, but they get even better with a little creative flair and thoughtful pairing:
- Serve with: A pot of tea or rich hot chocolate on a breezy day, or a glass of cold milk for a comforting snack.
- Fruit accents: Fresh berries (like strawberries or raspberries) on the side cut the richness and add color.
- Brownie variations: Swirl the pastel frosting even more dramatically for a tie-dye effect, or pipe little rosettes for a party look.
- Festive toppings: Sprinkle with mini candy eggs, colored sugar, or coconut shreds tinted with food coloring for more Easter playfulness.
- For kids’ parties: Let little hands add the sprinkles or choose their frosting colors—they’ll love the creative freedom.
- Make-ahead note: Brownies can be made a day ahead and frosted the day you plan to serve, making for stress-free hosting during holiday gatherings.
You’ll find these brownies are always a hit at brunches, classroom parties, or as a sweet treat tucked into an Easter basket.
FAQs about FROSTED EASTER BROWNIES
Can I make Frosted Easter Brownies ahead and store them?
Absolutely! Once frosted, cover them tightly and store at room temperature for up to 24 hours, or in the fridge for up to 4 days. For the best texture, let them come to room temperature before serving so the frosting softens slightly.
How do I freeze Frosted Easter Brownies for later?
These brownies freeze well. Chill them in the fridge so the frosting firms up, then slice and wrap individually in parchment or plastic wrap. Store in an airtight container in the freezer for up to one month. Thaw at room temperature for a few hours before serving.
What substitutions work for Frosted Easter Brownies if I’m out of bittersweet chocolate?
If you don’t have bittersweet chocolate, you can use semisweet chocolate in a pinch—the brownies will be a touch sweeter. Avoid milk chocolate, as it won’t have the same depth of flavor. Good cocoa powder and a little extra chocolate can also boost richness if needed.
Celebrate Spring with Each Creamy Bite of These Brownies
There’s pure joy in sharing a plate of FROSTED EASTER BROWNIES with the people you love—each piece beautifully marbled, topped with pastel clouds of buttercream, and impossibly fudgy beneath. The colors and flavors promise spring, and the texture is soft enough to melt in your mouth but sturdy enough for seconds. Whether you’re baking for a crowd or simply for the fun of it, these brownies offer a taste of celebration in every cheerful, chocolatey bite. Serve them up and watch them disappear!
More Delicious Recipes
- Easter Egg Fruit Pizza: This fun and colorful dessert captures the spirit of Easter with a vibrant fruit topping.
- St. Patrick’s Day Brownie Trifle: A layered delight that combines brownies with creamy elements, perfect for festive gatherings.
- Mint Chocolate Chip Brownies: These brownies add a refreshing twist with mint flavor, creating a deliciously fudgy treat.
FROSTED EASTER BROWNIES: Irresistibly Festive & Easy!
Ingredients
Equipment
Method
- Start by preheating your oven to 350°F (175°C) and lining a 9x13-inch baking pan with parchment paper, leaving an overhang on the sides for easy removal later. This crucial step prevents sticking and ensures clean cuts.
- In a large, heatproof bowl, combine the unsalted butter, bittersweet chocolate, and unsweetened cocoa powder. Place this bowl over a simmering pot of water, creating a double boiler, and stir occasionally until the mixture is fully melted and gloriously smooth; alternatively, you can microwave in 30-second intervals, stirring in between.
- Once melted, remove from heat and stir in the granulated sugar and light brown sugar until fully combined and no longer gritty. The mixture should become glossy and beautifully dark.
- Now, one at a time, whisk in the large eggs, ensuring each egg is fully incorporated before adding the next. This creates an emulsion that contributes to the brownies' fudgy texture. Stir in the vanilla extract and the espresso powder – don’t skip the espresso, as it deepens the chocolate flavor without making the brownies taste like coffee!
- In a separate medium bowl, whisk together the all-purpose flour, baking powder, and salt. Gradually add the dry ingredients to the wet ingredients, folding gently with a spatula until just combined. Be careful not to overmix, as overmixing can develop gluten and lead to a tougher, cakey brownie rather than a fudgy one.
- Pour the luscious batter into your prepared baking pan and spread it evenly with an offset spatula. Bake for 25-30 minutes, or until a toothpick inserted into the center comes out with moist crumbs attached, but not wet batter. The brownies should look set around the edges but still a little soft in the very center – this guarantees ultimate fudginess. Allow the brownies to cool completely in the pan on a wire rack before frosting; this is non-negotiable for a clean frosting application!
- While your decadent brownies are cooling, it's time to whip up the dreamy pastel frosting. In the bowl of a stand mixer fitted with the paddle attachment, cream the softened unsalted butter on medium speed until it's light and fluffy, about 2-3 minutes. Gradually add the confectioners' sugar, one cup at a time, mixing on low speed until combined, then increase to medium-high until fully incorporated and smooth. Beat in the vanilla extract and a pinch of salt. With the mixer running on low, slowly drizzle in the heavy cream, one tablespoon at a time, until the frosting reaches your desired spreadable and pipeable consistency – it should be exquisitely smooth and utterly cloud-like. Once achieved, divide the frosting into several smaller bowls. Add a few drops of different pastel food colorings to each bowl (think soft pink, sky blue, mint green, sunshine yellow), mixing gently until uniformly colored. The goal is a light, airy, and beautifully vibrant buttercream that’s easy to spread or pipe.
- Once your brownies are completely cooled and your pastel frosting is ready, it's time for the fun part: decorating! Using an offset spatula, spread a generous layer of one color of frosting evenly over the cooled brownie slab. Alternatively, fill separate piping bags with each pastel frosting color. Pipe random dollops and swirls of the different colors all over the frosted surface. Then, using a small offset spatula or the back of a spoon, gently swirl and marble the colors together for a beautiful, artistic effect. You want visual appeal that captures the essence of spring, creating a mosaic of soft, inviting hues. Finish with a shower of festive Easter sprinkles, nonpareils, or small candy eggs to truly complete the look and add an extra pop of color and texture.