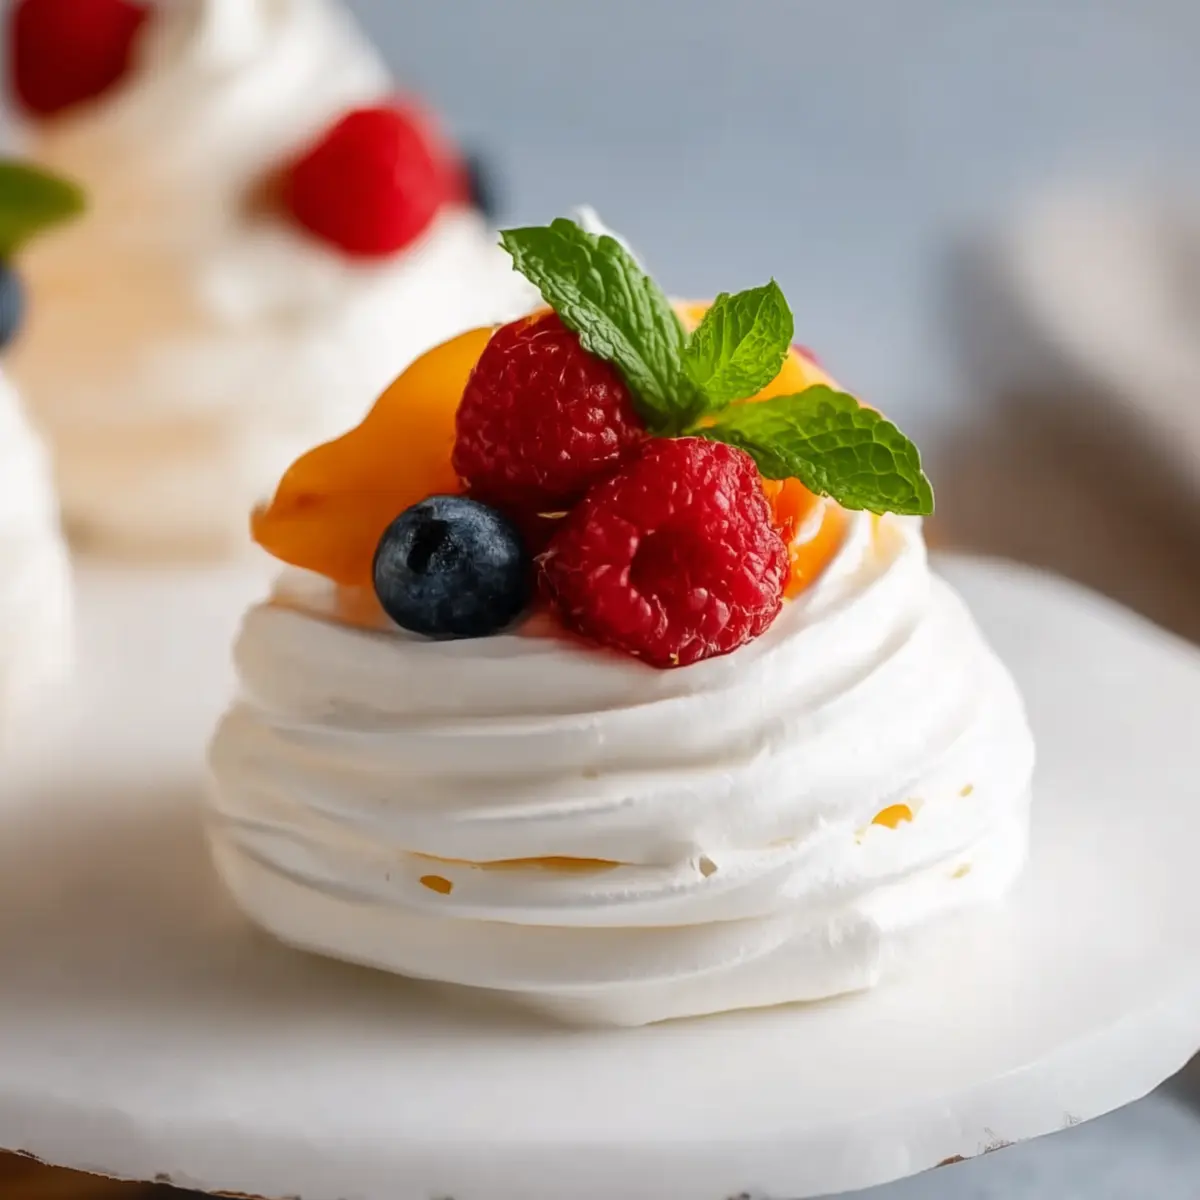
Some desserts sweep in with the kind of drama you only pull off once a year, but these Mini Pavlova Desserts are oddly irresistible and surprisingly low-key for how much of a show-stopper they actually are. There’s something wildly inviting about that shattering meringue shell giving way to a softer, pillowy center—right before a light mound of whipped cream and jewel-toned fruit tumble over the top. I never make these without getting at least one gasp (followed by a quiet spoon duel for the last bite at the table).
What’s even better, a mini pavlova feels like the answer to both the “I want something truly special” and “I’m not spending my night fussing” moments. They look fussy, but secretly? The oven and a handful of pantry staples do almost all the work. Whenever I’ve served these at family brunches, bridal showers, or on a summer patio after a light meal, nobody can stop smiling—right down to the person sneaking seconds straight from the tray.
The Moment Mini Pavlova Dessert Steals the Spotlight
Picture a table filled with chatter, late afternoon sunlight, and the gentle clink of coffee cups—or, honestly, a weeknight where you just need a win. That’s when you want these mini pavlova desserts making their entrance. They’re equally at home as the centerpiece of a holiday spread or nestled on a sturdy backyard picnic plate. What never changes is the way eyes widen the second you set down these crisp-topped, cream-loaded cloudlets, streaked with color from whatever fresh fruit you’ve decided is in season or—if you’re anything like me—simply what’s left in the fridge.
If you’ve ever been intimidated by the thought of making meringue, these smaller pavlovas are your new friend. There’s nothing delicate or scary about them; in fact, I find the process oddly calming. The sound of the mixer spinning, the syrupy sheen of beaten [egg whites](https://en.wikipedia.org/wiki/Egg_white), and the low, slow bake—it’s all part of the ritual, and the payoff is a dessert that always steals the show.
What You’ll Need to Craft Mini Pavlova Dessert Perfection
A mini pavlova is just meringue and a few finishing touches, but each ingredient has a job (and a personality). Here’s what you’ll need:
- egg whites – the backbone of your meringue, best at room temperature for the most volume and stability.
- Granulated sugar – brings the structure and those signature glossy peaks; superfine if you have it, but regular works just fine.
- Lemon juice – a little acidity helps stabilize the meringue and keeps things from tasting too sweet.
- Vanilla extract – for warmth and subtle aroma that makes each bite more than just sweet air.
- Cornstarch – the secret to getting that crisp shell with a soft, marshmallow-like center.
- Heavy whipping cream – cold and unflavored, this gets whipped up into soft peaks for the dreamy filling.
- Powdered sugar – blends right into your cream, giving it just the right hint of sweetness.
- Fresh fruit – anything juicy, tart, or colorful works: berries, peach slices, kiwi, you name it.
- Mint leaves (optional) – a sprig or two freshens up the whole affair and adds that “I actually tried” sort of look.
See the recipe card below for the full list of ingredients and measurements.
Bringing the Mini Pavlovas to Life: A Step-by-Step Journey
Making mini pavlova dessert is mostly about taking your time and working with what you’ve got. Here’s how I make them—and I’ve made a lot:
- Start with the oven on low heat. Line a big, sturdy sheet with parchment. There’s no need to fear the slow-bake—your oven does most of the work for you.
- In a perfectly clean bowl (any grease ruins the magic), beat your egg whites on high until they look foamy and a bit frothy. Begin adding sugar, just a little at a time. This part isn’t quick: the sugar needs time to dissolve, creating a glossy, sticky cloud. The meringue will grow thick and glossy as you persist—soft, pillowy peaks giving way to stiff billowy mountains.
- Fold in the lemon juice and vanilla gently; don’t knock out all the air you’ve just whipped in. Next comes the cornstarch. This step is the difference between a dry meringue and a pavlova with that essential marshmallow-y heart.
- Spoon or pipe the mixture onto your baking tray into charming little circles—about the size of a small ramekin. Use the back of a spoon to create a dip in the center of each nest, making the perfect hollow for whipped cream and toppings later.
- Let the meringues bake slowly, resisting the urge to peek. After their set bake time, shut off the oven and leave them undisturbed as they come down to room temp. This rest is where the shell crisps and the inside stays oh-so-soft. Touching, they should sound hollow and feel barely fragile, like holding spun sugar.
- Once they’re cool, whip your cream to plush, soft peaks with a little powdered sugar. It’s quick—be careful not to overwhip. Pipe or spoon into each waiting pavlova before tumbling on your chosen fruit. I usually start with berries, then throw on whatever else is begging for attention.
- Serve promptly: mini pavlova desserts are never quite as dreamy once they’ve sat out for hours. That said, nobody has ever complained about second helpings, even if the shell gets a touch softer.
Texture, Flavor, and That First Bite of Mini Pavlova
It’s the contrast that keeps you coming back—one second you tap that shell and it splinters beneath your spoon, practically a whisper, and the very next is all supple, sticky meringue along with the billow of cool cream. Berries add sharpness and juice, their acidity balancing the sweetness of the pavlova base, and if you use peach or kiwi, you get their perfume right at the end. Sometimes, if you hit the odd spot, the marshmallow heart pulls at your fork, reminding you this isn’t just sugar and air—it’s a tapestry of texture.
There’s an ephemeral quality to these too: the crispness is fleeting, the cream threatens to melt, and the fruit is never better than those first chilled minutes. Each bite is sweet, yes, but also light and fresh, never cloying. The complexity comes from the crackle, the cream, and the wild mix of fruit—custom-built for the season or the occasion.
Subtle Ways to Elevate Mini Pavlova Dessert
Getting pavlova perfect isn’t all high technique—it’s about the small details. Don’t let a speck of yolk into the whites; even a drop will ruin the rise. Use a metal or glass bowl for the most stable meringue. If fresh lemon juice isn’t on hand, white vinegar works as a backup to provide that tang and help the meringue stabilize.
If you crave a new twist, try adding a dash of almond extract or a sprinkle of finely grated citrus zest into the meringue. For a deeper vanilla punch, swap standard extract for vanilla bean paste. And of course, fruit is an open playground: blackberries and passionfruit for something tart, or a tumble of chopped mango if you’re craving extra sun.
Mini pavlova shells can be made in advance—just keep them totally dry and airtight at room temperature until you’re ready to assemble. If you pair them with whipped coconut cream or lemon curd instead of the classic, you’ve suddenly invented a whole new kind of mini pavlova dessert.
Serving Mini Pavlovas for Maximum Impact
There’s no wrong way to serve a mini pavlova, but presentation is part of the magic. Stack them on a cake stand at the center of the table, nestling each in a swirl of cream with an artfully arranged pile of fruit. A few torn mint leaves look like you called in a pastry chef—use them if you have them handy. If you’re aiming for an extra-festive finish, dust a little powdered sugar over the fruit.
You could pair mini pavlovas with a chilled sparkling wine or a pitcher of tart lemonade. They’re fantastic on buffets: small enough to pick up with fingers, impressive enough to get serious attention. For dinner parties, set out bowls of assorted fruit so guests can build their own. Leftovers, if you’re lucky enough to have any, make for a decadent breakfast treat.
FAQs about Mini Pavlova Dessert
Can mini pavlova dessert be made ahead of time?
Yes, you can make the meringue nests a day or two in advance. Store them in an airtight container somewhere cool and dry, but wait to fill them with whipped cream and fruit until just before serving to keep that crisp shell intact.
Can I freeze mini pavlova dessert?
The meringue shells alone freeze quite well—wrap them carefully and store in an airtight box for up to a month. However, avoid freezing once filled with cream and fruit, as the textures won’t survive thawing. Assemble the dessert fresh for best results.
What can I use if I don’t have fresh fruit for topping my mini pavlova?
If fresh fruit isn’t on hand, you can try stewed fruit, lemon curd, or even canned fruit well drained. Just make sure to avoid anything too watery as it will soften the meringue quickly.
How do I keep mini pavlova dessert from becoming soggy?
Always fill mini pavlovas right before serving, never in advance, to keep that signature crunch. If you need to prep ahead, keep the baked meringues, cream, and fruit separate and assemble moments before eating. Avoid letting the meringues sit in a humid environment, as they’ll pick up moisture fast.
Conclusion
There’s something about building a tray of mini pavlova desserts that feels like a little celebration—a way to welcome whatever moment you’re in with color, cheer, and the kind of texture that pulls everyone together for one more taste. Whether you’re a seasoned baker or you’ve never beaten an egg white in your life, this is the sort of recipe that rewards the curious and the casual alike. Each bite is crisp, soft, tart, and cool—a fleeting, sweet finale worth lingering over. Let a batch of these mini pavlovas share your table next time, and see how quickly simple ingredients can turn into lasting memories.
More Delicious Recipes
- Loaded Leprechaun Popcorn: This delightful snack features a blend of sweet and salty, making it a fun addition to any dessert spread alongside mini pavlovas.
- Irish Apple Cake with Custard Sauce: This classic dessert pairs beautifully with the lightness of pavlovas, making for a comforting yet special treat.
- No-Bake Baileys Chocolate Pie: The creamy chocolate flavor complements the fruity pavlovas perfectly, adding a rich element to your dessert selection.
Mini Pavlova Dessert Recipe
Ingredients
Equipment
Method
- Preheat your oven to 200°F. Line a large baking sheet with parchment paper.
- Using a stand mixer or handheld electric mixer, beat the egg whites on high speed for about 1 minute until soft peaks form. With the mixer still on, gradually add in the sugar, 1 tbsp at a time, and beat 10 minutes on high speed, or until stiff peaks form. It will be smooth and glossy.
- Using a spatula, quickly fold in the lemon juice and vanilla extract, then fold in the cornstarch and gently mix until well blended.
- Pipe meringue into 3 to 3½-inch wide nests onto the parchment paper using a 1M Star tip. Indent the center with a spoon to allow room for toppings.
- Bake for 1 hour and 15 minutes, then turn the oven off and without opening the door, let meringue sit in the oven until completely cooled, about 3-4 hours. (The outsides will be dry and crisp to the tap and a very pale cream-colored, and insides will still be marshmallow soft.)
- Transfer the pavlova with the parchment paper onto the counter for assembly.
- To make the whipping cream: beat cold whipping cream with 2 tbsp powdered sugar in a cold bowl for 2-2½ minutes or until whipped and spreadable.
- Once pavlova are completely cool, pipe some of the whipped cream in the indentation and top with a little fresh fruit.
- Serve and enjoy within 3 hours.