If you’ve ever stood in the kitchen mid-holiday rush, hunting for a dessert that looks impressive but won’t leave you chained to the oven all afternoon, these Andes Mint Mini Cheesecakes are absolutely your answer. You get that classic cool-mint chocolate combo everyone loves, but in adorable, hand-held form—ideal for holiday trays, potlucks, or those moments you just want to indulge in a sweet bite-sized treat with a little leftover magic.
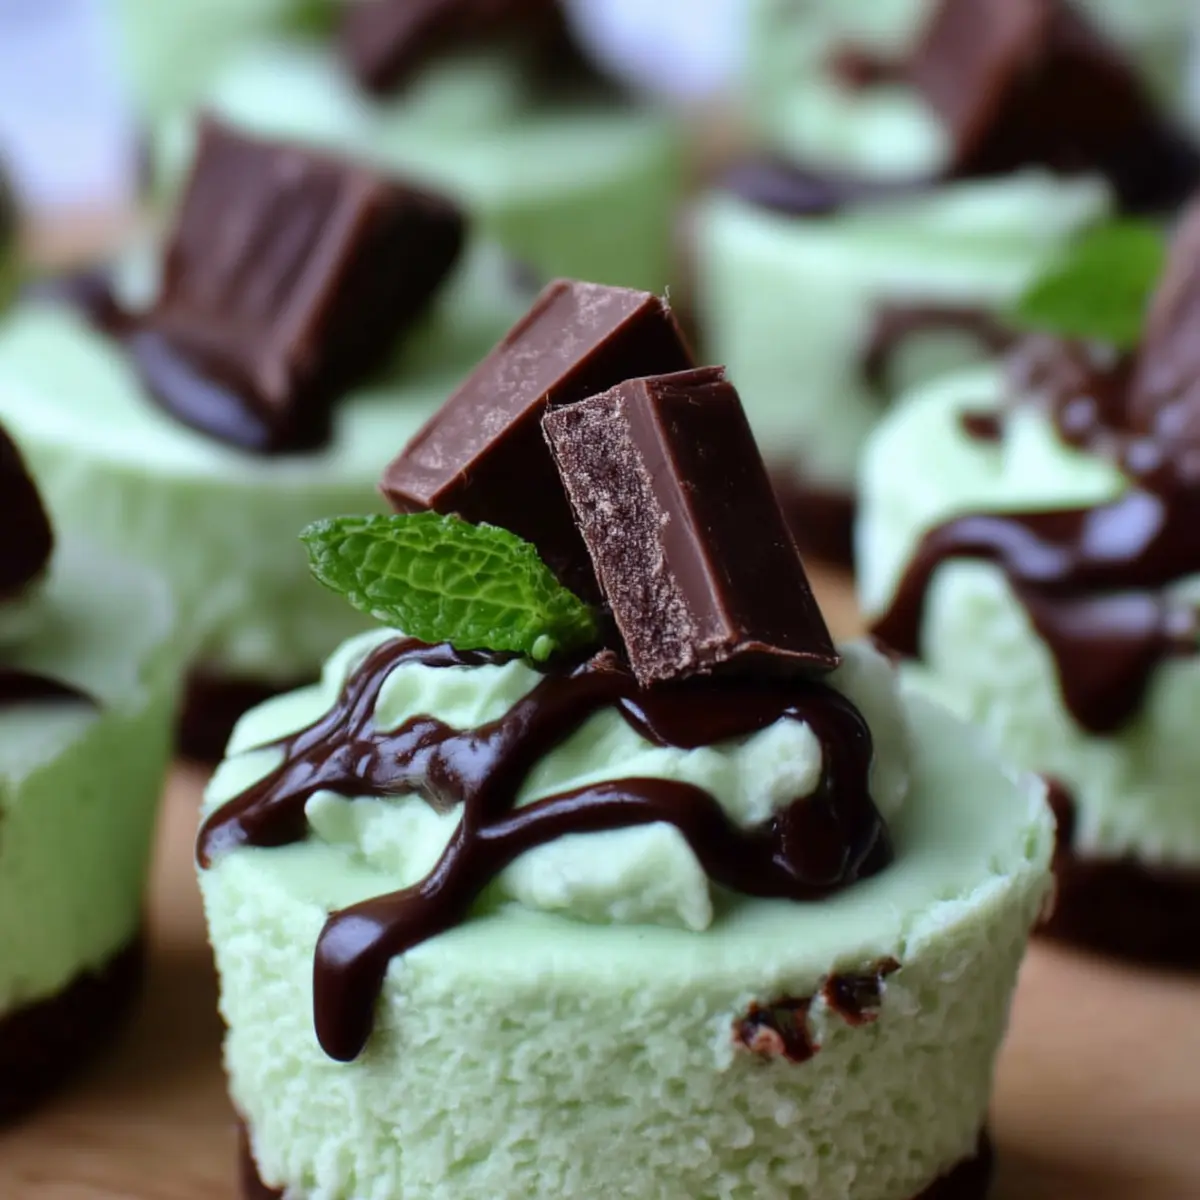
That pop of green peeking through beneath a silky chocolate topping, all crowned with those iconic Andes mint pieces… let’s just say nobody’s walking by your dessert table without reaching for one. The baked cheesecakes are creamy in the middle, with a buttery chocolate crust and just the right kick of mint. And I’ll be honest—cheesecake “mini anything” always feels so much more fun.
Why These Andes Mint Mini Cheesecakes Are a Party Favorite
You know that feeling when you want something more special than store-bought brownies but still not too fussy? Andes Mint Mini Cheesecakes hit that sweet spot, literally. They’re a showstopper without being over-the-top complicated, and honestly—they disappear from party trays faster than you can set them out.
The real charm is in their make-ahead magic. You can whip these up ahead of time, freeze them, and pull out a tray whenever company drops in (or when the craving strikes late at night). The chocolate cookie crust, cooling minty filling, and shiny chocolate blanket with those iconic Andes mints on top—each layer brings its own texture and flavor. You get a little crunch, a lot of creaminess, and that unmistakable fresh-mint chocolate hit.
These are perfect for the holidays, but don’t be surprised if you find yourself craving them year-round. Mint and chocolate is classic for Christmas, but it’s also just a universally loved combo for birthdays, spring parties, and even St. Patrick’s Day tables.
Inside the Ingredients for Andes Mint Mini Cheesecakes
Let’s break down what goes into making these chocolate-mint beauties and why each part matters.
- Nonstick baking spray: Keeps every little cheesecake from sticking, making your life so much easier when it’s time to pop them out.
- Chocolate graham cracker crumbs: The foundation of that signature chocolatey, slightly crunchy crust. Gives a deeper cocoa note than plain graham crackers.
- Sugar: Sweetens both the crust and the filling and balances out the tang of the cream cheese.
- Butter, melted: Binds the crumbs together for a buttery, rich base.
- Cream cheese, softened: The star of the show; creates that smooth, creamy cheesecake filling.
- Egg: Helps set the cheesecake for a dense-yet-fluffy texture.
- Mint extract: Adds that cool, refreshing mint note that pops through every bite.
- Green food coloring: Not essential for taste, but it gives that fun blast of minty green color.
- Chocolate chips: Used to make that irresistibly silky chocolate topping—like a little ganache blanket for each mini cheesecake.
- Andes mints, chopped: Adds crunch, color, and that instantly recognizable mint flavor on top.
See the recipe card below for the full list of ingredients and measurements.
Fun Swaps and Variations for Mini Mint Cheesecakes
Out of an ingredient or want to suit different tastes? Keep these swaps in your back pocket:
Swap the chocolate graham crackers for chocolate wafer cookies, or even chocolate sandwich cookies with the filling scraped out. If you’re dairy-free, try a plant-based cream cheese and dairy-free chocolate chips. Not into mint? Sub with almond or vanilla extract and leave out the food coloring—you’ll get a classic chocolate mini cheesecake instead.
Gluten-free friends coming over? Gluten-free chocolate cookies work beautifully. For topping, swap Andes mints for crushed peppermint candies or chocolate shavings if you don’t have them handy. As long as you keep the basic chocolate and creamy filling combo, you can riff on flavors pretty endlessly.
How to Make Andes Mint Mini Cheesecakes Step by Step
Here’s how you’ll go from a handful of ingredients to perfect, party-ready Andes Mint Mini Cheesecakes. Gather your ingredients first—and let’s get baking.
- Preheat your oven and coat your mini cheesecake pan with nonstick baking spray. This helps ensure your cheesecakes release easily and keep their neat, round shape for serving.
- Stir the chocolate graham cracker crumbs and a sprinkle of sugar together in a bowl, then drizzle over the melted butter. Mix until the crumbs feel like wet sand. Spoon a bit into each cheesecake cup and press firmly—just enough to hold the crust together, not so much that it’s jammed tightly in.
- With a stand mixer or handheld mixer, blend the softened cream cheese and the rest of your sugar until dreamy and smooth—no lumps invited. Add the egg, mint extract, and a few drops of food coloring. Mix on low until just combined. You want everything smooth, but don’t overmix or you could introduce air bubbles.
- Scoop the green, minty cream cheese batter over each chocolate base, smoothing the tops lightly with the back of your spoon or a small spatula. Each cup should look filled and vibrant, with that unmistakable mint color peeking through.
- Bake until the cheesecake centers are just set with a slight jiggle. Once baked, let the trays rest in the oven with the door propped open for a few minutes—this helps prevent sudden temperature shocks that can cause cracks. Then cool them down completely in the fridge for a few hours (or overnight, if you’re ahead of schedule).
- When you’re ready to finish, melt your chocolate chips until glossy and smooth. Smother each mini cheesecake with a spoonful of melted chocolate, letting it gently spread out and settle beautifully on top.
- Sprinkle with chopped Andes mints while the chocolate is still warm so the pieces set into the topping. Chill one more time if needed, then carefully pop each cheesecake from the pan—no need to fuss, they come out clean and perfect when chilled.
Kitchen Tips for Cheesecake Success
A few tricks make this recipe practically foolproof. Always bring your cream cheese to room temperature before mixing—cold cheese clumps and ruins the dreamy texture you want in every bite.
For the crust, make sure to press gently but firmly so it holds together but doesn’t get rock solid. When you’re mixing the batter, stay on low speed and stop once everything is smooth. Overmixing can add air and cause your cheesecakes to puff and then sink.
Chilling is non-negotiable—these little cheesecakes need time to set. Overnight is ideal if you can wait, but a few hours works in a pinch. For storage, keep them covered in the fridge. If you want to freeze, do so before topping with chocolate and Andes mints, then add the finishing touches after thawing.
Use a thin knife or offset spatula to loosen the edges before removing each cheesecake from the pan. And don’t stress about imperfections—once the chocolate and mints are on top, any little cracks disappear.
Pairings and Creative Twists
Andes Mint Mini Cheesecakes steal the show all on their own, but if you want to round out a dessert spread, add mini brownies, chocolate-dipped strawberries, or a big bowl of fresh berries for a pop of color and freshness.
Try pairing these with hot chocolate, an espresso shot, or cool vanilla bean ice cream for a welcome creamy contrast. For variation, turn these into a no-bake treat by swapping the baked filling for a whipped cream cheese mixture and chilling until set, or use different flavored extracts like orange or raspberry for a new spin. You can even sprinkle on some crushed chocolate cookies or white chocolate curls as an added flourish.
Love a festive look? Drizzle melted white chocolate across the top or add a few edible gold sprinkles. The beauty of mini desserts is how easily you can customize each batch—and make holiday dessert tables that much more exciting.
FAQs about Andes Mint Mini Cheesecakes
Can I make Andes Mint Mini Cheesecakes ahead of time?
Yes, you can prepare these mini cheesecakes in advance. They hold up beautifully in the fridge for a couple of days, and you can even freeze them before topping for longer storage.
What’s the best way to store leftovers?
Store leftover Andes Mint Mini Cheesecakes in an airtight container in the refrigerator. They stay creamy and delicious for several days—just keep them chilled to maintain the perfect texture.
Do I need a special mini cheesecake pan?
A mini cheesecake pan with removable bottoms makes things extra simple, but you can use a standard mini muffin tin with liners if needed. Just be sure to use liners or very thorough nonstick spray to help release them cleanly.
Can I make a full-size version instead of mini cheesecakes?
Absolutely, you can adapt this recipe for a standard springform pan to make one large cheesecake. Just adjust the baking time and keep an eye on doneness—the creamy mint-chocolate layers scale up wonderfully.
Final Thoughts on Andes Mint Mini Cheesecakes
A tray of Andes Mint Mini Cheesecakes always brings out that delighted “wow” from anyone lucky enough to snag one. They fit easily into busy schedules, pack all that bold chocolate-mint flavor into a single bite, and dress up any celebration or weeknight craving without breaking a sweat.
This is one of those recipes you’ll come back to, season after season—whether for a winter party, a classroom treat, or just a cozy night in with someone who appreciates a good cheesecake twist. If you’re after a dessert that looks fancy, tastes fresh, and freezes like a dream, these mini cheesecakes deliver every single time.
More Delicious Recipes
- Mint Chocolate Chip Brownies: These fudgy brownies are packed with minty goodness, making them a perfect companion to your mini cheesecakes.
- Shamrock Mint Chocolate Pie: Celebrate with this creamy mint chocolate pie that complements the flavors of your Andes Mint Mini Cheesecakes beautifully.
- St. Patrick’s Day Mint Blossom Cookies: These delightful cookies offer a festive mint flavor, perfect for adding to your holiday dessert spread.
Andes Mint Mini Cheesecakes
Ingredients
Equipment
Method
- Preheat oven to 325 degrees and spray the mini cheesecake pan with nonstick baking spray.
- Combine graham crackers, 2 tablespoons of sugar, and butter. Divide in the mini cheesecake pan evenly. Press down gently with a spoon.
- In a stand mixer, blend cream cheese and ¼ cup plus 2 tablespoons of sugar until smooth and creamy. Add the egg, mint extract, and food coloring: mix just until incorporated on low. Spoon the cream cheese mixture over the chocolate graham crackers, dividing evenly.
- Bake for 20 minutes. Turn off the oven, prop open the oven door with a wooden spoon, and allow the cheesecakes to cool down slowly for only about 5-10 minutes, then remove them from the oven.
- Remove from oven and chill for several hours or overnight before removing from pan.
- Melt chocolate chips in the microwave according to the manufacturer's instructions. Top each mini cheesecake with a heaping tablespoon of chocolate and a few pieces of Andes mints.