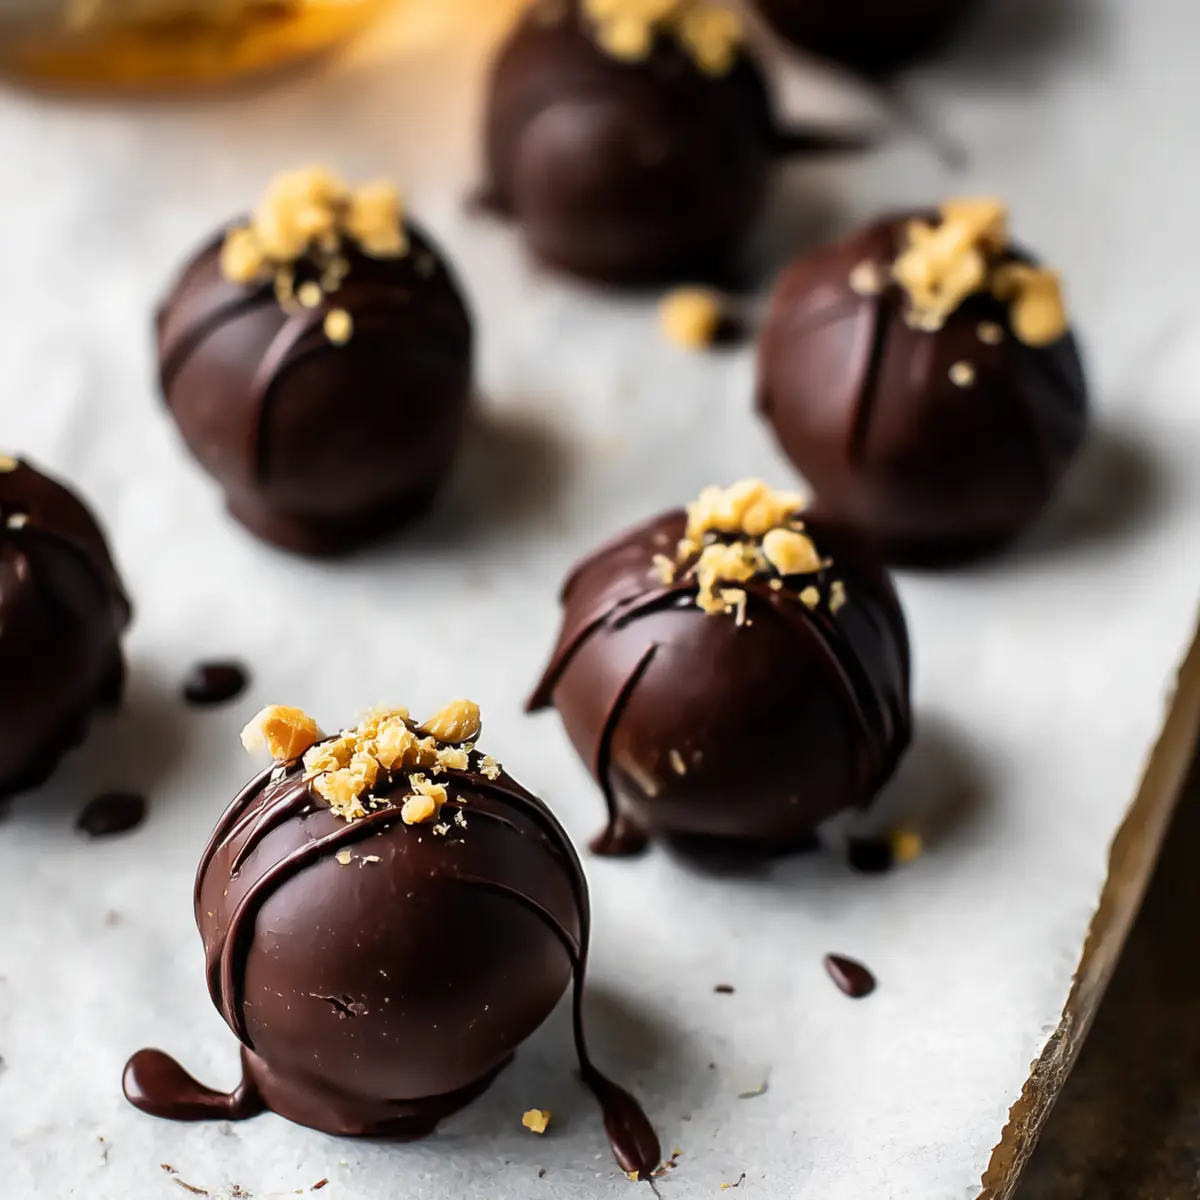
There’s just something irresistible about a homemade truffle—especially when it delivers a trio of chocolate, creamy peanut butter, and a daring splash of whiskey. These Chocolate Peanut Butter Whiskey Truffles are designed for pure indulgence: fudgy, melt-in-your-mouth centers lifted by salted peanut notes, a gentle warmth from the whiskey, and a satisfying snap of chocolate coating with every bite. If you’re searching for a no-fuss treat that’s both elegant enough for gifting and impossible to resist for snacking, you’re exactly where you need to be.
The best part? These truffles marry classic flavors with a grown-up twist, yet they don’t demand any professional tricks. The method is approachable, the results are rich, and each bite has that lush, crave-worthy balance of sweet, salty, and boozy. I’ll let you in on a secret: the moment those chocolate-peanut aromas fill your kitchen, it’s hard not to swipe a taste before the coating is even set.
The cosy tools that bring these truffles to life
Making Chocolate Peanut Butter Whiskey Truffles is wildly satisfying and doesn’t call for any fancy gadgetry. Here’s what you’ll want to have on hand to make your chocolate dreams a reality:
- Heatproof bowl – Perfect for melting chocolate and blending up that creamy filling safely over simmering water.
- Saucepan – Use it to create gentle steam, melting everything together without risk of scorching.
- Parchment-lined baking sheet – Absolute must for setting, chilling, and prepping your truffles for their glossy coat.
- Small spring-loaded scoop (about 1 tablespoon size) – For even, tidy truffle shapes you don’t have to fuss over.
- Fork or chocolate dipping tool – Essential for dipping each truffle into its bittersweet chocolate bath while keeping your fingers (mostly) clean.
- Toothpick – Helps nudge the delicate dipped balls onto the sheet, preserving their roundness.
- Paper towels – To wipe off your dipping tool now and then, keeping that chocolate fresh and swirly for each truffle.
That’s it! No mixers, no molds, just simple kitchen gear and a bit of patience as these beauties set.
Why these ingredients make the perfect truffle filling
- Semisweet baking chocolate – This is the backbone of your truffle: deep, rich flavor that’s smooth and perfectly bittersweet for a mature, layered bite.
- Butter – Adds richness and a creamy melt, blending beautifully with both the chocolate and peanut butter.
- Creamy peanut butter – There’s nothing quite like the nutty, silky consistency here; it delivers that nostalgic flavor with a luxurious texture.
- Heavy cream – Makes the filling ultra-smooth and truffle-like, ensuring melt-in-your-mouth results every time.
- Whiskey – The grown-up twist! Choose your favorite whiskey (classic, rye, or even peanut butter whiskey) for a gentle warmth and subtle complexity.
- Tempered chocolate – This is your final coat, bringing a glossy sheen and that satisfying snap you expect from a truly gorgeous truffle.
- Finely chopped peanuts (for garnish, if desired) – Sprinkle these on for a little crunch and an extra hit of peanut flavor.
See the recipe card below for the full list of ingredients and measurements.
How to craft your Chocolate Peanut Butter Whiskey Truffles step-by-step
- Melt and combine ingredients: Place the semisweet chocolate, butter, peanut butter, and heavy cream into a heatproof bowl. Set this over a saucepan of simmering water. Stir frequently until the mixture is melted, silky smooth, and everything smells like pure dessert heaven.
- Flavor with whiskey: Remove the bowl from the heat and stir in your whiskey of choice. The aroma will get warmer and a little grown-up—a sign you’re right on track.
- Chill until scoopable: Refrigerate the mixture, uncovered, for about 2 hours or overnight, until firmed up and scoopable. It should hold its shape when you press a spoon into it, but still feel fudgy, not hard.
- Scoop and shape: Use a small spring-loaded scoop to portion out mounds of the chilled mixture onto a parchment-lined baking sheet. The mounds will look rustic—don’t worry, you’ll shape them!
- Roll into balls: Quickly roll each mound between your palms into a ball. If the mixture gets warm or sticky, pop it back in the fridge for 15 minutes before continuing.
- Chill again: Put all the rolled balls back on the baking sheet and chill for another 30 minutes, or until they’re nice and firm. This makes dipping so much easier.
- Dip in chocolate coating: Using a fork or dipping tool, plunge each ball into melted, tempered chocolate. Lift and gently tap off any excess chocolate. The shell should set as it cools, creating a lovely shiny finish.
- Garnish and let set: While the chocolate’s still soft, sprinkle on chopped peanuts if you’d like extra crunch. Gently use a toothpick to slide each truffle onto the lined sheet. Repeat this process, wiping your fork with a paper towel as needed to keep everything tidy.
- Set and enjoy: Allow the truffles to set completely at room temperature or in the fridge. Once set, they’re ready for sharing (or hiding for yourself).
Tips, troubleshooting, and common truffle mistakes
- Chocolate not melting smoothly? Use gentle, indirect heat (double boiler style) and stir frequently. Avoid scorching by never letting water touch the chocolate directly.
- Filling too soft to scoop? It may just need more chilling time. If it’s still loose after a few hours, let it sit overnight in the fridge.
- Struggling with messy dipping? Rechill the truffle centers if they start to get sticky or melt in your hands—especially if your kitchen is warm. Work in small batches to keep things cool.
- Chocolate streaks on the coating? This sometimes happens if the chocolate isn’t properly tempered. Don’t panic—truffles will taste just as delicious, and a little extra peanut sprinkle on top never hurts.
- Chocolate unusually thick or clumpy? Add a tiny bit of neutral oil and stir well, but only as a last resort. Always start with the right melting method to prevent this.
Above all, remember: truffles don’t have to look perfect to taste absolutely divine. Even if your first dip looks rustic, the flavor and texture will still shine.
Pairings and truffle variations for every occasion
Chocolate Peanut Butter Whiskey Truffles are delicious on their own, but they can also be the star of a homemade dessert platter. Try serving them:
- Alongside fresh berries – Raspberries or sliced strawberries bring brightness and complement the truffles’ richness.
- With a glass of whiskey or port – For a grown-up treat, let the flavors echo and deepen.
- Next to coffee or espresso – A hot, robust coffee draws out the chocolatey notes.
- On a grazing dessert board – Pair with shortbreads, candied nuts, and dried fruits for a sweet party spread.
If you love to play with flavors, consider these twists:
- Swap the whiskey – Use a flavored whiskey, such as peanut butter whiskey, for a more pronounced nutty kick.
- Make it festive – Dust the truffles with edible gold, colored sugar, or drizzle with a contrasting chocolate for celebrations.
- Allergy-friendly options – Substitute sunflower seed butter or almond butter for peanut butter if you’re working around allergies.
- Turn down the booze – If you’d prefer a non-alcoholic version, simply skip the whiskey (the chocolate and peanut butter are plenty flavorful).
One of my favorite ways is to box up a few truffles as a homemade holiday gift—I swear, they disappear faster than anything else on the treat tray.
FAQs about Chocolate Peanut Butter Whiskey Truffles
How should I store Chocolate Peanut Butter Whiskey Truffles, and how long will they keep?
Store your truffles in an airtight container in the fridge. They’ll stay fresh for up to 2 weeks—if you can resist them that long! The fridge keeps the centers fudge-like and the coating nice and snappy.
Can I make these truffles without whiskey and still get great flavor?
Yes! Simply leave out the whiskey, and you’ll still enjoy a beautifully rich chocolate and peanut butter flavor. They’ll taste a little sweeter and kid-friendly, minus the grown-up warmth.
Are Chocolate Peanut Butter Whiskey Truffles suitable for freezing?
Absolutely. Once fully set, layer truffles between sheets of parchment in an airtight container and freeze for up to one month. Thaw gently in the fridge to preserve the coating and texture. They’re a dream for prepping ahead of time!
One batch of Chocolate Peanut Butter Whiskey Truffles, endless indulgence
Every batch of Chocolate Peanut Butter Whiskey Truffles brings creamy, bold flavors to your dessert table: the lush chocolate, nutty richness, and that whisper of whiskey all come together for a treat that feels both nostalgic and grown-up. With their glossy shells and melt-in-your-mouth centers, they’re the truffles you’ll want to return to—whether for gifting, sharing, or sneaking from the fridge late at night. Savor each bite, and don’t be surprised if they vanish as fast as you can make them!
More Delicious Recipes
- St. Patrick’s Day Truffles: These festive truffles share a rich, chocolatey essence that pairs wonderfully with the peanut butter whiskey flavor.
- Baileys Irish Cream Cookies: If you like boozy treats, these cookies infused with Baileys bring a delightful twist to traditional flavors.
- Irish Cream Poke Cake: This cake is moist and flavorful, perfect for those who enjoy the combination of chocolate and a hint of alcohol, much like your truffles.
Chocolate Peanut Butter Whiskey Truffles
Ingredients
Equipment
Method
- Place the chocolate, butter, peanut butter, and cream in the heatproof bowl set over a saucepan of simmering water. Heat, stirring frequently, until the mixture is melted and smooth.
- Remove from heat. Stir in the whiskey.
- Refrigerate, uncovered, for 2 hours or overnight or until solid enough to be scoopable.
- Use a small 1-tablespoon spring-loaded scoop to form mounds of chocolate onto a parchment-lined baking sheet.
- Quickly roll the mounds into balls with the palms of your hands. If the mixture gets too warm and melts, return to fridge for 15 minutes before continuing to roll.
- Return the truffles to the baking sheet and chill for another 30 minutes, or until firm.
- Dip the balls in tempered chocolate. For smooth results, use a fork or chocolate dipping tool to completely plunge the ball in chocolate. Lift up and tap the hand holding the fork to allow the excess chocolate to drip back into the bowl. Use a toothpick to gently slide the dipped truffled onto a parchment lined baking sheet.
- Sprinkle with chopped peanut before the chocolate sets, if desired. Repeat with remaining balls, wiping off your fork with a paper towel after every couple truffles. Let the truffles set completely before serving or storing.
- The truffles can be made ahead of time and stored in an airtight container in the fridge for up to 2 weeks.