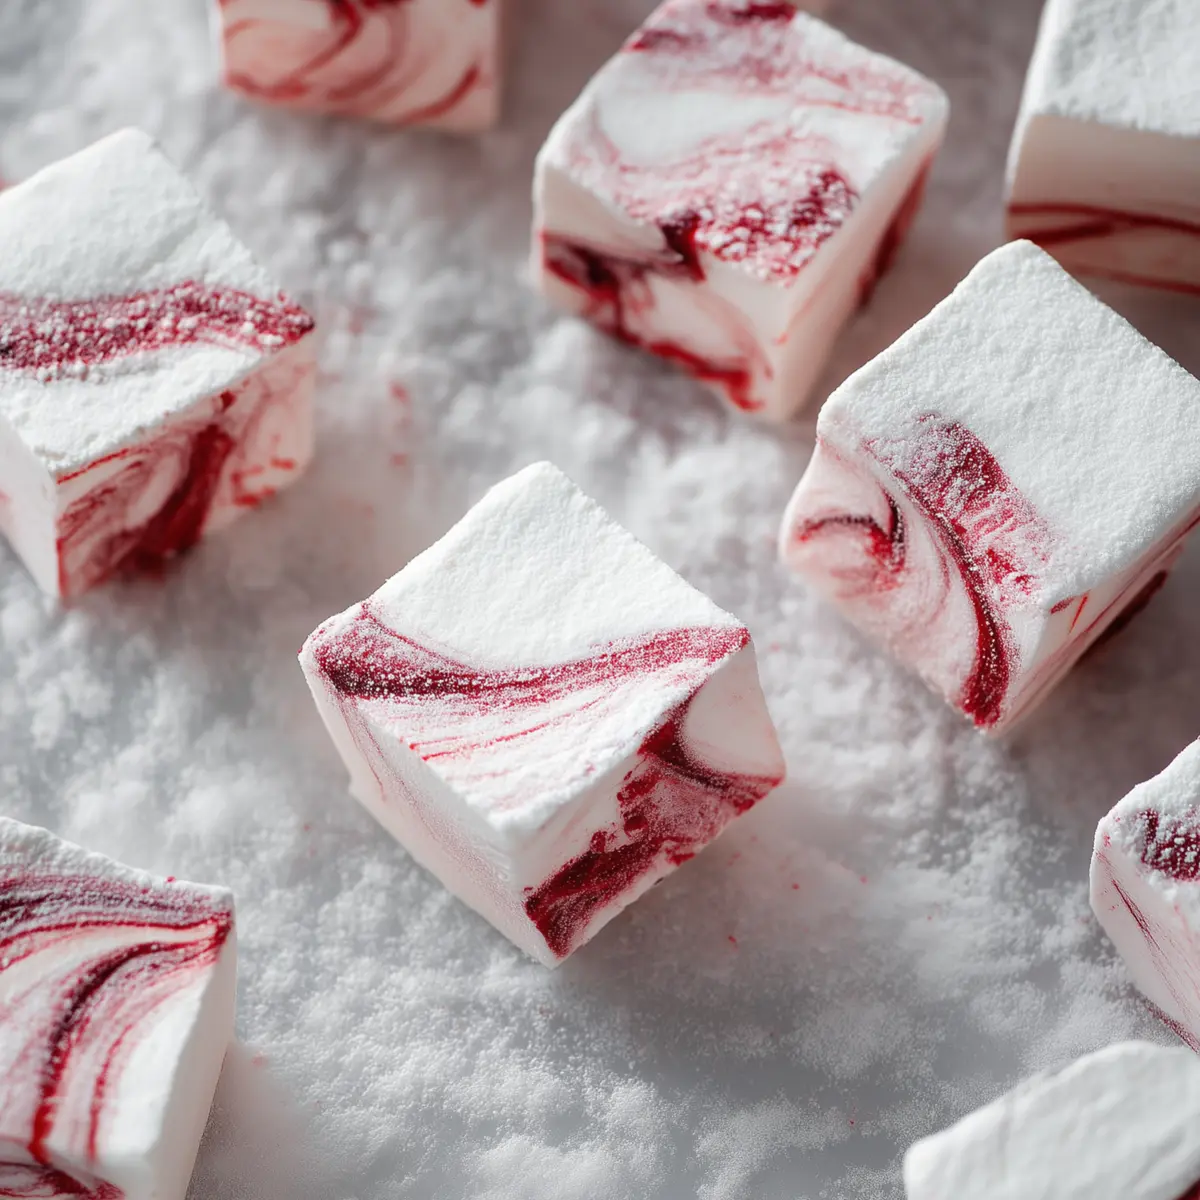
If you’ve ever wished your holiday treats could double as edible gifts and pure winter magic, Candy Cane Marshmallows might just become your go-to tradition. You catch that first sweet whiff of peppermint as you swirl the red ribbons through the pillowy mixture, and suddenly it feels like the kitchen is ready for festivities, no matter what the calendar says.
Making homemade marshmallows sounds fussy, but that’s the thing—they’re surprisingly doable, and a hundred times more satisfying than anything bagged from the store. Plus, nothing beats that soft, airy texture and burst of minty flavor on a chilly December night, especially bobbing in a mug of cocoa. If you’re after a treat that looks as impressive as it tastes, these holiday marshmallows just deliver.
Holiday Marshmallows that Steal the Show
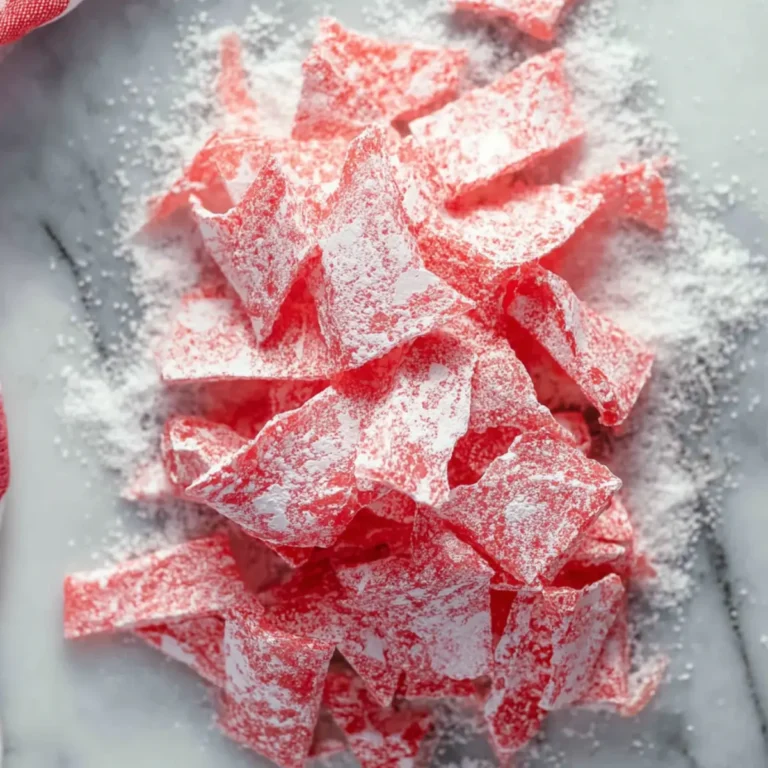
There’s nothing quite like a batch of Candy Cane Marshmallows stacked up on your counter, catching the light and drawing everyone in for “just one more.” These soft, peppermint-infused squares have all the playful spirit of the season, but they feel like a little kitchen miracle every time. They’re festive, totally customizable, and yes—you actually get those pretty red candy cane swirls in every bite.
You’ll love how these marshmallows manage to be both a nostalgic treat and a stunning centerpiece for a dessert table. They’re just as at home in a holiday cookie box as they are on top of a steaming mug of hot chocolate, melting into creamy, pepperminty puddles. More than anything, these are the kinds of homemade sweets that make chilly days brighter—whether you’re sharing them, gifting them, or cashing in on a quiet night to yourself.
Inside the Marshmallow: The Candy Cane Marshmallows Ingredient Breakdown
You don’t need a fancy pantry or hard-to-pronounce ingredients to whip up a batch of these signature homemade marshmallows. Here’s what brings them to life (and yes, there’s a surprise or two):
- Water: Gives the gelatin and sugar mixtures their structure and moisture.
- Unflavored powdered gelatin: The essential magic for marshmallow texture; helps set up that signature bounce.
- sugar: Creates the sweetness and smooth structure.
- Light corn syrup: Keeps things smooth, glossy, and prevents graininess.
- Peppermint extract: Adds that cool, unmistakable holiday tingle with every bite.
- Kosher salt: Brings all the other flavors into balance—don’t skip it.
- Red food coloring: Turns your marshmallows into a candy cane dream with just a swirl or two.
- Powdered sugar or cornstarch: Protects the pillowy cubes and keeps them from sticking together.
See the recipe card below for the full list of ingredients and measurements.
Creative Swap Ideas for Holiday Marshmallows
Missing something in your pantry or want to put your own stamp on these candy cane marshmallows? You’ve got options.
Swap out peppermint extract for vanilla, almond, or even a splash of orange for a twist on the holiday flavor. If you’d rather skip artificial food coloring, try natural beet juice or a drop of raspberry purée to get that festive swirl—just keep it minimal so your marshmallows stay fluffy.
Corn syrup helps keep things super smooth, but golden syrup works in a pinch if you’re out. If you’re vegan, consider a gelatin alternative that’s meant for marshmallows (though expect a slightly different texture). And if you’re dropping these into cocoa, try dusting them with cocoa powder instead of plain powdered sugar for a mocha vibe.
Swirling Up Holiday Magic: Candy Cane Marshmallows Step-by-Step
Ready to transform simple sugar and water into festive, cloud-like treats? Here’s how you bring these homemade marshmallows from pantry to party:
- Start by prepping your pan—coat it well so those marshmallows pop out easily later. No one wants stuck-on corners when there’s a cookie box to fill.
- In your mixer bowl, sprinkle the gelatin over cool water and give it a moment to bloom. It should look thick and a little weird—that’s good news, it’s working!
- Meanwhile, combine the sugar, corn syrup, and more water in a saucepan. Stir gently as it heats up, then let it bubble away without stirring once it’s dissolved. When those big clear bubbles turn syrupy and your thermometer reads the mark, remove it from the heat.
- With the mixer on low, slowly pour the hot syrup into the bloomed gelatin. Add peppermint extract and salt, then carefully ramp up the mixer to high. Watch as the mixture turns white, glossy, and doubles in volume—it’s like watching a snowstorm in a bowl.
- Once stiff peaks form, scoop the marshmallow mixture into your pan. Work quickly, as it’ll start to firm up fast. Smooth the top with a spatula so those swirls pop.
- While it’s still warm, add drops of red food coloring across the top and swirl them in using a toothpick. No need for perfection—the more whimsical, the better.
- Let the pan rest until the marshmallow slab feels solid when gently pressed. You’re building patience (or just busying yourself licking the bowls clean).
- Turn the slab onto a powdered surface and slice it up using a sharp, greased knife. If it sticks, wipe it down between cuts so every piece looks clean and square.
- Roll each marshmallow cube in powdered sugar or cornstarch, coating every side so they stay tender, fluffy, and utterly irresistible.
Marshmallow Mastery: Tips & Tricks You’ll Love
When it comes to Candy Cane Marshmallows, the little things make the biggest difference. Use a thermometer when boiling the syrup—too hot, and you’ll get marshmallows that are tough instead of soft. Pour the syrup in slowly; moving too fast can splash or deflate the mixture. If you’ve never bloomed gelatin before, let it stand until it looks fully set and opaque before adding the syrup.
Grease your pan generously, and don’t skip rolling the marshmallows in powdered sugar or cornstarch after slicing. This keeps them fluffy and prevents sticky edges, making them easy to pack and gift. For the cleanest slices, use a hot, sharp knife and wipe it down frequently.
Marshmallows store beautifully at room temperature, tucked in an airtight container and dusted so they don’t stick. No need to refrigerate unless your kitchen is extra humid—just keep them dry and cool. They’ll be perfect for snacking or topping cocoa for several days (if they last that long).
Pairings & Variations for Unforgettable Holiday Treats
Whether you’re serving, gifting, or just treating yourself, Candy Cane Marshmallows are endlessly versatile. Drop a few into homemade hot chocolate—watching them melt and streak the drink pink is half the fun. They also team up brilliantly with brownies, layered in s’mores, or perched on top of a frothy latte for an instant festive twist.
For a playful dessert tray, try dusting marshmallows with crushed candy canes, freeze-dried raspberries, or a touch of cocoa powder. Dip half in melted dark chocolate for a show-stopping finish. Feeling extra creative? Sandwich them between cookies for a marshmallow whoopie pie or cut them into smaller cubes for stirring into cookie dough or ice cream.
These marshmallows make exceptional holiday gifts—just pack them in pretty boxes or jars, and you’ve got the ultimate edible present. They can be made ahead, freeze beautifully, and hold their flavor and texture for weeks if stored well.
FAQs about Candy Cane Marshmallows
Can I make Candy Cane Marshmallows without corn syrup?
Yes, you can substitute corn syrup with golden syrup or honey for a similar texture, though the taste will shift slightly. The syrup prevents crystallization and helps keep the marshmallows smooth and tender.
How long will homemade marshmallows stay fresh?
Homemade marshmallows last up to two weeks if stored in an airtight container at room temperature. Just be sure to keep them dusted with powdered sugar or cornstarch to prevent sticking.
Can I use natural food coloring for the red swirl?
Absolutely, natural food colors like beet juice or raspberry purée can give a nice red swirl. Use only a small amount so your marshmallows stay fluffy and don’t get overly moist.
How do I know when the sugar syrup is ready?
The sugar syrup reaches the right stage when it hits the recommended temperature and turns clear with big, glassy bubbles. Using a candy thermometer is the best way to ensure perfect texture every time.
Final Thoughts on Candy Cane Marshmallows
Homemade Candy Cane Marshmallows are one of those holiday recipes you’ll want to revisit year after year. They add a burst of color and cheer to any cookie box, mug of cocoa, or dessert table—and let’s be honest, they taste like Christmas itself.
If you’ve been looking for a sweet little tradition that looks gorgeous and brings out everyone’s inner child, these marshmallows more than deliver. Here’s to chilly evenings, sticky fingers, and a kitchen that smells like peppermint dreams.
More Delicious Recipes
- Andes Mint Chocolate Cupcakes: These minty cupcakes bring a rich chocolate flavor that pairs delightfully with the peppermint of your marshmallows.
- Mint Chocolate Chip Brownies: These fudgy brownies offer a chocolatey complement to the minty freshness of your Candy Cane Marshmallows.
- Mint Chip Mousse Cups: The light and airy texture of this mousse mirrors the soft, fluffy goodness of homemade marshmallows, making them a perfect festive pairing.
Candy Cane Marshmallows
Ingredients
Equipment
Method
- Grease a 9x9-inch baking pan with cooking spray and set aside.
- In the bowl of a stand mixer, add ⅔ cup cold water. Sprinkle gelatin on top and let bloom.
- In a medium saucepan over medium-high heat, combine granulated sugar, corn syrup and ⅔ cup water. Stir until sugar is dissolved. Bring the mixture to a boil, swirling the pan occasionally, until the mixture reaches exactly 240°F on a candy thermometer, about 10-12 minutes. Immediately remove from heat.
- With the stand mixer on low speed, slowly and carefully pour the melted sugar mixture into the gelatin mixture. Add the peppermint extract and salt.
- Slowly (to avoid splashes) increase the speed to high and whip until the mixture is stiff and white, about 10-12 minutes. When you remove the whisk, stiff peaks should form that take a few seconds until they fall back into the marshmallow mixture. Working quickly, pour the mixture into the prepared baking pan and use a spatula to help spread evenly.
- While the marshmallows are warm, add droplets of red food coloring to the top. Use a toothpick or skewer to swirl the food coloring throughout the marshmallows.
- Let the marshmallows sit and firm for at least 4 hours at room temperature or 2 hours in the refrigerator.
- Dust your work surface with powdered sugar or cornstarch. Use a butter knife to slice around the edges of the pan, then turn the marshmallow out onto the work surface. You may need to pry it out at a corner. Use a sharp knife to cut the marshmallow into (at least) 16 pieces. If needed, spray the knife with cooking spray to help prevent sticking. If there is excess cooking spray on your marshmallow, dab with a paper towel to remove.
- Roll each marshmallow in powdered sugar or cornstarch on each side to prevent sticking, then serve.