When I think about Rock Candy, it instantly takes me back to family gatherings at Christmas, when the kitchen would fill with a mix of excitement and that sharp, sweet aroma you only get when sugar is boiling on the stove. I always associate the crackling sound of the sugar syrup hardening with the anticipation of breaking up those big, sparkling sheets of candy. The appeal isn’t just about nostalgia, though—rock candy has a certain playful magic, sparkling like edible gems and delivering bright, punchy flavors you can customize for any holiday or celebration. It’s one of those recipes that’ll bring out your inner kid—no matter what age you actually are.
Rock candy is deceptively simple but never boring. There’s something transformative about turning a handful of basic ingredients into vivid, jewel-like pieces that catch the light and snap between your teeth. My favorite batches are boldly colored—sometimes a shocking red with cinnamon oil for a little extra heat; other times, soft blue with a gentle, almost floral hint. I love to pile the shards into a bowl and watch as friends and kids reach in, drawn by the promise of that glassy crunch and the sugar rush that follows.
When Rock Candy Steals the Spotlight at Any Gathering
There’s always that moment at a party or family get-together when the treats come out—and Rock Candy draws everyone in. Maybe it’s the way the shards glitter on the table, or how kids (and adults, let’s be honest) love picking out their favorite colors and flavors. Around the holidays, I keep plates of rock candy close at hand for spontaneous guests, and it always disappears faster than I expect. If you’re ever in need of a conversation starter, a sweet centerpiece, or a last-minute edible gift, this is it. The sheer drama of breaking the sheet into irregular gems is enough to make anyone stop and watch.
The Ingredients That Make Rock Candy Sparkle
Every batch feels like a little chemistry experiment—but all you need are a few pantry staples (plus a hit of color and flavor if you want to dress things up). Here’s a walkthrough of the essentials and what they do for your candy:
- water – provides the base to dissolve and evenly distribute the sugar, so everything melts together without burning.
- Sugar – the real backbone: it melts, caramelizes, and, when cooled, creates that signature brittle snap.
- Corn syrup – prevents the sugar from crystallizing too soon and helps ensure a glossy, flawless sheet.
- Food coloring (optional) – if you want that pop of holiday color; use a single shade or get creative with swirls and gradients.
- Flavored candy oil – brings personality: cinnamon, peppermint, or fruity flavors all work. It’s concentrated, so pick favorites and use sparingly.
- Powdered sugar – dusts each shard, keeping the pieces from sticking together and adding a delicate finish.
See the recipe card below for the full list of ingredients and measurements.
Starting the Candy Transformation
Before you do anything else, clear some space—making rock candy isn’t complicated, but it does demand your full attention for those crucial caramelizing minutes. You’ll want to butter a rimmed metal sheet pan and line it with parchment. Butter the parchment, too, tucking right into the corners so nothing tries to sneak underneath. Wax paper is out; trust me, it melts and makes a mess.
Grab a deep saucepan, because sugar at a rolling boil has a mind of its own and loves to try and bubble over. Combine the water, sugar, corn syrup, and, if you’re feeling vibrant, a streak or two of food coloring. Stir it all gently over medium-high heat until you don’t see any sugar grains clinging to the pan.
Attach a candy thermometer—don’t let it touch the bottom, or you’ll get a false reading. Once the mixture starts to look clear and starts bubbling, you’re committed. Somewhere around the 150°C mark (that’s the hard crack stage), things change quickly. If the syrup climbs up the sides, pull it off heat for a minute and stir down the bubbles. Returning it to the burner, keep a keen eye. Slightly over is always better than under for that perfect, snappable texture.
How the Sugar Crystallizes Into Magic
As soon as your thermometer registers that magic number, reach for your flavored oil. This is where things smell intense—especially with strong flavors like cinnamon—so open a window if you can. Stir quickly, keeping your face well away from the vapor. Pour the molten liquid sugar into your prepped pan and leave it alone for a few hours. No poking.
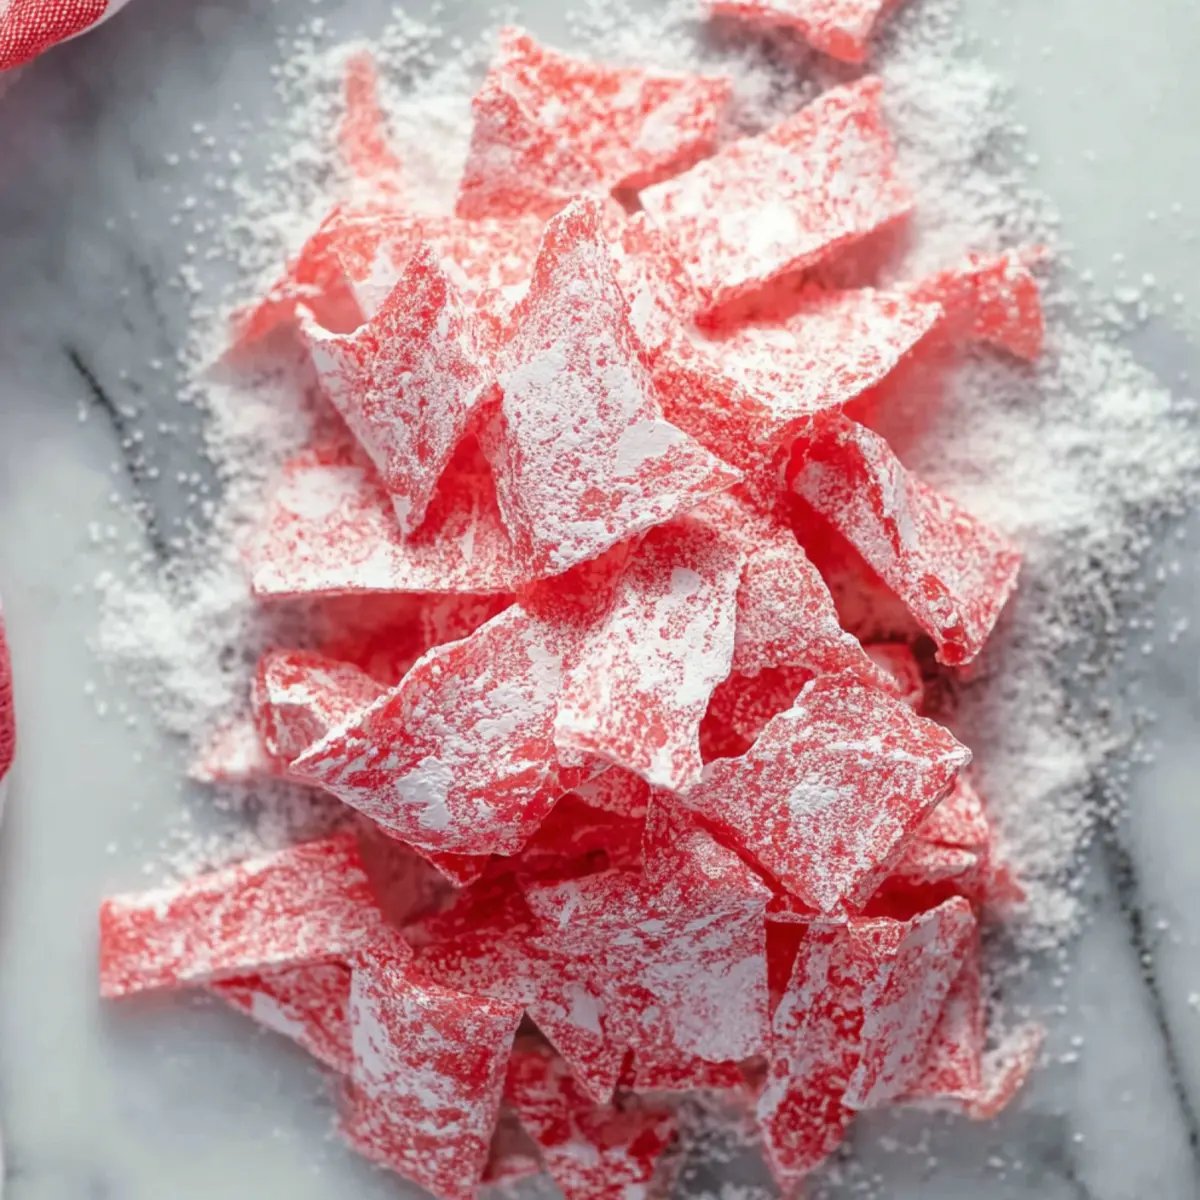
After it’s fully cooled—don’t rush, or you’ll find sticky, stringy patches—dust the top with powdered sugar. It’s a satisfying moment: that white snowfall against jewel-bright candy. Flip everything onto a board, peel away the parchment gently, and get ready to break it up. I use a heavy knife tip or, sometimes, a meat mallet covered with parchment for less mess. Aim for bite-sized pieces—shards that look like sea glass always catch the light best.
A final dusting of powdered sugar helps keep things neat and prevents sticking. Tuck those brilliant candies into an airtight container, and you’re done.
Texture, Flavor, and That First Crackling Bite
There’s truly nothing like that first snap when you bite into a fresh piece of rock candy. The texture is satisfyingly brittle—like the edge of frosted glass, but immediately giving way to smooth, melting sweetness. If you’ve gone bold with flavor oil, the taste hits fast and clear: fiery cinnamon, brisk mint, or something fruit-forward that lingers on your tongue. The gentle dusting of powdered sugar softens the edges, delivering not just sweetness but a subtle, snowy finish that tempers even the most intense flavors.
Visually, a dish of rock candy becomes the focal point on any buffet or dessert table. Colors shine more brilliantly against the soft coating; the aroma, faintly spiced or minty, teases when you open the container. Every piece is a little different—a shard of edible stained glass, ready to crunch, melt, and vanish before you can even pick out your next favorite color.
Tips and Twists for Showstopping Rock Candy
If you’re a first-timer, here’s how to avoid pitfalls and give your rock candy some personal flair:
- Always use a deep, heavy-bottomed pan to help distribute heat evenly and prevent scorching.
- Don’t skip the thermometer—guesswork leads to sugar that stays sticky or burns before hardening. Go a touch above hard crack temperature if in doubt.
- Use flavor oils, not extracts. Extracts can add water to your mix and ruin that perfect snap. Stick with concentrated candy oils.
- Experiment with colors and swirls: pour half your mix, add another drop or two of a second color, and swirl gently with a toothpick—no overmixing, or you’ll lose the glassy look.
- For softer edges (great if serving younger kids), dust well with powdered sugar and break pieces when completely cool.
- Feel like getting fancy? Use silicone molds for gemlike, uniform shapes—though personally, I prefer the jagged, spontaneous look of hand-broken pieces.
- For storage, always use an airtight container and keep candy cool and dry. Humidity is your enemy—your candy will get sticky if left out or stored somewhere damp.
- Looking for holiday twists? Try red with cinnamon oil for Christmas, green with peppermint, or pastel hues with bright fruity flavors at Easter.
Serving Rock Candy for Celebrations—and Just Because
This is a recipe that begs to be shown off. Fill up glass jars for a center-of-the-table display—let everyone break off a piece with a gentle tap. Tuck shards into cellophane bags as take-home gifts, or load them up as party favors for birthdays and showers. When I host dessert buffets, I’ll often slip rock candy pieces in between cookies and truffles for that glittering hit of color and dramatic crunch.
Of course, you don’t need a special occasion. Rock candy is equally at home tucked into a lunchbox for a surprise treat or as a midweek, post-dinner sugar rush. For something a little different, try sprinkling crushed rock candy atop frosted cakes or cupcakes. The sparkle and subtle sweetness bring a playful, unexpected twist. Whatever you do, just have fun with it—every batch looks a bit different, and that’s exactly the point.
FAQs about Rock Candy
How long can I store homemade rock candy?
If kept in an airtight container in a cool, dry spot, rock candy will easily last several weeks. Just make sure to keep out any humidity or moisture, as that can make the pieces go sticky or dull over time.
Can I make rock candy without food coloring and flavor oil?
Absolutely! The base recipe works just as well with no added color or oil—it’ll set up as beautiful clear gems with a pure, classic sugar taste. For those who want a more understated or “glass candy” look, skip both additions.
Is it possible to freeze rock candy for longer storage?
Freezing is not recommended. The candy can absorb moisture during thawing and turn sticky or grainy, losing that crisp snap. It’s better to make fresh or store tightly sealed at room temperature.
What are some creative ways to serve rock candy?
Besides piling them into candy jars or party bags, try using rock candy as cake decorations, cupcake toppers, or even stirring sticks for hot beverages. At parties, shattered rock candy makes a great edible centerpiece or colorful accent among other desserts.
There’s something timeless and joyful about the ritual of making rock candy—watching the syrup transform, listening for that satisfying crack, sharing each colorful shard with friends or family. No matter the occasion, the process feels a little special, the results even more so. Next time you want a sweet that’s as fun to make as it is to eat, throw together a batch of rock candy and let the kitchen fill up with sparkle, sweetness, and just a little bit of magic.
More Delicious Recipes
- Christmas Coffee: This festive drink pairs perfectly with sweet treats like rock candy, enhancing the celebration atmosphere.
- Peppermint Hot Chocolate: The minty flavors complement rock candy beautifully, making for a delightful dessert spread during chilly gatherings.
- Cozy Holiday Drink: This warm beverage can be enjoyed alongside your colorful rock candy, adding to the festive vibe of any occasion.

Rock Candy
Ingredients
Equipment
Method
- Butter a 15 inch x 10 inch x 1 inch rimmed metal sheet pan.
- Line with parchment paper, and butter the parchment paper, making sure the edges of the parchment paper are well buttered to prevent the candy from seeping underneath. Do not use wax paper as it won't hold up to the high temperature of the candy being poured.
- In a large deep sauce pan combine water, sugar, corn syrup, and food coloring. Mix over medium high heat until sugar starts to dissolve.
- Attach a candy thermometer to the side of the pan making sure it does not touch the bottom of pan for an accurate temperature.
- Continue to boil until sugar mixture reaches 300 degrees (hard crack stage) about 20 minutes. Watch closely, if mixture starts to boil too close to the edge of pan remove from heat, and stir until bubbles subside. Then return to medium-high heat. It's better to slightly be over 300°F than under for candy to set properly.
- Once mixture reaches 300°F degrees remove from heat and stir in candy oil, working quickly. Keep face away from the mixture as it can be extremely strong depending on flavor, and keep area well ventilated.
- Pour immediately into prepared pan. Allow to cool for 4 hours.
- After 4 hours dust the top of candy with powdered sugar. Flip candy over onto a large cutting board or cookie sheet, and remove parchment paper.
- Return candy to the pan and use the tip of a sharp knife or heavy mallet to break candy into bite size pieces. If using a mallet cover candy with parchment paper while breaking.
- Dust with more powdered sugar and store in a airtight container.