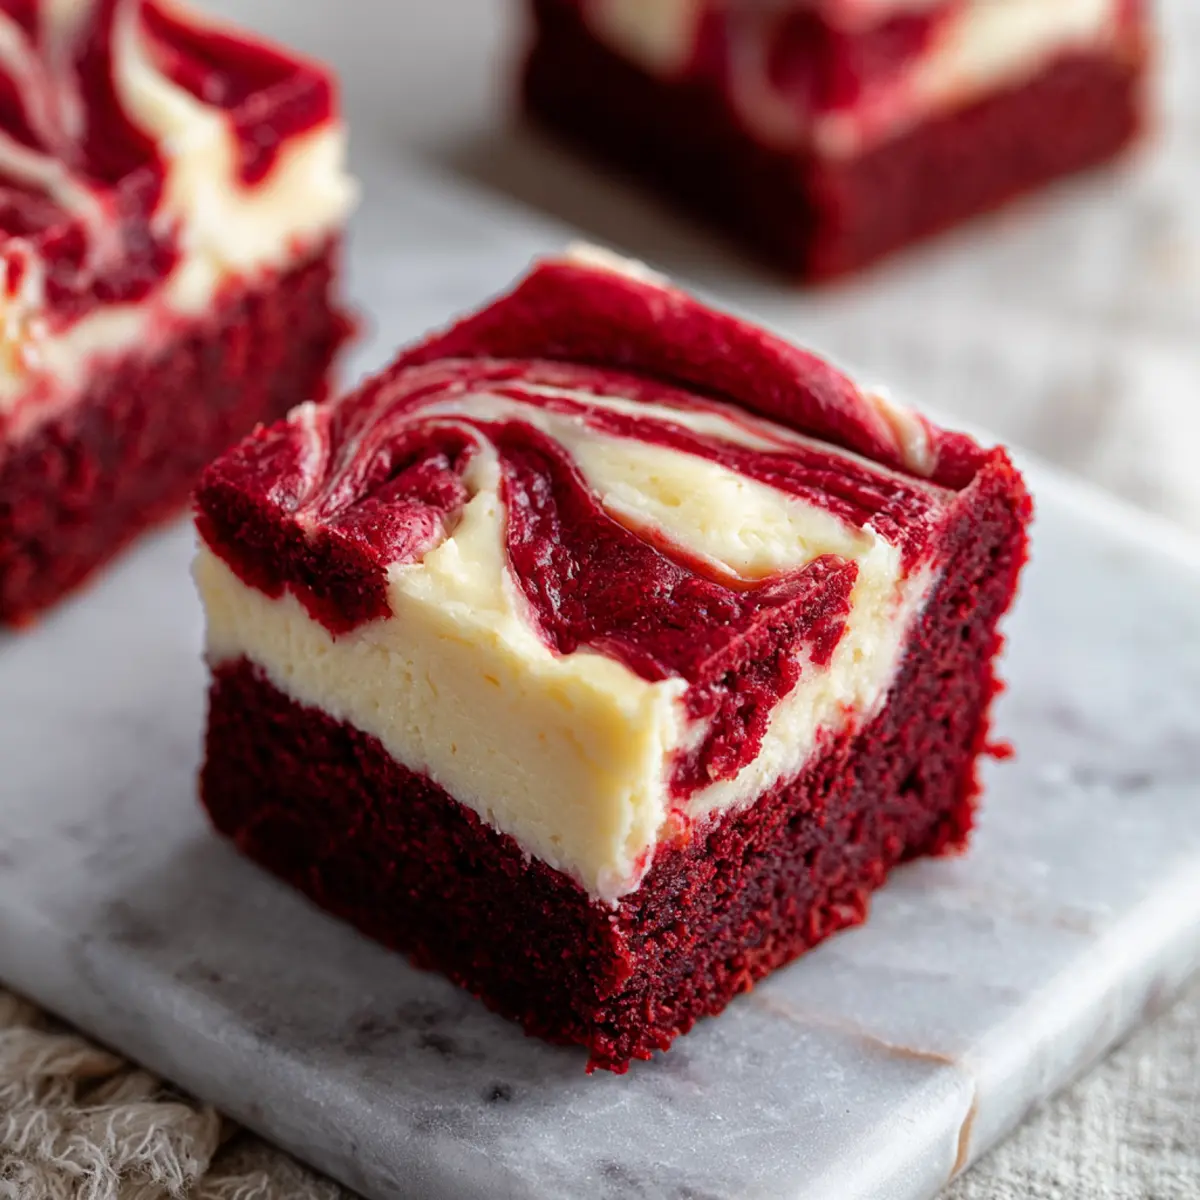
Some desserts just have a little extra drama when you slice into them, and these Red Velvet Cheesecake Brownie Bars definitely deliver on that front. I still get a little thrill every time I cut through the rich, chocolatey red velvet layer and see those creamy cheesecake swirls. If you love both brownies and cheesecake, this is the treat you never knew you needed.
When you’re in the mood for a showstopping bar that’s surprisingly easy to pull together, Red Velvet Cheesecake Brownie Bars bring together the best of two worlds: the fudge-like depth of brownies and that classic tangy cheesecake. Share them for Valentine’s Day, family celebrations—or honestly, any time you want to add some color to your dessert tray.
Red Velvet Swirl Magic: Why These Bars Stand Out
If you crave a dessert that looks just as incredible as it tastes, these Red Velvet Cheesecake Brownie Bars deserve a spot in your kitchen. The marbled effect from swirling dreamy vanilla cheesecake with deeply colored red velvet batter makes every square a conversation starter.Beyond their stunning looks, they balance two favorites: dense, fudge-like brownies with the creamy tang of cheesecake. They’re not overly sweet or heavy, so you can enjoy them after a special dinner or serve them up as a surprise treat with coffee. They also slice beautifully, hold their shape, and turn any gathering—big or small—into a little occasion.
Ingredients That Build Flavor in Red Velvet Cheesecake Brownie Bars
Each ingredient here has a role in bringing both the color and texture to life. This recipe uses simple ingredients you probably have in your pantry, along with a couple that make red velvet desserts truly unique.- Butter – brings richness and helps create that classic fudgy brownie texture.
- Granulated sugar – sweetens both the brownie base and the tangy cheesecake layer.
- Unsweetened cocoa powder – gives the brownie base its subtle chocolate flavor and slightly earthy notes.
- Salt – balances the sweetness and brings out the chocolate taste.
- Red food coloring – creates the signature vivid color for red velvet desserts.
- Vanilla extract – deepens both the brownie and the cheesecake flavor.
- Distilled white vinegar – enhances the tanginess and keeps the red velvet true to tradition.
- Eggs – add structure and moisture to both layers.
- All-purpose flour – gives the brownie layer its body without making it cakey.
- Cream cheese – forms the creamy, luscious cheesecake swirl that cuts through the brownie richness.
See the recipe card below for the full list of ingredients and measurements.
Substitution Ideas & Tools
If you’re out of block-style cream cheese, be sure not to swap with a spreadable version—the consistency just isn’t the same. For that signature swirl, a butter knife or skewer is ideal. You’ll also want to use parchment paper for easy removal and a sturdy square baking pan to get those neat edges.How to Make Red Velvet Cheesecake Brownie Bars: Step by Step
Baking these bars is all about layering and swirling. Here’s how you bring it all together for striking, bakery-worthy treats at home:- Preheat your oven and line a baking pan with parchment, letting it hang over the edges for easy lifting. Give any exposed pan sides a quick spray with oil.
- Mix up the red velvet base by stirring together melted butter, sugar, cocoa powder, salt, red food coloring, vanilla, and vinegar in a large bowl until smooth and deep red.
- Blend in the eggs one at a time for richness, then fold in the flour just until it disappears and the batter turns thick and glossy. Set aside a small portion for the swirling.
- In a separate bowl, use a hand mixer or sturdy whisk to beat cream cheese with sugar and vanilla until very smooth. Blend in the egg last for a silky, pourable cheesecake batter.
- Pour the main red velvet brownie batter into your prep’d pan. Gently spread it into the corners for an even base.
- Layer the cheesecake mixture evenly over the red velvet batter—pour gently so the batters stay separate at first.
- Dollop spoonfuls of the reserved red velvet batter across the cheesecake layer. Swirl through both layers with a butter knife or toothpick, moving in relaxed, figure-eight patterns. Stop when you like the marbled effect—less swirling means prettier blocks.
- Bake until the edges are slightly firm and a toothpick near the center comes out with a few moist crumbs or some thick cheesecake. If it looks wet or liquid, bake it a bit longer.
- Cool the pan completely before carefully lifting out the bars by the parchment and cutting into squares. This keeps the layers sharp and clean for that beautiful swirl effect.
Getting the Perfect Swirls and Texture: Tips & Tricks
Red Velvet Cheesecake Brownie Bars aren’t tricky, but a few easy tips will make them extra special. You’ll want dense, moist brownie and a creamy, set cheesecake—not overbaked edges or muddled swirls. Here’s what to keep in mind:- Let the cream cheese come to room temperature before mixing for effortless blending. Cold cream cheese can lead to lumps in your cheesecake layer.
- Don’t overmix the batters once you add flour or eggs—this keeps the brownies moist, not dry or cakey.
- Swirl gently. Overdoing it mixes the two batters too much, making the layers muddy instead of swirled. Simple figure-eights with a skewer or knife are enough.
- Check for doneness by looking for slightly set edges and a toothpick that comes out with just a few crumbs or some cheesecake. If you see raw batter, give it a few more minutes.
- Patience! Cool completely before slicing, so the layers hold together for picture-perfect bars.
Serving Ideas, Variations, and Pairings for Your Bars
Red Velvet Cheesecake Brownie Bars are made for sharing. Try them dusted with a light sprinkle of powdered sugar or drizzled with a little melted dark chocolate for even more contrast. For a party platter, pair them with chocolate-dipped strawberries, or serve alongside fresh berries to add a tart bite.If you want to riff on the classic, swap the vanilla extract for almond extract in the cheesecake for a nutty undertone. Or, add a handful of mini chocolate chips to the brownie layer for extra richness. These bars look especially stunning on a white plate with a drizzle of raspberry sauce—perfect for holidays or romantic evenings.
Storing and Making Ahead: Keeping Your Bars Fresh
You can easily make Red Velvet Cheesecake Brownie Bars ahead, as their flavor and texture only improve after a few hours in the fridge. Store them airtight in the refrigerator, where they’ll stay fresh for several days. If you want to freeze extras, wrap the bars tightly and freeze for up to a month. Thaw in the fridge before serving for the best texture.For serving later, let them sit at room temperature for 10–15 minutes to soften slightly, but keep chilled for longer storage so the cheesecake layer stays creamy and safe.
FAQs about Red Velvet Cheesecake Brownie Bars
Can I substitute a different food coloring in Red Velvet Cheesecake Brownie Bars?
Yes, you can use gel or natural food colorings if you prefer. The intensity may vary, so adjust to reach your desired shade of red. Just make sure your choice is bake-safe and doesn’t add unwanted flavors.
How should I store leftover Red Velvet Cheesecake Brownie Bars?
The bars keep best stored airtight in the refrigerator. This preserves the creamy cheesecake layer and prevents the brownie from drying out. Letting them come to room temperature briefly before serving returns some fudgy softness.
Why did my cheesecake swirl blend into the brownie layer?
This usually happens from over-swirling the batters together. Swirl just enough for a marbled effect and avoid fully mixing the layers. Use a gentle hand and stop as soon as you see an attractive pattern.
Can I freeze these bars for later?
Yes, these bars freeze quite well. After cooling and slicing, wrap the brownies tightly in plastic and freeze. Thaw them overnight in the fridge to maintain their creamy texture and lovely swirl.
A Slice of Red Velvet Cheesecake Brownie Bar Bliss
One forkful of these Red Velvet Cheesecake Brownie Bars, and you’ll see why they’re such a favorite. That rich, chocolatey brownie base and tangy-sweet cheesecake make a decadent duo—especially with those eye-catching swirls on top.Share them at your next gathering, or tuck one away for a not-so-guilty midnight treat. However you serve them, you’ll find yourself savoring each creamy, fudgy bite.
What To Try Next
If you loved the rich and layered flavors of these bars, these recipes will keep your sweet tooth happy.
- No Bake Lemon Blueberry Cream Cake — a refreshing no-bake dessert with creamy layers and fruity brightness.
- Strawberry Lemon Blondies — another baked bar with a fruity twist, perfect for spring and summer treats.
- No Bake Greek Yogurt Jello Cheesecake — a creamy cheesecake option with a cool, gelatin set texture to contrast the dense brownie bars.
Recommended Equipment

Baking Frame Rectangular Adjustable Decorating
Perfect for shaping rectangular brownie bars
View on Amazon
Westmark 32732260 Non-Stick Round Baking Pan
Ideal for baking cheesecake and brownie layers
View on Amazon
* As an Amazon Associate, I earn from qualifying purchases. There is no extra cost to you.
Red Velvet Cheesecake Brownies
Ingredients
Equipment
Method
- Preheat oven to 350℉. Line an 8×8-inch baking pan with parchment paper leaving a couple inches of overhang for easy lifting. Use cooking spray to grease the sides not covered with paper. Set aside.
- RED VELVET BROWNIES: In a large bowl, stir together the melted butter, sugar, cocoa powder, salt, red food coloring, vanilla, and vinegar. Combine well.
- Stir in the eggs one at a time, incorporating well with each addition. Add the flour and stir until just combined. Set batter aside.
- CHEESECAKE: In another large bowl, beat together the cream cheese, sugar, and vanilla with an electric hand mixer. Add the egg and blend until smooth. Set aside.
- ASSEMBLING: Reserve 1/2 cup of red brownie batter for topping. Pour the remaining red velvet batter into the prepared pan.
- Pour the cheesecake batter evenly over the red velvet batter.
- Dollop the reserved 1/2 cup of red velvet brownie batter over the cream cheese layer. Use a butter knife or toothpick to swirl the cheesecake together with the dollops of red velvet batter. TIP: Don’t over-do the swirling. Less is more. It might be helpful to make “figure 8” swirls.
- BAKE at 350℉ for 30 minutes, or until a toothpick inserted into the center comes out with a few moist crumbs of brownie batter or thick baked cheesecake stuck to it. If it still looks wet, bake a few minutes more.
- Cool completely before lifting the parchment out of the pan to cut the brownies into squares.