There’s a certain magic in the kitchen when the smell of toasted graham and melty chocolate fills the air. S’mores Cookie Bars instantly take me back to long summer evenings by the campfire, but with the cozy pleasure of homemade baking. What I love about these bars is how they turn the classic fireside treat into something utterly fuss-free: no sticky fingers, no lost marshmallows. Just chewy, chocolatey goodness in every bite, with those dreamy toasted notes and gooey layers you crave. Whether you’re baking for a party or just craving a hit of nostalgia, s’mores cookie bars are pure comfort in a pan.
What Makes These S’mores Cookie Bars So Irresistible
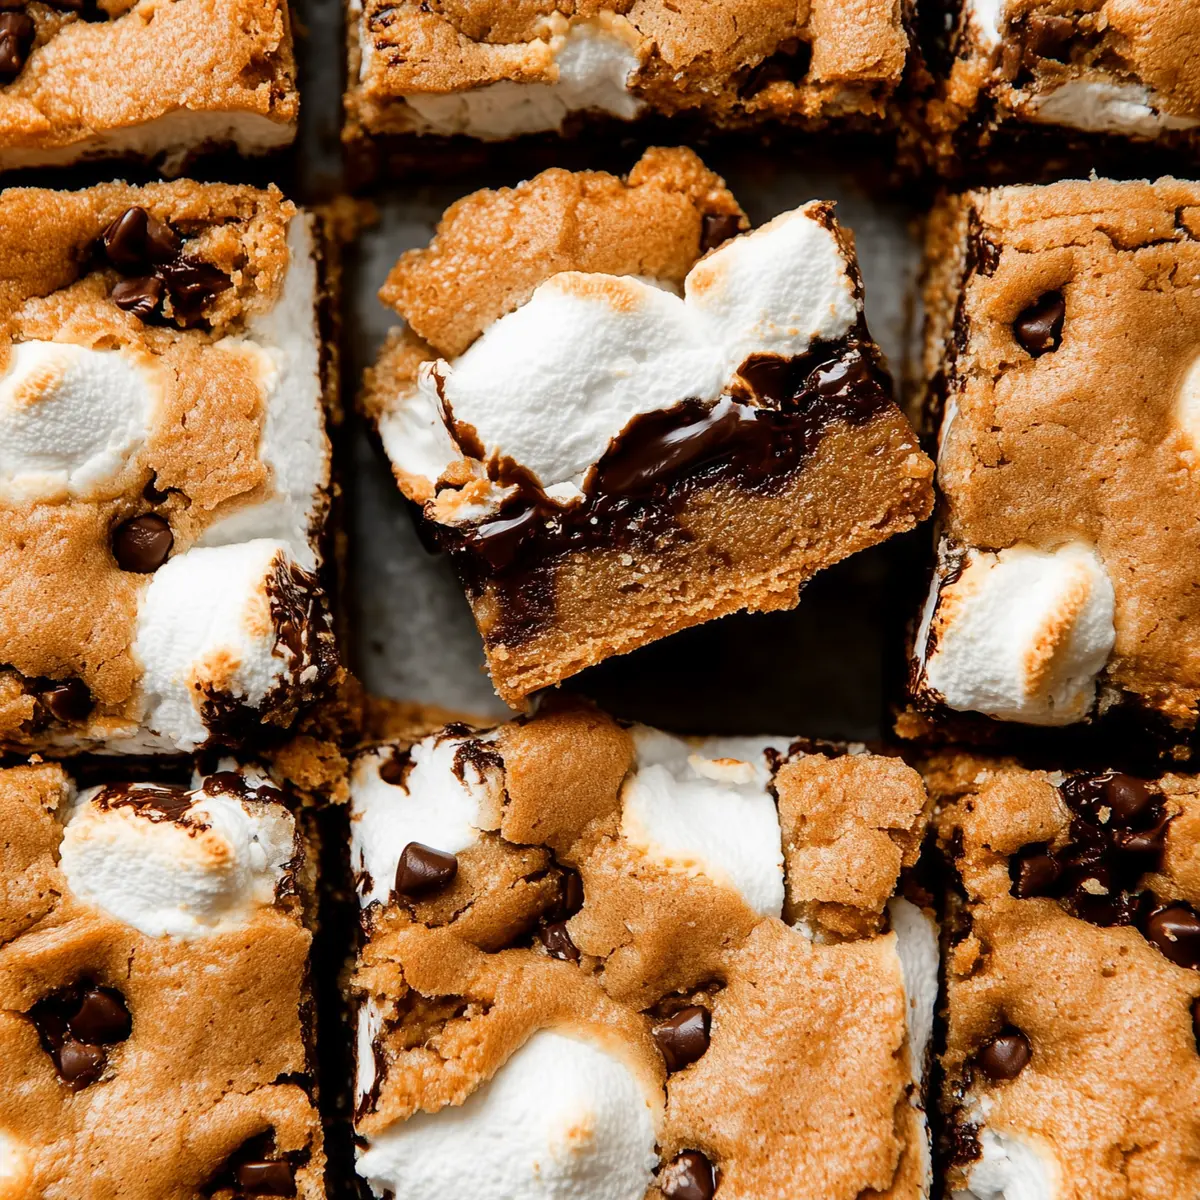
Biting into one of these s’mores cookie bars is the definition of indulgence—a little crisp at the edges, soft and chewy throughout, with pockets of melted chocolate and gooey marshmallow that stretches when you pull a piece apart. The graham cracker flavor isn’t just a background note, either. Mixed right into the dough, it brings a warm, almost nutty undertone that makes the bars taste just like a campfire s’more… only better.
What keeps me coming back, again and again, is how this recipe combines all the messy joy of s’mores with the neat convenience of a cookie bar. No sticky campfire hands, no worrying about half-melted chocolate falling into the fire. Each bar is its own little square of happiness, perfect for sharing—or not.
The Ingredients That Make These Cookie Bars Shine
Let’s break down what goes into these s’mores cookie bars and why each part matters:
- Butter – softens the dough for a chewy, tender bite and adds rich flavor that melds with the graham and brown sugar.
- Brown sugar – brings a caramel undertone and keeps the bars moist and flavorful.
- Egg – acts as a binder, helping everything hold together while adding subtle richness.
- Vanilla extract – rounds out the sweetness, giving each bar that home-baked aroma.
- All-purpose flour – gives the bars their structure and a soft crumb that’s sturdy, not cakey.
- Graham cracker crumbs – the signature flavor! They add a toasted, sweet crunch that mimics classic s’mores.
- Baking powder – a touch of lift creates bars that aren’t dense, but still satisfyingly chewy.
- Salt – a pinch wakes up all the other flavors and keeps things from getting too sweet.
- Semi-sweet chocolate chips – you get delicious pools of melted chocolate in every bite.
- Marshmallow creme – for the signature gooey, stretchy layer that defines this recipe. Store-bought or homemade both work beautifully.
See the recipe card below for the full list of ingredients and measurements.
Bringing These S’mores Cookie Bars Together in Your Kitchen
There’s something deeply satisfying about pressing sticky dough into a pan and knowing gooey, golden treats are just half an hour away. Here’s how these s’mores cookie bars come together, step by step:
- First, preheat your oven and line your baking pan with parchment. That little overhang will make lifting the cooled bars out a breeze—trust me, you’ll thank yourself later.
- Cream the butter and brown sugar until it’s pale, thick, and fluffy. Add your egg and vanilla, scraping down the bowl to catch any hidden patches.
- In another bowl, whisk together the flour, graham crumb, baking powder, and salt. Fold it into the wet mix until just combined—the dough will be thick and sticky, almost like Play-Doh but more fragrant and inviting.
- Press about two-thirds of the dough evenly across the bottom of your pan. It’ll be a thin layer, just enough to cradle that marshmallow goodness.
- Spoon the marshmallow creme on top and gently push it into the corners. Don’t worry if it’s a little rustic; a few sticky spots just add to the charm. Sprinkle chocolate chips generously over the marshmallow layer.
- Mold the remaining dough into flat pieces and puzzle them across the top. The layers don’t need to be perfect—let some chocolate and marshmallow peek through for that classic, gooey look.
- Bake until the top is golden and your kitchen smells like a summer evening. Let them cool completely before cutting (the hardest part!). Use the parchment to lift the slab from the pan, slice, and serve up the taste of s’mores, no campfire required.
Getting That Perfect Gooey Centre and Crispy Top
The heart of these s’mores cookie bars lies in the contrast between textures. You want the base soft but firm enough to hold, the marshmallow center thick and gooey, and the top golden brown with just a little crisp. The trick is not to overbake—even if the bars look a bit soft in the pan, they’ll set up as they cool.
If you want a dramatic marshmallow pull with every bite, don’t skimp on the marshmallow creme. Let the bars cool completely before cutting; otherwise, you risk a melting avalanche. For an extra hit of nostalgia, give the top a quick toast with a blowtorch right before serving—you’ll hear crackling sugar and taste toasted marshmallow in every mouthful.
Tips, Swaps, and Serving Ideas for S’mores Cookie Bars
Making s’mores cookie bars is quite forgiving—perfect for a last-minute dessert or to bake ahead for a gathering. Here’s what I’ve learned along the way:
- If you don’t have marshmallow creme, try your hand at homemade or substitute another fluffy spread, but avoid regular marshmallows; they melt too much and won’t create the same gooey layer.
- Love a more intense chocolate hit? Swap some chips for chopped chocolate bars or even chunkier pieces for those molten puddles.
- For individual treats, bake the dough in lined muffin tins for single-serve s’mores cups—great for parties and little hands.
- Store the bars tightly covered at room temperature. They keep their chewy texture for several days, making them just as dreamy on day three as fresh from the oven.
- Serve warm for maximum goo, or at room temp if you’re stacking and packing for a picnic. A scoop of ice cream on top turns one bar into a full-on dessert experience.
FAQs about S’mores Cookie Bars
Can s’mores cookie bars be frozen for later?
Yes, you can freeze s’mores cookie bars. Allow them to cool completely, slice, and wrap tightly in plastic or store in an airtight container. Thaw at room temperature before serving for that chewy, melty goodness.
What type of chocolate works best for s’mores cookie bars?
Semi-sweet chocolate chips work wonderfully, bringing rich chocolate flavor that balances the sweet marshmallow. You can also use chopped chocolate bars if you want bigger, gooier pockets of chocolate.
How long can I store s’mores cookie bars at room temperature?
These s’mores cookie bars stay fresh covered at room temperature for up to a week. For best texture, keep them well wrapped so they don’t dry out.
Are there any substitutes for marshmallow creme in s’mores cookie bars?
If you don’t have marshmallow creme, homemade marshmallow spread is your best substitute. Regular marshmallows don’t hold up in baking and won’t give you the same gooey layer.
Can I double the recipe for a larger crowd?
Absolutely! Just double the ingredients and bake in a larger pan, such as a 23×33 cm (9×13-inch) dish. The bars may need a few extra minutes in the oven—just look for a golden, set top.
After just one batch, you’ll understand why these s’mores cookie bars have become my go-to for nostalgic comfort baking. There’s nothing quite like sharing them—still slightly warm from the oven, marshmallow clinging to your fingers, chocolate melting into the chewy crumb. Grab a square or two, pour yourself something cold or hot, and let yourself be transported straight to fireside bliss—no sticks required.
More Delicious Recipes
- Andes Mint Chocolate Cupcakes: These cupcakes offer a delightful minty chocolate experience, perfect for dessert lovers.
- Mint Chocolate Chip Brownies: Indulge in these fudgy brownies that combine rich chocolate with refreshing mint flavor.
- St Paddy’s Mint Cheesecake Cups: These cheesecake cups are a fun, minty treat that’s great for sharing and celebrating.
S'mores Cookie Bars
Ingredients
Equipment
Method
- Preheat oven to 350°F (177°C). Line an 8-inch square baking pan or 9-inch square baking pan with parchment paper, leaving enough overhang on the sides to easily remove the bars when they have cooled. Set aside.
- In a large bowl using handheld or stand mixer fitted with a paddle attachment, cream the butter and brown sugar together on medium-high speed, about 3 minutes. (Here’s a helpful tutorial if you need guidance on how to cream butter and sugar.) Add the egg and vanilla extract and beat until combined. Scrape down the sides and up the bottom of the bowl as needed. Mixture may appear curdled and that’s ok.
- Whisk the flour, graham cracker crumbs, baking powder, and salt together in a medium bowl. Pour the flour mixture into the wet ingredients and then beat on medium speed until combined.
- Press/spread 2/3 of the graham cookie dough into prepared pan. (Doesn’t have to be exact, just eyeball it.) It will be a thin layer and the dough is sticky, so use your hands if needed. Spread the marshmallow creme evenly on top. This will be tricky since the marshmallow creme is sticky, but do the best you can to get an even layer. Layer chocolate chips evenly on top. Mold the remaining cookie dough into flat pieces and layer on top of the chocolate chips, as pictured and shown in the video above. You won’t have enough dough to make one single layer, so some chocolate chips/marshmallow will be exposed.
- Bake the bars for 25-30 minutes or until the top is lightly golden brown. Remove from the oven and place the pan on a wire rack. Cool bars completely.
- Lift the bars out using the parchment paper overhang on the sides. Cut into squares.
- Cover and store leftover bars at room temperature for up to 1 week.