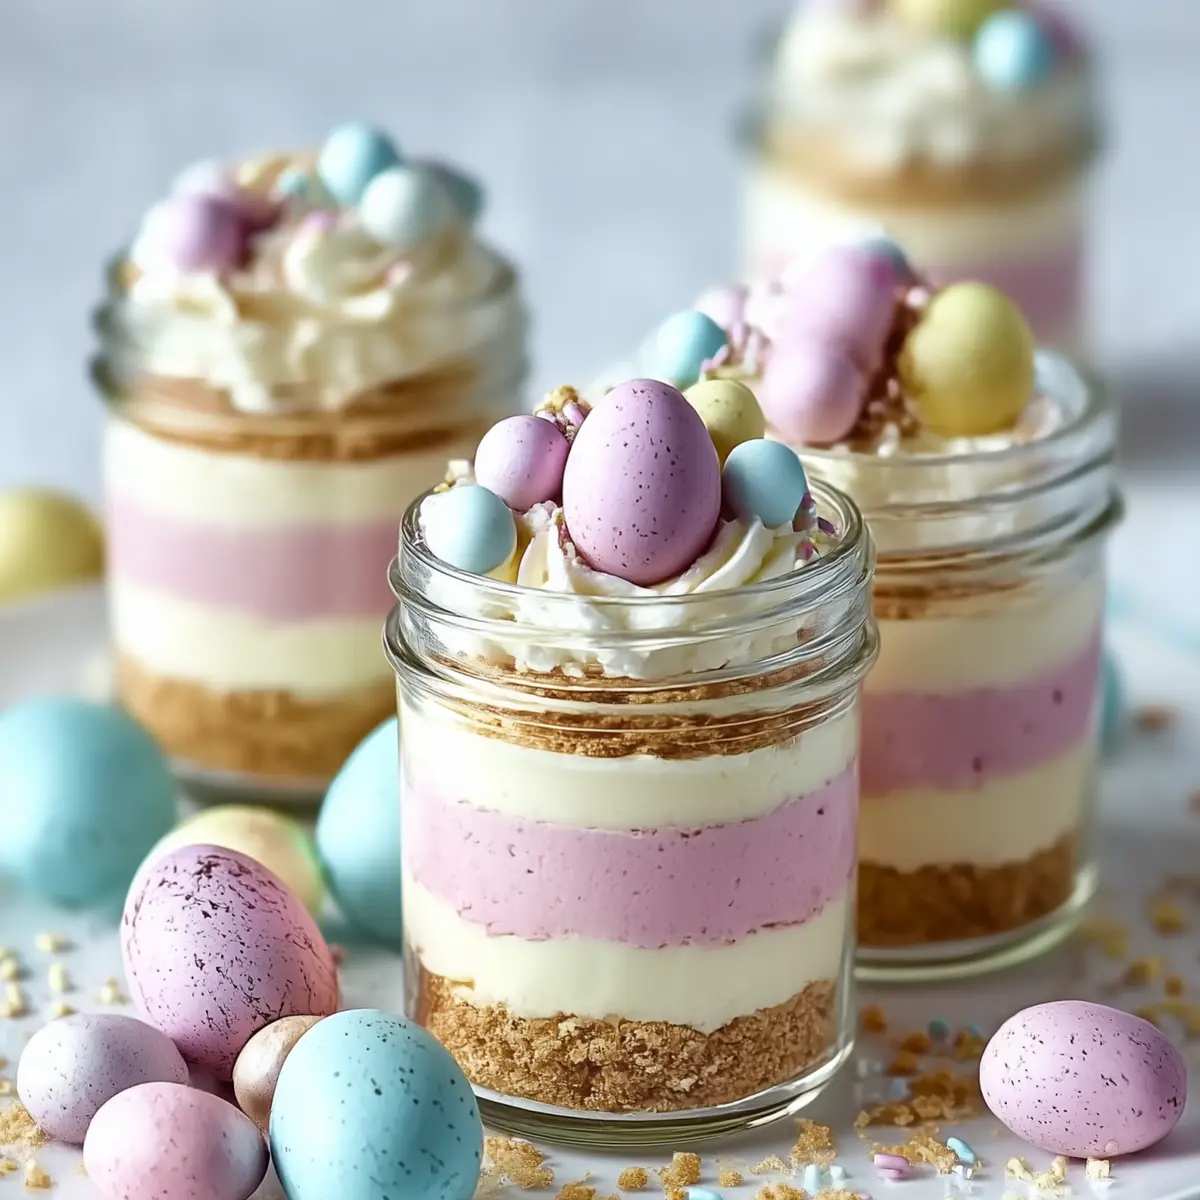
The second my kitchen fills with the scent of buttery crumbs and sweet vanilla, I know it’s time for another round of Easter Egg Cheesecake Jars. This isn’t just a pastel dessert for the holiday table—these little jars are straight-up feel-good magic no matter your age. You’ve got every layer: buttery crunch, tangy pillowy cheesecake, clouds of whipped cream, and the absolute best part—those cute candy eggs and a shower of sparkly sprinkles.
If putting together a show-stopping, easy treat sounds impossible during the rush of spring parties or brunches, these jars have your back. You get bakery-level looks for zero oven drama and not even the hint of a water bath. Just creamy, colorful, no-bake goodness that’s customizable for every mood or mouth.
Why Everyone Loves These Easter Egg Cheesecake Jars
If quick wins in the dessert department are your thing, these Easter Egg Cheesecake Jars are your new favorite shortcut. There’s no need to fuss with springform pans or worry about cracks or sinking centers. You just layer creamy cheesecake filling over a sweet, crumbly base and finish with the kind of toppings that make everyone smile.
They’re wildly adaptable. Make them as bright or as muted as you like. Toss in sprinkles, choose your favorite candy eggs, or experiment with different colors and flavors. Kids love to help build their own jars, and grown-ups love that the results look fancy enough for Easter lunch but take zero baking expertise.
Planning a brunch, egg hunt, or any spring gathering? These little jars are perfectly portable—pop on a lid and go. Even better, you can prep them ahead so dessert is totally stress-free.
Inside the Jar: The Easter Egg Cheesecake Jars Ingredient Breakdown
- graham cracker crumbs: bring that classic, slightly nutty crunch and form the base of each jar.
- Granulated sugar: adds sweetness and helps bind the crumb layer together.
- Unsalted butter: melts into the crumbs, making everything rich and golden.
- Cream cheese: creamy and tangy, the heart of the no-bake cheesecake filling.
- Powdered sugar: sweetens the filling while dissolving completely for ultra smoothness.
- Vanilla extract: delivers cozy depth and warmth in every spoonful.
- Heavy cream: whipped to soft peaks for an ultra fluffy, light-as-air texture.
- Pink gel food coloring or freeze-dried strawberry powder: optional, but brings gentle color or a subtle fruity note.
- Whipped cream: airy topping that’s impossible to resist.
- Pastel candy eggs: the signature Easter touch—crunchy, sweet, and oh-so-cute.
- Rainbow or pastel sprinkles: for that extra festive sparkle.
See the recipe card below for the full list of ingredients and measurements.
Bright Swaps & Little Twists for Easter Egg Cheesecake Jars
No graham crackers handy? Any crunchy cookie works—think digestive biscuits, vanilla wafers, or even chocolate cookies for a fun spin on your mini cheesecake. Want a gluten-free option? Try ground gluten-free cookies.
To lighten things up or add more flavor, swap some cream cheese for Greek yogurt or mascarpone. Whipping cream alternatives like coconut cream work for dairy-free needs. For color, any gel food coloring does the trick, or try matcha or blueberry powder for a gentle hue. Candy eggs can mean anything from milk chocolate to dark, or go nuts with caramel eggs. No rules—just joy.
How to Layer Easter Egg Cheesecake Jars Like a Pro
- Blend your crumbs, sugar, and melted butter in a bowl until the mix holds together like wet sand. It should smell toasty-sweet and look irresistible already.
- Spoon the crumb mixture into mini jars, pressing lightly to form an even base. Aim for a firm but not rock-solid layer—that little bit of crumble is what makes it special.
- Whip the cream cheese in a mixing bowl until it’s silky smooth. Add in powdered sugar and a pour of vanilla, then let the mixer run until everything’s fluffy and soft and smells like a dessert bakery.
- Gently fold whipped cream into your cheesecake mix in two batches, keeping it light so you get a delicate, mousse-like filling.
- Separate the filling into two bowls. Tint one with pink gel food coloring or a scoop of strawberry powder—go just until it’s your dream shade of spring.
- Spoon or pipe the pink layer over your crust, then top with the white cheesecake. Don’t sweat perfect layers—if they swirl together it looks even more festive!
- Dollop or pipe whipped cream on top. The more swoopy or ruffled, the better the drama.
- Scatter candy eggs and sprinkles over each jar. Chill the finished jars in the fridge until it’s party time. They’ll set up beautifully and look even more enticing when served nice and cold.
Cheesecake Jar Secrets: Tips & Tricks
If you want ultra-smooth no-bake cheesecake, make sure your cream cheese is truly at room temp—it makes whisking a breeze and avoids any annoying lumps. Crushing the cookies really fine for the crust creates a dreamy, cohesive base (I love using a food processor, but a rolling pin works fine too). For showstopper layers, use a piping bag for the cheesecake filling—it’s not essential, but it gives you that bakery finish with barely any effort.
Party coming up? Assemble the jars the night before and chill them well—just wait to add candy eggs so they stay crisp and cute. Don’t stress if your layers aren’t perfectly even; a little swirl or tilt gives homemade charm. These jars are super forgiving, so even if things look rustic they’ll still taste incredible.
Any leftovers hold up for a couple days in the fridge—just cover them tightly. If you’re short on fridge space, use shallow containers and layer the same way for a less formal but equally tasty dessert.
Serving Ideas and Flavor Variations
These adorable Easter Egg Cheesecake Jars are just begging to be part of your spring brunch spread. They vibe perfectly with fresh berry salads, hot cross buns, or citrus tarts. Layer up different colored cheesecake layers for a rainbow effect, or go vibrant with blueberry or matcha-infused versions.
Chocolate lovers can swap in a cocoa crust and chocolate eggs up top. For a tangier twist, fold a spoonful of lemon or orange zest into the cheesecake layer and top with candied citrus. Feeling grown-up? Try a splash of almond extract or toss on toasted coconut.
Make-ahead magic: these jars are fridge-friendly for up to two days, making them a stress-free finish to any party. Want to prep even further? You can freeze the jars (minus candy and whipped topping) and thaw overnight for surprise dessert cravings.
FAQs about Easter Egg Cheesecake Jars
Can I make Easter Egg Cheesecake Jars ahead of time?
Yes, you can assemble Easter Egg Cheesecake Jars a day or two in advance and chill them until serving. Just add the candy eggs and whipped topping just before you’re ready to eat, so everything stays crisp and picture-perfect.
Is there a way to make these cheesecake jars gluten-free?
Absolutely! Use your favorite gluten-free cookies or graham-style crackers for the crust, and double-check that your candy decorations are also gluten-free. The creamy cheesecake filling is naturally gluten-free, so it’s just a simple swap for anyone watching wheat.
How do I get bright, pretty layers in my jars?
To make bold colors, use gel food coloring or powdered freeze-dried fruit for extra vibrancy and flavor. Piping the fillings with a bag gives you neater, more distinct layers, but even spooning will look good—perfection isn’t the goal here.
Can I freeze Easter Egg Cheesecake Jars?
Yes, you can freeze the assembled jars before adding toppings. Thaw overnight in the fridge, then decorate with whipped cream and candy eggs right before serving. This makes them a handy make-ahead treat for busy holidays or surprise guests.
Final Thoughts on Easter Egg Cheesecake Jars
These Easter Egg Cheesecake Jars are a playful way to bring celebration—and a little bit of magic—right to your table. They’re easy, crowd-pleasing, and so adaptable, you’ll find yourself reaching for this recipe long after the Easter baskets are packed away.
Next time you need a no-bake treat that looks like you fussed (but you absolutely didn’t), grab your jars and get layering. You might just discover that the best kind of kitchen joy comes in pastel-topped, spoon-able bites.
More Delicious Recipes
- Easter Egg Fruit Pizza: This colorful treat combines fruity flavors and a festive touch, perfect for spring celebrations.
- Loaded Leprechaun Popcorn: A fun and crunchy snack that adds a playful twist to any party, ideal for celebrating the season.
- St. Paddy’s Mint Cheesecake Cups: These vibrant mint-flavored cheesecake cups are an exciting twist that pairs well with festive occasions.
Easter Egg Cheesecake Jars
Ingredients
Method
- In a bowl, combine graham cracker crumbs, sugar, and melted butter. Stir until it resembles wet sand.
- Spoon the crumb mixture into mini jars and press gently to form the crust base.
- In a mixing bowl, beat the cream cheese until smooth. Add powdered sugar and vanilla and beat again until fluffy.
- Fold whipped cream into the cream cheese mixture in two batches until fully combined.
- Divide mixture into two bowls. Tint one with pink food coloring or strawberry powder for a fruity layer.
- Spoon or pipe the pink layer over the crust. Follow with the white layer on top.
- Add a swirl of whipped cream on each jar.
- Decorate with candy eggs and sprinkles. Chill until ready to serve!