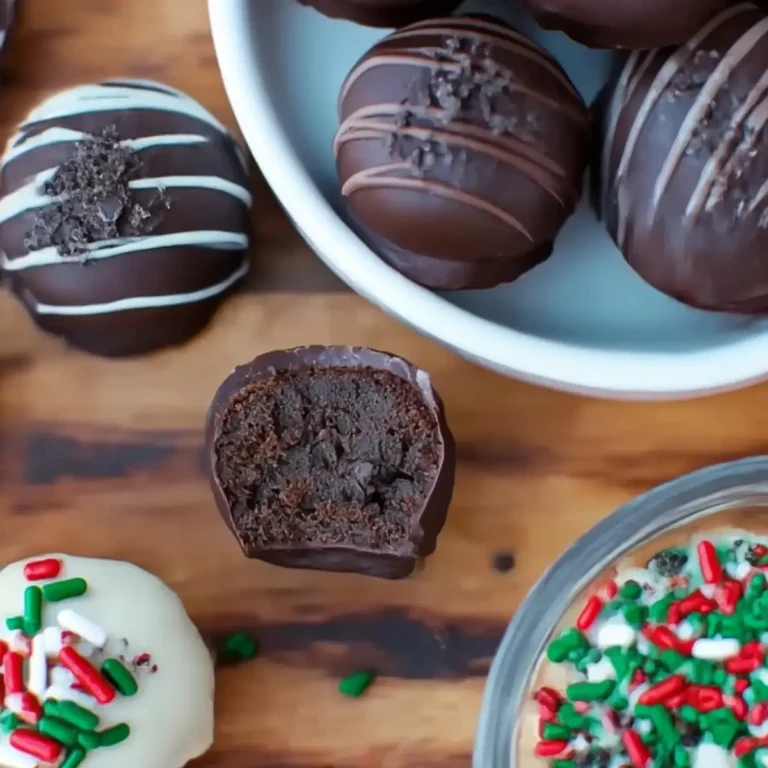
If you’re looking for a show-stopping treat for your Easter celebration, these Easter Egg Oreo Cookie Balls just might be the most delightful (and easiest) sweets you’ll ever whip up. You get all the joy of classic Oreo truffles—velvety, cookies-and-cream centers and a smooth candy shell—shaped and decorated to look like cheery Easter eggs. They’re no-bake, ridiculously simple for kids or adults, and totally customizable for your favorite color combos.
Once you’ve made these Easter Egg Oreo Cookie Balls, it’s hard not to feel like a kitchen artist. There’s something so fun about swirling pastel shades and drizzling playful stripes onto each egg. They’re the kind of sweet treat that instantly brightens a table and gets everyone talking—and sneaking back for seconds.
Why these Easter Egg Oreo Cookie Balls are the ultimate Easter treat
There’s nothing quite like the combination of creamy, crunchy, and chocolatey goodness you get when you bite into an Oreo cookie ball, and here, the Easter egg twist doubles the fun. These no-bake treats are perfect for kids’ hands or any group activity, making them a go-to for Easter parties, school celebrations, or family baking projects. Plus, the decorating process is your excuse to unleash creativity—think stripes, polka dots, and vibrant pastel swirls for a true Easter vibe.
What I love most about these is the texture contrast: tender cookie truffle inside, crisp candy shell outside. Plus, they’re just so cute on a holiday tray. On our last spring bake, my kitchen smelled like sweet vanilla and melted chocolate—definitely the scent of festivities in the air.
Essentials for making perfect Oreo cookie balls
To pull off Easter Egg Oreo Cookie Balls with ease, you’ll want a few simple kitchen tools on hand:
- Food processor or blender – To quickly blitz Golden Oreos into fine, even crumbs for the perfect truffle texture.
- Mixing bowl – For combining the Oreo crumbs and cream cheese. Go with a medium-sized bowl for easy mixing.
- Parchment paper – Keeps the dipped cookie balls from sticking as they set and makes clean-up a breeze.
- Microwave-safe bowls – For melting the white candy coating and any colored coatings for drizzle decoration.
- Toothpicks – For dipping and helping to neatly transfer the eggs in and out of the melted coating—plus covering the little “dipping hole” after.
- Spoon or piping bag – For drizzling the colorful melted candy on top, creating your festive egg designs.
- Fridge or cool place – To chill and set the eggs, keeping their shape and ensuring a crisp coating.
These are all you’ll need—no oven required, just simple tools and your hands.
The essential ingredients behind cookie ball magic
- Golden Oreos, crushed into crumbs – The heart of the truffle, offering sweet vanilla flavor and a soft, cookies-and-cream center.
- cream cheese, room temperature – Binds everything together and brings rich, creamy tanginess to the mix.
- White candy coating – Melts to form the smooth candy shell and serves as a base for all your festive colors.
- Additional white candy coating (per color, for decorating) – Use this to melt and tint with gel colors for your pretty Easter egg patterns.
- Gel icing colors – Your path to vibrant pastel swirls, dots, and lines; shape any fun look you imagine.
See the recipe card below for the full list of ingredients and measurements.
How to shape, dip, and decorate Easter Egg Oreo Cookie Balls
- Blitz the cookies: Add Golden Oreo cookies to your food processor or blender and pulse until you get a fine, sandy crumb that smells of sweet vanilla. You want absolutely no big pieces left for the creamiest truffle texture.
- Mix into a dough: In your mixing bowl, combine the crushed cookies with the softened cream cheese. Use a spoon or your hands, kneading until the mixture is uniform, glossy, and easily forms soft balls. The result should feel like thick cookie dough—sticky but firm.
- Shape into eggs: Scoop about 1.5 tablespoons of the mixture and roll into a ball, then gently press and taper the ends to form a classic egg shape. They should look plump and smooth, easily holding their shape without cracks.
- Chill for firmness: Set the shaped eggs on a parchment-lined tray and refrigerate for about 1 hour. This step firms them up so they don’t fall apart when dipping.
- Dip in melted candy coating: Once chilled, melt your white candy coating until smooth and fluid. Dip each egg by piercing the bottom gently with a toothpick, swirling it in the melted coating, and allowing any excess to drip off. Place dipped eggs back on parchment. While the candy sets, twist out the toothpick and dab a little extra melted coating to fill in the hole.
- Decorate with colors: Allow the shell to set and dry fully, then melt a small amount of white candy coating for each color you want to use. Stir in gel icing colors until you get vibrant pastels or brights, then pipe or drizzle over the eggs with a spoon or piping bag. Experiment with stripes, splatters, and polka dots—every egg is a blank canvas.
- Chill and enjoy: Once the decoration is firm, your Easter Egg Oreo Cookie Balls are ready to serve! Store them in the fridge so they keep their shape and texture firm and creamy.
All my favorite tips and how to avoid cookie ball mishaps
Keep these handy tips in mind for your best cookie balls yet:
- Don’t skip the chill: Warm truffle dough won’t hold its shape and could break apart in the melted coating. At least one hour of fridge time gives you firm, easy-to-dip eggs.
- Melt coating gently: Candy coating can seize or burn if overheated. Short microwave bursts (stirring between each) keep it smooth and silky. If it seems thick, stir well—it’ll often loosen up as it warms.
- Trouble dipping? If the coating drips unevenly or looks thick, your candy may be too cold or over-melted. Give it a quick stir or a few seconds more heat for perfect dipping consistency.
- Don’t rush decoration: Wait until the dipped shell is fully set before you drizzle or pipe colored coating—otherwise, colors may smudge or run.
- Storage matters: These stay freshest and tastiest in the fridge. A sealed container helps keep out fridge flavors and locks in that creamy center.
- Troubleshooting cracks and texture: If you see cracks or the coating separates, try letting the dipped eggs come to room temp for a few minutes before decorating. Using room temperature cream cheese also helps prevent lumps.
Festive pairing ideas and brilliant Easter cookie ball variations
Serve your Easter Egg Oreo Cookie Balls with other spring classics for the full celebration spread, or dress them up to suit any style:
- Pairing ideas: These are perfect on a dessert platter alongside carrot cake, lemon bars, fresh berries, or pastel-frosted cupcakes. Add a pitcher of iced tea or a festive punch for bright holiday color!
- Decorating variations: Go for classic pastels, or make “speckled eggs” with tiny chocolate sprinkles. You can even use dark chocolate to drizzle stripes for a bold look, or mini candies for added crunch.
- Flavor twists: Try swapping in chocolate sandwich cookies for the Oreos—or mix your favorite cookie crumbs for new flavors. Experiment with flavored extracts like almond or lemon in the dough for a new spin.
- Kid-friendly approach: Let little hands drizzle colors, or set out small bowls of edible decorations for sprinkling.
- Make-ahead: Shape and dip the eggs ahead of time, then decorate the morning of your celebration for maximum freshness and fun.
FAQs about Easter Egg Oreo Cookie Balls
How long do Easter Egg Oreo Cookie Balls keep in the fridge?
They’ll stay creamy and delicious for up to one week when stored in a covered container in the fridge. The candy coating keeps them fresh, and the centers remain soft and flavorful even after several days.
Can I use another type of cream cheese or dairy-free alternative in Easter Egg Oreo Cookie Balls?
Classic full-fat cream cheese gives the best creamy texture, but you can try a dairy-free substitute if needed. Just be sure it’s thick and not whipped or spreadable, as soft alternatives can make the mixture too sticky to hold its shape.
Are Easter Egg Oreo Cookie Balls freezable or good to make ahead?
Yes! You can freeze Easter Egg Oreo Cookie Balls before decorating (after dipping), then thaw and finish your colorful designs later. Make sure to let them defrost in the fridge before decorating for best results.
Celebrate Easter with creamy cookie ball delight
Nothing brightens up an Easter table or treat box quite like these Easter Egg Oreo Cookie Balls. Their crisp candy shell cracks to reveal a sweet, silky cookie center—perfect for nibbling with a cup of tea or sharing in a sunny backyard. I always find the decorating part brings out a little laughter and friendly competition, but no matter how they look, they’re always delicious. Celebrate with a colorful batch and watch everyone reach for just one more.
More Delicious Recipes
- Easter Egg Fruit Pizza: This colorful fruit pizza is a perfect festive dessert to complement the vibrant Oreo cookie balls.
- St. Paddy’s Mint Cheesecake Cups: These creamy mint cheesecake cups offer a delightful contrast in flavors, making them a delicious addition to your Easter celebrations.
- Loaded Leprechaun Popcorn: This fun and festive popcorn is not only a great snack but also fits the theme of creativity and sweetness for your Easter festivities.

Easter Egg Oreo Cookie Balls
Ingredients
Equipment
Method
- Add the Golden Oreo cookies to a food processor or blender and crush into crumbs.
- Mix the cream cheese and cookie crumbs together in a bowl until well combined. You should easily be able to form balls.
- Form Easter eggs from the cookie mixture using about 1 1/2 tablespoons per egg.
- Put the eggs in the fridge for about 1 hour to firm up a bit.
- When the Oreo eggs have been chilled, melt the 10 ounces of white candy coating and dip the chilled eggs into the melted candy coating. Set on parchment paper to dry. I use a toothpick for dipping and put the toothpick into the bottom of the egg when I dip them. Lightly shake off excess candy coating, then set the egg on the parchment paper and gently twist the toothpick while pulling it out. Use a little dab of candy coating to fill in the hole where the toothpick was.
- Once dry, add the decorations. Use about 1 ounce of each color you’re using so that you have enough to melt and work with. I used 5 colors, but feel free to use as many or as few as you like. If you’re only using one color, you probably want to use at least 3-4 ounces of white candy coating. Melt your white candy coating, one color at a time, then add gel icing color until you have the color you want. Pipe or drizzle the colors over the Oreo eggs.
- Store Oreo eggs in the fridge. They should be good for about 1 week.