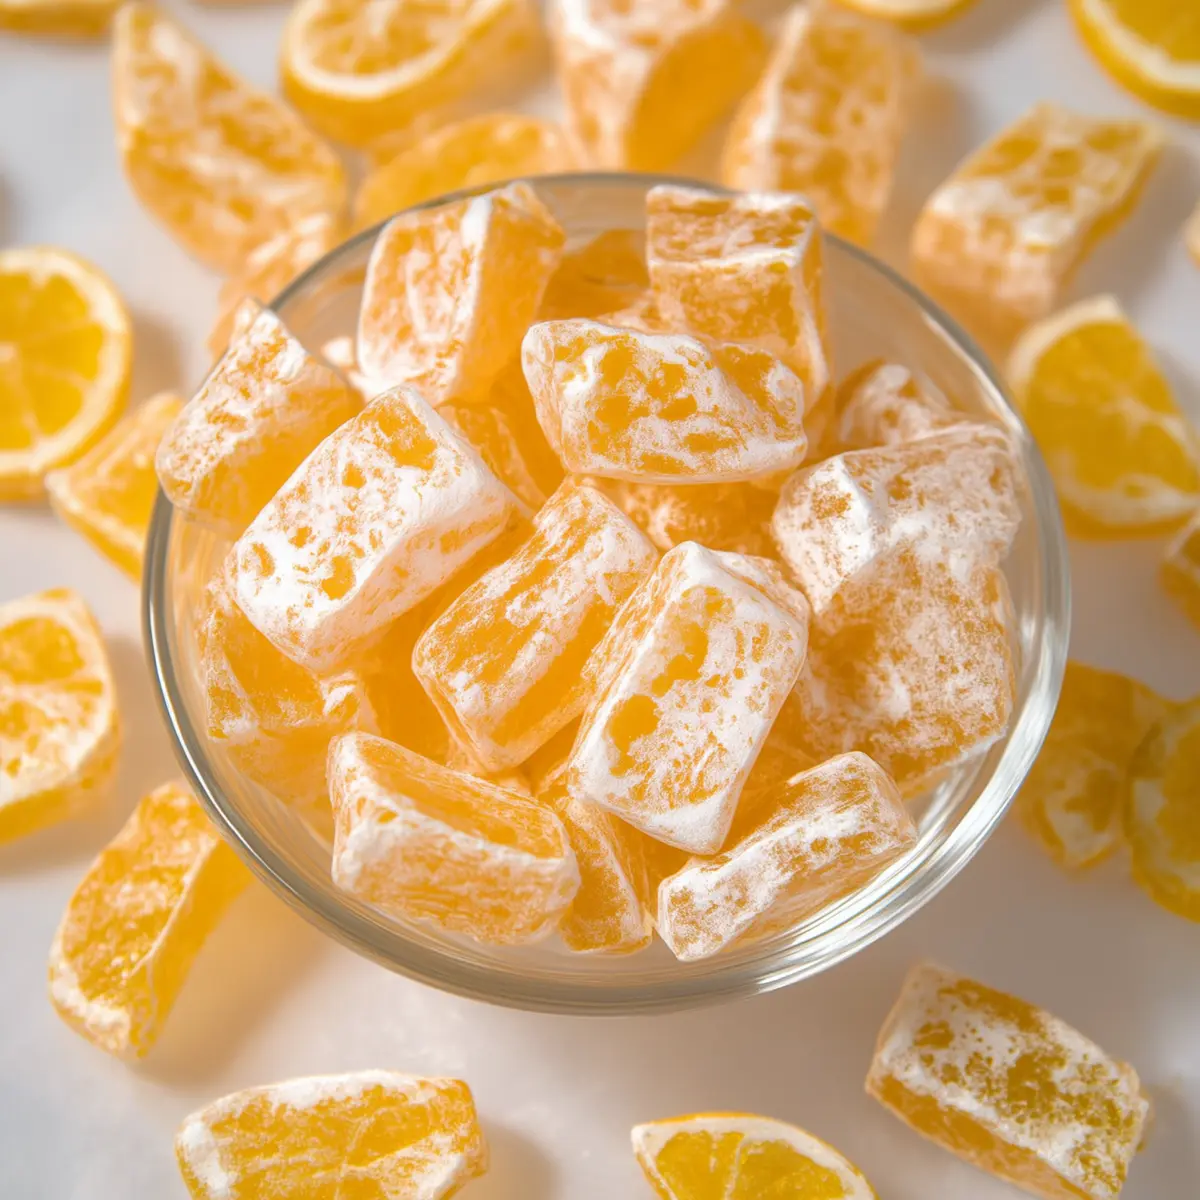
If you’ve ever wandered into an old-fashioned sweet shop and felt that irresistible tug toward the bright yellow rows of lemon drops, you’re in good company. Lemon Drops Hard Candy brings back that sweet nostalgia — right down to the cheek-puckering tang and glassy, sunlit shine. But making them yourself is a whole different experience: a little steamy, a bit sticky, and totally satisfying as you see those golden drops take shape on your counter. If you’ve been hunting for a homemade recipe that delivers zingy citrus flavor and a proper hard candy crunch, you’re in the right place.
What Makes Homemade Lemon Drops Hard Candy Special
The first thing you’ll notice when making Lemon Drops Hard Candy is that intoxicating perfume of zesty lemon as the syrup bubbles away. Unlike the mass-produced candies, homemade lemon drops explode with pure citrus oil and a subtle tartness you can control. There’s a little craftsman’s pride in pulling the molten sugar into glossy ropes and snipping it into cheerful yellow jewels.
They’re a perfect treat for gifts — fill up small jars, tie a ribbon around them, and you’ve got a nostalgic, handmade surprise. But there’s also something meditative about the process: watching the clear syrup deepen to a sunny gold, feeling the gentle give as you pull soft sugar into shape, and tossing those finished pieces in a powdery snow of confectioner’s sugar. These lemony candies won’t just hit the nostalgia button; they’ll brighten up your afternoon like a burst of early spring.
Ingredients for Lemon Drops Hard Candy—A Closer Look
Here’s what gives Lemon Drops Hard Candy their charm and punchy flavor:
- sugar – The backbone of all hard candy. It melts and resets to create that classic glassy crunch.
- Water – Keeps the sugar from burning, giving you time to dissolve and cook the syrup up to the precise candy stage.
- Natural lemon oil – Delivers a powerful, true-lemon flavor. You’ll want the real, food-grade oil here — not extract — for that “just-zested” brightness.
- Cream of tartar – A tiny bit helps prevent the sugar from crystallizing, so you get a perfectly smooth finish instead of gritty bits.
- Yellow gel food coloring – Totally optional, but a drop or two makes that sunny, classic lemon drop color pop.
- Citric acid (optional) – The secret weapon for a tart, puckery finish. Skip it for a sweeter drop, or add it for that tangy punch.
- Confectioner’s sugar – Creates a soft “dust jacket” that keeps those candies from sticking together once they cool.
- Vegetable oil or nonstick spray – For slicking your kitchen scissors. It’s a lifesaver when snipping candy—no gummy residue left behind.
See the recipe card below for the full list of ingredients and measurements.
Making Lemon Drops Hard Candy Step by Step
Making Lemon Drops Hard Candy is a bit of a kitchen adventure—think fudge-making meets stained glass. Here’s how the process unfolds:
- Prepare your workspace by laying down a silicone baking mat on the counter. Give your kitchen shears a quick spray or swipe of vegetable oil or nonstick spray so they’re ready for sticky business. Set a bowl of confectioner’s sugar close by.
- In a medium saucepan, combine the sugar, water, and a pinch of cream of tartar. Set it over medium heat, stirring gently until the sugar dissolves away completely and the mixture goes from grainy to crystal clear.
- Once the syrup looks smooth, stop stirring—resist the urge! Clip in a candy thermometer or keep a digital one handy. As the syrup bubbles, occasionally brush the pan’s edges with a water-dipped pastry brush to head off any rogue sugar crystals.
- Let the sugar syrup cook up to the hard crack stage. You’ll notice the bubbles get smaller and the syrup loses its milky look, turning clear and thick. When your thermometer confirms you’ve reached the right temp, pull the pan off the heat.
- Quickly stir in the lemon oil, a drop or two of gel food coloring, and citric acid if you’re using it. The aroma at this stage is an instant mood-lifter — almost like peeling a fresh lemon at the stove.
- Carefully pour the hot syrup onto your waiting silicone mat. For safety, pull on a pair of cotton gloves, topped by rubber gloves. That sugar will be HOT, but you’ll want to shape it before it cools too much.
- Wait just a moment as the molten syrup firms up. Start folding the mat back and forth to help it cool and get a feel for its texture. The sugar will go from runny to plasticky and wonderfully malleable.
- When the syrup holds its shape (still pliable, but no longer gooey), grab the mass with your gloved hands. Fold it over itself several times. You’ll notice white streaks develop — that’s your sign it’s just right for shaping.
- Pull off a section and gently stretch it into a thick rope. Snip off small bitesized pieces with your oiled shears. Only work with short segments at a time to keep the sugar soft and easy to handle.
- Drop the warm pieces into confectioner’s sugar and toss them to coat. This stops the candies from sticking to each other while they finish cooling and setting up.
- Once cool and set, transfer your lemon drops to an airtight container. Store at room temp, out of direct sunlight—if you can resist eating them all in one afternoon!
Tricks to Mastering Lemon Drops Hard Candy
The candy process seems simple on paper, but Lemon Drops Hard Candy comes with a few quirks that can trip you up if you haven’t made hard candy before:
Always let the sugar fully dissolve before turning up the heat—any leftover crystals will make the finished candy gritty instead of glassy-smooth. When cooking the syrup, patience is everything. Rushing the process or cranking your burner will lead to scorched flavor or sticky drops that never harden properly.
Be generous with the oil or nonstick spray on your scissors—candy has a sneaky way of gumming things up right at the finish line. And don’t try to shape the whole mass at once; candy that cools too quickly can shatter when you cut it, while candy still too warm won’t hold its shape. Pulling smaller sections is a game changer.
For tart lovers, make sure your citric acid is blended in thoroughly—it sometimes clumps at the end. And if you find your candies are a bit sticky after storing, a quick extra roll in confectioner’s sugar will save the day. Lemon Drops Hard Candy is shelf-stable, but humidity is its enemy, so keep the lid tight and stash in a cool, dry place.
Lemon Drops Variations and Ways to Serve
Classic Lemon Drops Hard Candy are a treat on their own, but there’s room for creativity if you want to change things up. Want more color? Try swirling in a drop of blue gel food coloring for a greeny-lemon twist, or use orange coloring and swap lemon oil for orange oil for citrus variety packs.
For a bold, mouth-puckering hit, dust your finished candies with extra citric acid (just be sure everyone at the table loves a challenge!). If you’re avoiding citric acid, opt for lemon oil alone and ramp up the flavor for a sweeter, less tangy bite. Some folks like to roll freshly-sliced candies into small balls for an extra old-school look before coating them with confectioner’s sugar.
Lemon Drops make delightful party favors and are perfect in treat bags, lunchboxes, or as a little sparkly garnish beside a cup of black tea. You can also melt a few candies into hot water for a quick, lemony tea, or tuck Lemon Drops into homemade cocktails for a fun sugar rim.
These candies are quite shelf-stable, so you can make a double batch ahead of time and store them for weeks — just keep moisture out. Around the holidays, add a tiny splash of edible glitter for a festive shimmer or package them in tiny jars for cheerful DIY gifts.
FAQs about Lemon Drops Hard Candy
How long can I store Lemon Drops Hard Candy, and what’s the best way to keep them fresh?
Store your Lemon Drops Hard Candy in an airtight container at room temperature, making sure they’re kept away from humid spots and direct sunlight. They stay crisp and tasty for several weeks, as long as you give them a fresh toss in confectioner’s sugar if they get a little sticky.
Can I make Lemon Drops Hard Candy without citric acid?
Absolutely. Citric acid ramps up the tart, “puckery” flavor, but you can leave it out if you want a sweeter, milder lemon drop. Just rely on plenty of natural lemon oil to give that true citrus zing.
Is it possible to freeze Lemon Drops Hard Candy for longer storage?
Freezing hard candy isn’t recommended—moisture can sneak in and turn them sticky as they thaw. As long as you keep them tightly sealed and dry, they’ll keep beautifully at room temp for weeks.
My Lemon Drops Hard Candy didn’t harden up—what went wrong?
The most common culprit is not bringing the sugar syrup up to the right hard crack temperature. If the candy stays soft, try cooking the syrup a little longer next time, and ensure your thermometer is working and placed correctly in the mixture. Always pour and shape the candy quickly, since cooling too slowly can also affect the final texture.
Making your own Lemon Drops Hard Candy is as much about the experience as it is the flavor — a perfect mix of tangy, sweet, and hands-on creativity. From the burst of lemony aroma in your kitchen to the satisfying snap as you bite in, there’s a cozy thrill in every stage. Pour yourself a mug of tea, pop a candy on your tongue, and let that sunny citrus warmth brighten your day—whether you’re sharing a jarful with friends or sneaking the last candy for yourself.
More Delicious Recipes
- Lemon Truffles: These delightful truffles use lemon for a burst of citrus flavor, perfect for fans of lemony sweets.
- Meyer Lemon Mini Muffins: If you love lemon, these fluffy muffins are a delicious way to enjoy that citrus zing for breakfast or a snack.
- Blueberry Lemon Poppy Seed Sourdough Muffins: These muffins combine blueberries and lemon for a sweet and tangy treat that pairs well with your lemon drops.
Lemon Drops Hard Candy
Ingredients
Equipment
Method
- Cover countertop or work surface with a silicone baking mat.
- Spray kitchen shears with vegetable oil or nonstick cooking spray.
- Place the confectioners sugar in a small bowl. Set aside.
- In a medium saucepan, combine granulated sugar, water, and cream of tartar. Cook over medium heat, stirring occasionally until the sugar dissolves.
- Once sugar has dissolved, stop stirring* and add a candy thermometer to monitor the temperature (or keep a hand-held digital thermometer nearby!)
- Continue cooking the sugar mixture until it reaches 300° F / 149° C on a candy thermometer, periodically brushing down the sides of the pan with a wet pastry brush to prevent crystallization. Cooking the sugar will take about 15 minutes, so be patient!
- Remove saucepan from heat. Stir in lemon oil, yellow food coloring, and citric acid if using.
- Pour hot sugar mixture onto prepared silicone mat. Put on your cotton gloves, then add a pair of rubber gloves over top.
- Allow the sugar syrup to rest on the mat, periodically folding the mat over itself. As you do this, you’ll start to see the sugar sticking to itself and forming a mass, rather than immediately running back into a puddle.
- You’ll know the sugar is ready to pull when it comes together into a ball, and does not lose its shape. It will still be hot and easily pliable, but no longer 'gooey' or runny.
- With gloved hands, fold the sugar over itself several times (it will start to feel thicker and slightly less pliable, and you’ll see fine white streaks in the sugar). Do this 4-5 times, then pull it into a short, thick tube.
- With your hands, pull a section of the tube into a long rope, about 1/2-inch in diameter. Use kitchen shears to cut the rope into 3/4-inch pieces.
- Note: Work in small sections rather than pulling all of the sugar at once. Otherwise, the sugar will cool and become difficult to cut (or might even shatter when you try to cut it!) Pull the ropes in 12-inch increments, and keep the remaining sugar in a large mass/tube until ready to pull.
- Add the lemon drop candy pieces to the bowl confectioner's sugar, and toss to coat.
- Store lemon drop candy in an airtight container at room temperature for up to six weeks.