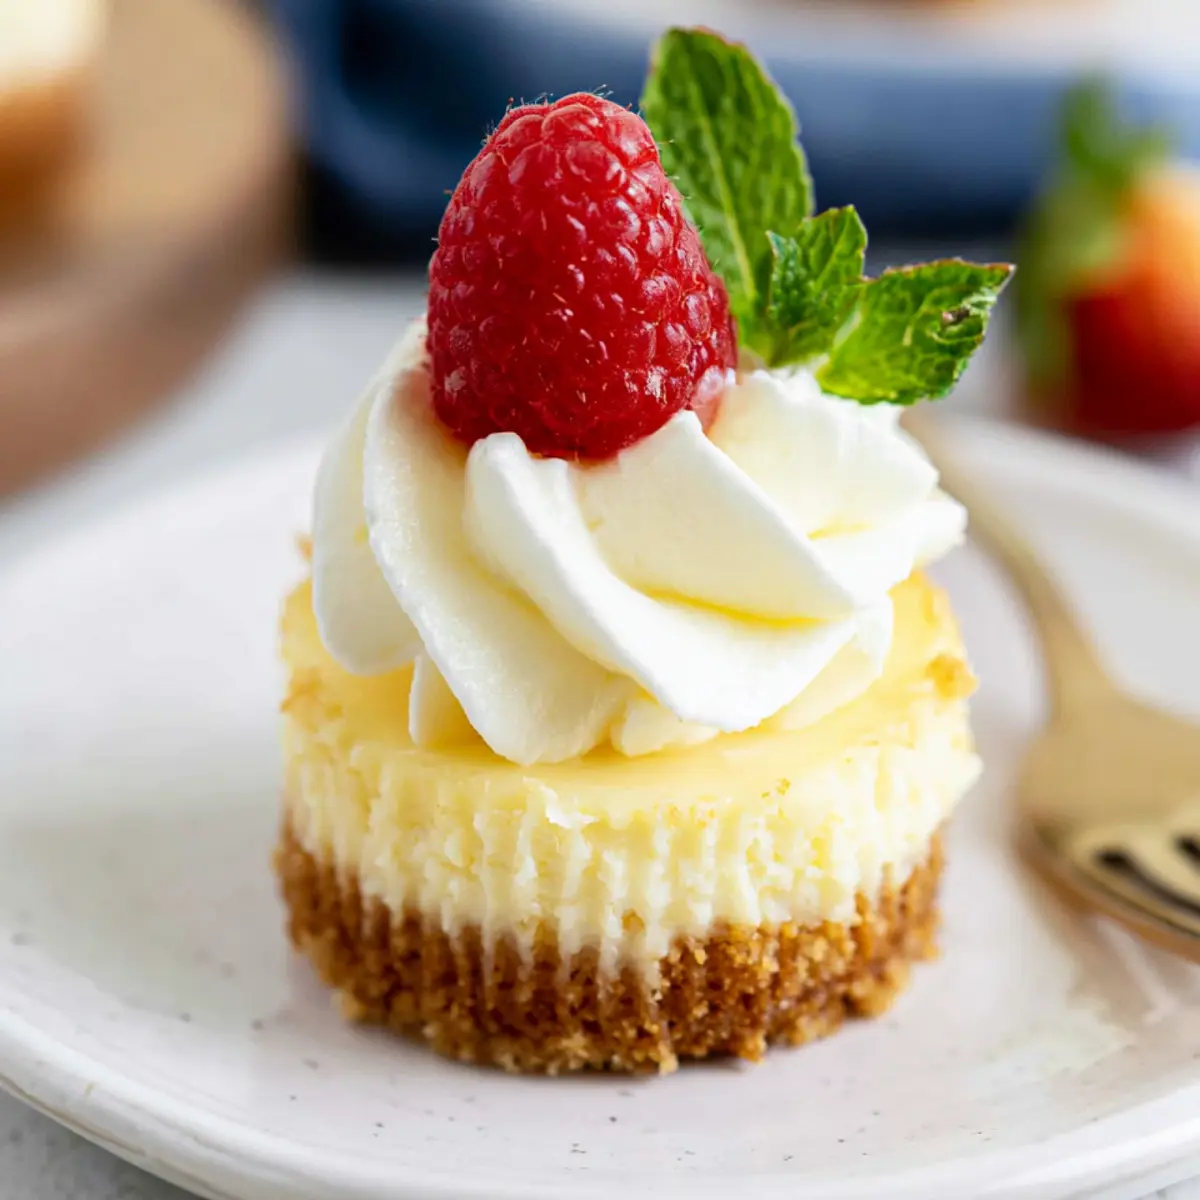
There’s something undeniably charming about unwrapping a mini cheesecake after dinner—the delicate pull of the paper liner, the gleam of creamy filling against golden crust, the quiet anticipation before that first silky bite. I always picture a table full of hungry friends or curious kids, each one reaching for their own perfect, palm-sized sweet. These mini cheesecakes have all the lush tang and melt-in-your-mouth smoothness of classic cheesecake, but with the bonus of being ready in a snap and just begging for creative toppings. Whether you’re prepping dessert for a party or just want a taste of something special without committing to a whole cake, this recipe delivers creamy, crack-free results every single time.
What Makes This Mini Cheesecake So Irresistible
There are recipes I make on repeat because they just work every single time, and this mini cheesecake is high on that list. The filling is ultra-smooth and rich, striking the ideal balance between creamy and airy, with a subtle tang that keeps each bite from feeling heavy. What really sets these mini cheesecakes apart is how easy they are to serve—no fussy slicing or worrying if the center will collapse when you cut in. They bake up quickly in a muffin pan, cool faster than traditional cheesecake, and can be dressed up with anything from a swirl of whipped cream and fresh berries to a drizzle of chocolate ganache. If you’ve ever been intimidated by classic cheesecake, consider these your new go-to for any gathering, potluck, or weeknight craving.
The Ingredients That Make This Mini Cheesecake Shine
- graham cracker crumbs – the classic choice for a slightly sweet, gently spiced crust; try digestive biscuits for a similar crunch if grahams aren’t on hand.
- Unsalted butter – brings richness and helps the crust hold together with a tender bite, never greasy.
- Full fat cream cheese – the backbone of every great cheesecake, lending a plush texture and tangy depth that low-fat simply can’t match.
- Granulated sugar – sweetens the filling and helps create that signature velvety texture.
- Vanilla extract – rounds out the flavor and adds warm, inviting notes to the cheesecake base.
- Large eggs – bind the batter for a custardy, rich set; just be gentle when mixing them in (more on that later).
- Whipped cream – provides a pillowy, luxurious finish when dolloped on each mini cheesecake.
- Fresh fruit – for a burst of bright flavor and color; berries, sliced kiwi, or mango work beautifully.
See the recipe card below for the full list of ingredients and measurements.
Bringing This Mini Cheesecake Together Step by Step
The process for these mini cheesecakes is as approachable as it gets, with each step bringing you closer to that first creamy bite.
- Start by preheating your oven and lining a standard muffin pan with paper liners. The liners not only make for fuss-free serving but give each cheesecake a neat, bakery-style look.
- For the crust, mix the graham cracker crumbs with melted butter until everything resembles damp sand. Press a generous spoonful into each liner and use the bottom of a measuring cup to create a compact layer. A quick bake will set the crust so it doesn’t mix with the filling later.
- Next, whip the cream cheese and sugar until completely smooth. There’s something deeply satisfying about watching the mixture go from chunky and lumpy to glossy and satiny—don’t rush this part.
- Add in the vanilla, then the eggs one at a time, mixing just until combined. This gentle handling is the secret to avoiding cracks and ensuring a dreamily smooth texture throughout.
- Spoon the filling onto the cooled crusts, filling each liner nearly to the top. Pop the tray into the oven and bake until the edges look set but the centers still have the slightest wobble.
- Once baked, cool the cheesecakes at room temperature to let them finish setting up. An overnight rest in the fridge is ideal—they taste even better with that cold, dense texture.
- Just before serving, pile on whipped cream, fresh fruit, or your favorite toppings. Each mini cheesecake becomes a canvas for whatever you’re craving.
Getting the Right Creamy Texture and No Cracks
Mini cheesecakes are wonderfully forgiving, but a bit of technique goes a long way toward that ultra-smooth, perfectly set filling everyone loves. Start with room temperature ingredients—they mix together seamlessly and won’t leave little lumps or cold streaks. When adding the eggs, mix just enough to incorporate; over-beating here is the fastest way to invite unwanted air bubbles and cracks. And while it’s tempting to keep baking if the centers seem a bit soft, remember they’ll firm up as they cool. Give them plenty of time in the fridge before peeling away the liner and sinking your fork in—the end result is silky, light, and beautifully consistent from edge to center.
Serving Mini Cheesecakes: Adding Toppings and Fresh Twists
The best part of making mini cheesecakes is how easily you can personalize each one to suit the occasion or just your mood. For a classic look, pipe a soft swirl of whipped cream on top and dot with a few glossy berries or thin slices of citrus. Chocolate lovers might drizzle over a quick ganache, while lemon curd, caramel sauce, or even a handful of toasted nuts add their own flair. If you’re prepping ahead, simply keep the cheesecakes in the fridge and garnish just before serving to keep everything fresh. Leftovers (if you manage to have any) will keep well chilled in an airtight container for several days, making them a handy grab-and-go dessert for busy weeks or unexpected visitors.
FAQs about Mini Cheesecake
Can I make mini cheesecakes ahead of time?
Absolutely. Mini cheesecakes actually taste better when made ahead, as the flavor improves after a full chill in the fridge. Prepare and bake them a day before serving, and add toppings right before eating.
What’s the best way to keep mini cheesecake from cracking?
Cracks are rare with this recipe, but using room temperature ingredients and mixing the eggs in gently helps keep the batter smooth. Don’t overbake; take them out when the centers still have a little jiggle, then chill thoroughly.
Do mini cheesecakes freeze well?
Yes, these freeze beautifully. Cool them completely, skip the toppings, and wrap each one tightly before freezing. Thaw overnight in the refrigerator and finish with fresh toppings just before serving.
Can I use another type of crust instead of graham crackers?
Definitely. You can substitute cookies like digestive biscuits, vanilla wafers, or chocolate cookies for the crust. Just pulse them into crumbs and use in place of the graham crackers for a slightly different flavor and texture.
How long do mini cheesecakes last in the refrigerator?
Stored in an airtight container, mini cheesecakes will keep for four to five days in the fridge. Wait to add whipped cream or fruit until just before serving for the best texture and appearance.
Once you’ve had your first cold forkful of mini cheesecake, it’s hard to stop dreaming up reasons to make them again. They’re everything you want in a classic cheesecake—rich, smooth, and a bit decadent—but with the joyful ease and playful presentation only minis can bring. Whether you’re feeding a crowd or just craving a treat with your late-night tea, these little cheesecakes always deliver a moment worth savoring.
More Tasty Ideas
- No-Bake Greek Yogurt Jello Cheesecake: This dessert offers a lighter take on cheesecake with Greek yogurt, keeping the creamy texture intact.
- Red White and Blue Mini Cheesecakes: These festive mini cheesecakes add a fun twist to the classic, perfect for celebrations or holidays.
- Strawberry Lemon Blondies: Combining fruity flavors and a rich texture, these blondies provide a sweet alternative to cheesecake.
The Best Mini Cheesecake Recipe
Ingredients
Equipment
Method
- Preheat the oven to 350º F. Line a regular sized muffin pan with paper muffin liners. In a mixing bowl, combine the graham cracker crumbs and melted butter until it resembles coarse sand. Put 1-2 tbsp of crumbs in each muffin cup. Use a 1/3 cup (or similar) to press the crumbs down firmly into the pan. Bake the crust for 5 minutes. Remove the pan from the oven and allow it to cool while prepping the cheesecake.
- In a mixing bowl, beat the cream cheese and sugar with an electric mixer until smooth, 1-2 minutes.
- Beat in vanilla extract and eggs, until smooth. The eggs are the last ingredient that get mixed into the cheesecake batter. Be sure to mix them in just until the yolk breaks. Over beating the eggs is the number one cause of air bubbles and cracking.
- Evenly divide the cheesecake batter among the muffin cups, filling the liners full. Bake for 15-17 minutes or until the center of the cheesecake is only slightly jiggly.
- Allow the cheesecakes to cool to room temperature then place them in the fridge for at least 4 hours to chill before serving. If refrigerating overnight, loosely cover the cheesecakes in plastic wrap.
- Top with whipped cream, fresh fruit or chocolate ganache before serving.