There’s something magical about the moment a dessert makes people pause—not just to admire, but to smile. That’s what happened the first time I brought these snowman cake pops to a holiday cookie swap. I had rushed through a dozen other recipes, but these were the ones everyone wanted to photograph first, then eat second. The best part? They didn’t fall off the sticks, slide in their coating, or look like a Pinterest fail. These snowman cake pops hold up, taste great, and add charm to any Christmas table.
They’re not just cute—they’re practical. With the right frosting ratio and a few structural tricks (hello, peanut butter cup hats), these pops won’t crumble, collapse, or crack. You can prep them ahead, store them safely, and still get that “Wow, did you make these?” reaction every time.

Table of Contents
Recipe Overview & Why You’ll Love It
Snowman cake pops are the perfect intersection of festive design, bite-sized indulgence, and make-ahead ease. You’re getting soft, flavorful cake bound with real butter frosting, dipped in a smooth white chocolate shell, and finished with miniature candy features.
Unlike many cake pop recipes that turn greasy or fall apart, this version focuses on texture first. The frosting-to-cake ratio is tested to avoid mushy or dry centers. They’re ideal for Christmas dessert boards, classroom parties, or DIY food gifts—and they’re sturdy enough to transport without damage.
If you’ve struggled with cake pops before, this recipe gives you structure, timing, and visual tips so your snowman cake pops come out clean, tall, and cheerful every time.
Ingredients & Substitutions
The key to perfect snowman cake pops starts with balance—between flavor, moisture, and coating hold. Here’s what you’ll need:
For the Cake Base
- 1 box vanilla or chocolate cake mix, prepared per box instructions (or your favorite homemade cake recipe)
- Tip: Vanilla works best for color contrast under the white coating.
For the Frosting
- ½ cup (113g) butter, softened
- 1½ cups (180g) powdered sugar
- 2 tablespoons (30ml) heavy cream or milk
- ½ teaspoon vanilla extract
Substitutions: Use plant-based butter and oat milk for dairy-free; skip vanilla for a more neutral base.
For Coating and Decorating
- 16 oz (454g) white candy melts or chopped white chocolate
Candy melts are easier; white chocolate tastes richer but may require thinning with shortening. - Mini Reese’s peanut butter cups (1 per cake pop, for hats)
- Mini chocolate chips or brown mini M&Ms (for eyes and buttons)
- Orange sprinkle rods or small pieces of orange candy melts (for noses)
- Lollipop sticks
- Optional: holiday sprinkles, melted chocolate for scarves or smiles
Equipment You’ll Need
- 2–3 mixing bowls (for frosting, cake, and candy melts)
- Electric mixer or sturdy whisk
- Baking sheet lined with parchment
- Microwave-safe bowl
- Lollipop sticks
- Styrofoam block or cake pop stand
- Small piping bag or zip-top bag (for detailed decorating)
- Optional: cookie scoop for evenly sized balls
Step-by-Step Instructions
Step 1 – Bake and Cool the Cake
Prepare the cake according to the box or your own recipe. Allow it to cool completely—at least 60 minutes at room temperature. Warm cake leads to sticky, gummy texture when mixed.
Step 2 – Make the Frosting
Beat the softened butter until light and fluffy (about 2 minutes). Add powdered sugar, cream, and vanilla. Beat again until smooth and spreadable—not runny. If it’s too thick, add a few drops of cream. If too thin, add more sugar.
Step 3 – Crumble and Combine
Crumble the cooled cake into a large bowl using your hands or a fork. Add about ¾ of the frosting. Mix by hand until the texture is like soft cookie dough—moldable but not greasy. Add more frosting only if the mixture crumbles.
Step 4 – Form & Chill
Roll the mixture into 1½-inch balls. You should get about 24. Place them on a parchment-lined tray. Chill in the fridge for 2 hours, or freeze for 30 minutes if short on time.
Step 5 – Insert Sticks
Melt a small portion of candy melts. Dip one end of each lollipop stick into the melted coating, then insert it halfway into each cake ball. Chill for 10 minutes to let the coating harden and anchor the sticks.
Step 6 – Coat in White Chocolate
Melt the remaining candy melts in 30-second intervals, stirring between each. If too thick, stir in ½ teaspoon of vegetable shortening. Dip each cake pop into the coating, gently tap off excess, and place upright in your stand to dry.
Step 7 – Decorate Quickly
Before the coating sets, add mini chocolate chips or M&Ms for eyes and buttons. Insert a small orange candy or sprinkle for the nose. Let the shell harden, then press an upside-down mini peanut butter cup on top to create the hat. Optional: pipe melted chocolate smiles or scarves.
Why This Recipe Works
Snowman cake pops work when the cake mixture has the right texture and the coating process is timed well. Here’s what this recipe gets right:
- Cooling the cake prevents gummy, sticky texture.
- Gradual frosting addition allows better control over binding.
- Chilling the balls ensures they stay on the stick during dipping.
- Peanut butter cup hats add structure and visual height.
- Candy melt timing gives enough flexibility for decor without rushed chaos.
Each step anticipates common issues like cracking shells, greasy crumbs, or decorations falling off—so you don’t have to troubleshoot on the fly.
Pro Tips & Variations
- Use a cookie scoop for uniform pops. Consistency helps with even coating.
- Flavor variation: Add crushed peppermint or cinnamon to the cake mix.
- Swap the hats: Use mini sandwich cookies or marshmallows if peanut butter is a concern.
- Add shimmer: Sprinkle edible glitter over wet coating for sparkle.
- Scale easily: Double the recipe for 48 cake pops; half it for a smaller batch.
Make-Ahead, Storage & Freezing
Snowman cake pops are easy to prep in stages.
- Chill formed cake balls up to 2 days before dipping.
- Store decorated pops in an airtight container at room temp for 3 days.
- For longer storage, refrigerate up to 5–6 days, but allow them to come to room temperature before serving.
- Do not freeze decorated cake pops—the coating cracks and may spot.
- Freeze undecorated cake balls for up to 1 month, then thaw and dip fresh.
Serving Suggestions & Pairings
Display upright in a foam block, jar of sugar, or cake pop stand. These snowman cake pops add height and whimsy to holiday dessert boards.
Pair with:
- Hot cocoa or peppermint mochas
- Gingerbread men or chocolate crinkle cookies
- Peppermint snowballs for a flavor contrast
Use as edible place cards—write names on sticks for a personalized table setting.
Dietary Notes & Allergen Considerations
- Contains: gluten, dairy, soy (in candy melts), peanuts (in Reese’s)
- Gluten-Free Option: Use certified GF cake mix and frosting
- Dairy-Free Option: Use plant-based butter and non-dairy milk
- Nut-Free Option: Replace peanut butter cups with chocolate cookies or Rolos
Check all labels if serving to guests with dietary restrictions.
Troubleshooting & Common Mistakes
- Cake balls fall off sticks: Didn’t chill long enough or skipped anchor coating.
- Greasy mixture: Too much frosting—add gradually.
- Cracked coating: Cake balls too cold; let sit 5–10 minutes before dipping.
- Decorations fall off: Waited too long after dipping—add decor immediately.
- Lumpy coating: Didn’t fully melt candy or didn’t stir thoroughly.
FAQs
Can I make snowman cake pops ahead of time?
Yes. You can prepare the cake balls up to 2 days ahead and store finished pops for 3–5 days. They’re great for prepping in batches before the holiday rush.
What’s better: candy melts or white chocolate?
Candy melts are easier to use and set faster, making them ideal for clean presentation. White chocolate has better flavor but may need to be thinned and handled more carefully.
Can I freeze snowman cake pops?
Not once they’re decorated. The coating will crack and develop condensation spots. You can freeze the uncoated cake balls and dip them fresh later.
Can I use chocolate cake instead of vanilla?
Absolutely. The recipe works with either. Vanilla provides a brighter base under the white shell, but chocolate adds deeper flavor.
Conclusion
Snowman cake pops are more than just a festive treat—they’re a small, joyful way to make someone’s holiday a little brighter. With the right texture, technique, and timing, you’ll get a batch of pops that look polished and taste even better.
So go ahead—make them your own. Add scarves, swap flavors, or turn them into a snowman family with kids by your side. However you decorate them, these little pops are a reminder that the best holiday moments are made by hand, with care—and shared with smiles.
More Relevant Recipes
- Snowman Oreo Balls: These no-bake treats bring the same whimsical charm as snowman cake pops, with a creamy Oreo center dipped in white chocolate. Perfect for holiday platters or winter parties, they’re a fun, hands-on project for kids and adults alike.
- Little Debbie Christmas Tree Cake Truffles: A nostalgic twist on holiday baking, these truffles use pre-made snack cakes blended with cream cheese and coated in chocolate. The result is festive, fuss-free, and full of Christmas spirit—ideal for anyone who loves the ease of cake pops without the baking.
- Christmas Kitchen Sink Cookies: Packed with festive mix-ins like red and green candies, pretzels, and chocolate chips, these cookies offer a crunchy, chewy contrast to soft cake pops. They’re bold, playful, and endlessly customizable—perfect for complementing snowman cake pops on a holiday dessert table.
Snowman Cake Pops That Actually Hold Together
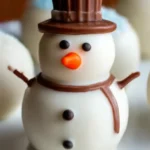
Snowman Cake Pops are festive holiday treats made from vanilla or chocolate cake mixed with smooth vanilla frosting, then dipped in white candy coating and decorated with charming snowman faces and hats. These sturdy, no-fail cake pops are perfect for Christmas parties, cookie swaps, or edible gifts.
- Prep Time: 30 minutes
- Cook Time: 25 minutes
- Total Time: 55 minutes
- Yield: 24 cake pops
- Category: Dessert
- Method: No-Bake (post-bake assembly)
- Cuisine: American
- Diet: Vegetarian
Ingredients
- 1 box vanilla or chocolate cake mix (plus required ingredients listed on the box)
- ½ cup butter, softened
- 1½ cups powdered sugar
- 2 tablespoons heavy cream or milk
- ½ teaspoon vanilla extract
- 16 oz white candy melts or white chocolate
- 24 mini Reese’s peanut butter cups
- Mini chocolate chips or brown mini M&Ms (for eyes and buttons)
- Orange candy melts or orange sprinkle rods (for noses)
- 24 lollipop sticks
- Sprinkles (optional for decoration)
- Small piping bag or sandwich bag (for details)
Instructions
- Prepare the cake according to box instructions or your homemade recipe. Allow it to cool completely.
- In a mixing bowl, beat the softened butter until light and fluffy. Add powdered sugar, heavy cream, and vanilla extract. Beat until smooth and creamy.
- Crumble the cooled cake into a large bowl. Add about ¾ of the frosting and mix until the texture resembles cookie dough. Add more frosting if needed.
- Roll the mixture into 1½-inch balls and place them on a parchment-lined baking sheet. Chill in the refrigerator for 2 hours or freeze for 30 minutes.
- Melt a small portion of the white candy melts. Dip one end of each lollipop stick into the melted coating, then insert it halfway into each cake ball. Chill for 10 minutes.
- Melt the remaining white candy melts in 30-second intervals, stirring in between, until smooth. Thin with ½ teaspoon of vegetable shortening if needed.
- Dip each chilled cake pop into the melted coating, tap off excess, and place upright in a styrofoam block or stand to set.
- Before the coating sets, press in mini chocolate chips or M&Ms for eyes and buttons, and add a sprinkle rod or orange candy melt piece for the nose.
- Once fully dry, press an upside-down mini peanut butter cup on top for the hat. Optionally, use melted chocolate in a piping bag to add a smile or scarf detail.
Notes
- Ensure the cake is fully cooled before crumbling to prevent gumminess.
- Use vanilla cake for better color contrast under white coating.
- Candy melts are easier to work with, but white chocolate offers richer flavor.
- Do not freeze decorated pops; freeze plain cake balls if needed.
- Store in an airtight container at room temperature for up to 3 days or refrigerate for longer storage.