I first made snowy Oreo pinecones on a snowy December afternoon when I needed something fun and festive to make with my niece and nephew. We’d seen them pop up on Pinterest and holiday baking boards, but I had always assumed they were more craft than dessert. I couldn’t have been more wrong. They turned out rich, chocolatey, crunchy, and absolutely stunning. No oven required, no fancy decorating skills—just three basic ingredients and some hands-on shaping. And that snowy powdered sugar finish? Pure winter magic.
If you’re looking for a crowd-pleasing no-bake treat that looks impressive, tastes indulgent, and doubles as a fun edible craft, snowy Oreo pinecones check every box.
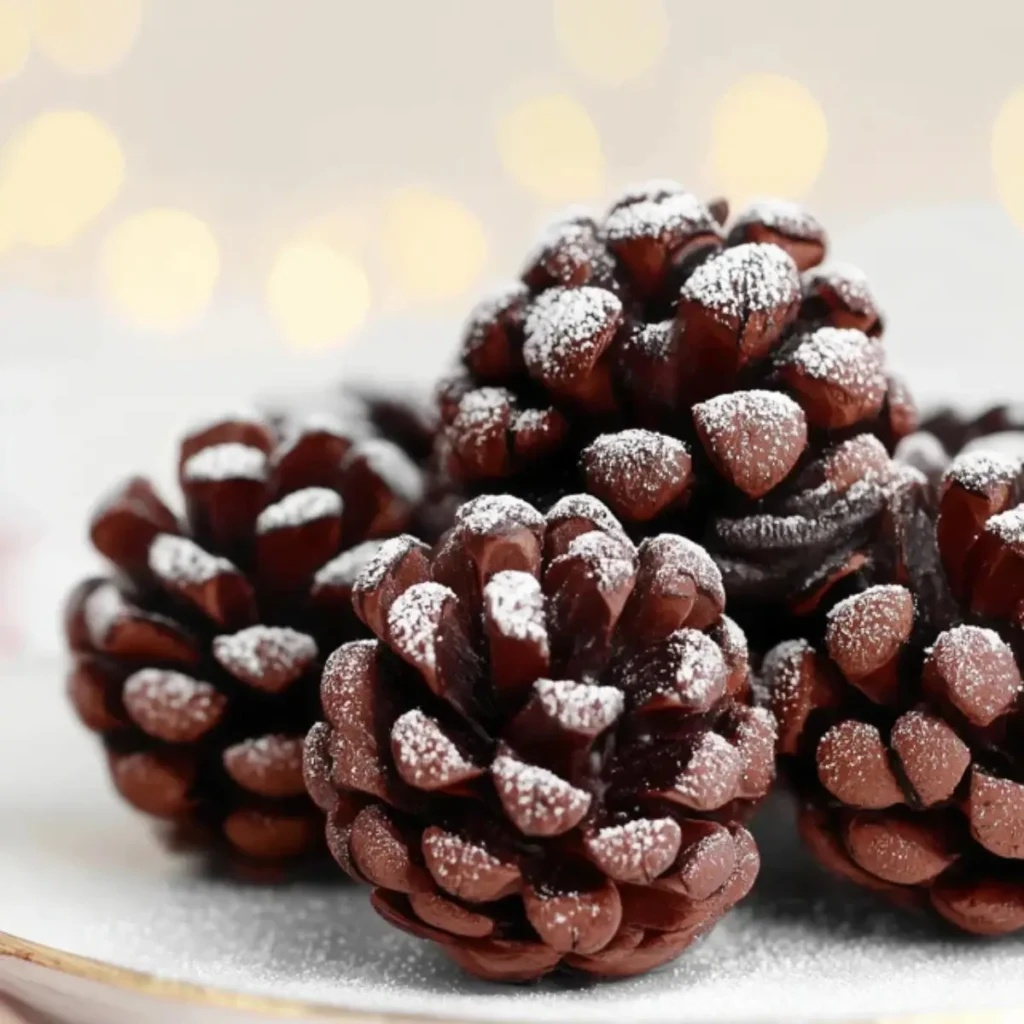
Table of Contents
Recipe Overview & Why You’ll Love It
Snowy Oreo pinecones are the perfect blend of form and function. They look like something off a holiday centerpiece but eat like a truffle with a chocolate cereal crunch.
They’re built from crushed vanilla Oreos and cream cheese, shaped into pinecones, and coated in overlapping layers of shell-like cereal. A light dusting of powdered sugar gives them a snowy, woodland look that’s perfect for holiday dessert tables or edible gifts.
Here’s why snowy Oreo pinecones are worth making:
- No baking, no stovetop—just mix, shape, and press
- Uses only 3 core ingredients
- Beautiful on holiday platters or tucked into gift boxes
- Kid-friendly and craft-like without being gimmicky
- Easily customizable with flavors and textures
Ingredients & Substitutions
To make 6 snowy Oreo pinecones, you’ll need the following:
Base Mixture
- 308g vanilla Oreos (2 standard packs) – finely crushed
Substitute with chocolate or peppermint Oreos for a flavor twist - 150g full-fat cream cheese (approx. ⅔ cup) – cold from the fridge
Use a dairy-free version if needed
Pinecone Texture
- 55g (2 oz) Coco Pops Chocos or similar chocolate shell cereal
Alternate options: Choco Waves, Cinnamon Toast Crunch, Curiously Cinnamon, or Shreddies
For a grown-up version, slivered almonds work beautifully
Finish
- Icing sugar (for dusting) – optional but recommended for the snowy effect
You can also add edible glitter for sparkle if desired
Tip: The finer your Oreo crumbs, the smoother your pinecone base will be. Use a food processor for best results, but a rolling pin and zip-top bag work in a pinch.
Equipment You’ll Need
You don’t need anything fancy to make snowy Oreo pinecones—just basic tools:
- Food processor or high-speed blender (or plastic bag + rolling pin)
- Mixing bowl and sturdy spoon
- Baking tray or large plate
- Baking/parchment paper (prevents sticking)
- Optional: gloves for easier handling of sticky dough
Step-by-Step Instructions
These snowy Oreo pinecones come together in about 30–40 minutes. Allow a little extra time for shaping if it’s your first go.
Step 1 – Prep the Tray
Line a medium baking tray or flat plate with parchment paper. This will be where your pinecones rest as you assemble and decorate them.
Step 2 – Crush the Oreos
Place 308g of vanilla Oreos into a food processor or blender and pulse until they form fine, even crumbs. If doing this manually, place the Oreos in a plastic bag and crush with a rolling pin until no large pieces remain.
Step 3 – Mix with Cream Cheese
Transfer the crumbs to a large bowl. Add 150g cold full-fat cream cheese and mix thoroughly with a wooden spoon until a soft dough forms. Once it starts coming together, use your hands to press the mixture into a large ball.
Step 4 – Shape the Pinecones
Divide the dough into 6 even portions. Roll each piece into a ball, then gently shape it into a pear or oval form using your fingers. Don’t stress about perfection—once coated in cereal, the shape becomes more defined.
Place each shaped base onto the lined tray.
Step 5 – Apply the Cereal
Start from the bottom of each “pinecone” and press in pieces of Coco Pops Chocos, working upward in neat, overlapping rows. This gives the realistic pinecone texture. Take your time—it’s a bit fiddly but worth the effort.
If pieces fall off, press them in more firmly or slightly reshape the base to help them stick.
Step 6 – Dust and Serve
Finish by sifting a light dusting of icing sugar over the top to mimic fresh snow. Serve on a festive tray or tuck into gift bags with ribbon for holiday favors.
Why This Recipe Works
There’s a reason snowy Oreo pinecones hold their shape, taste amazing, and don’t fall apart in your hands.
- Cream cheese binds the crumbs into a moldable, sturdy dough.
- Crushed Oreos provide both flavor and structure, making them ideal for shaping.
- Cereal “scales” add crisp texture and visual impact without needing a mold.
- No bake time reduces risk—no burnt edges, no overbaking, just chill and serve.
Shaping the mixture while cold keeps it firm. Layering the cereal from base to tip helps maintain balance and prevents gaps.
Pro Tips & Variations
Technique Tips
- If the dough feels too soft to shape, chill it in the fridge for 15–20 minutes first.
- Wet your hands slightly or wear food-safe gloves to avoid stickiness.
- Overlap cereal rows for a cleaner, pinecone-like finish.
Flavor Variations
- Swap in flavored Oreos (mint, gingerbread, dark chocolate)
- Add a few drops of vanilla or peppermint extract to the dough
Textural Upgrades
- Use slivered almonds for a more elegant look and nutty crunch
- Drizzle finished pinecones with melted white chocolate or edible glitter
Scaling the Recipe
- Double for a crowd (12 pinecones), halve for smaller batches (3 pinecones)
- For mini versions, divide dough into 10–12 small portions and shape as usual
Make-Ahead, Storage & Freezing
These are perfect for prepping ahead of time, making them ideal for holiday gatherings or gift boxes.
- Fridge: Store in an airtight container for up to 5 days. Keep chilled until ready to serve.
- Freezer: Freeze for up to 2 months in a tightly sealed container.
To serve, thaw in the fridge overnight or leave at room temp for 1–2 hours. Do not refreeze after thawing.
If freezing, add the cereal coating after thawing to maintain texture—some cereals may soften during freezing.
Serving Suggestions & Pairings
These snowy Oreo pinecones look gorgeous on a winter dessert table and pair well with cozy drinks and seasonal sweets.
- Serve with:
- Hot cocoa topped with whipped cream
- Espresso or spiced chai
- Eggnog or mulled cider
- Garnish with:
- Fresh rosemary sprigs and cranberries for a woodland look
- Mini marshmallows or crushed candy canes on the side
For edible gifts, package each pinecone in a cellophane bag and tie with twine or ribbon.
Dietary Notes & Allergen Considerations
- Vegetarian: Yes
- Vegan: Only with plant-based cream cheese and certified vegan Oreos + cereal
- Dairy-Free: Use dairy-free cream cheese; check Oreo and cereal labels
- Nut-Free: Yes (unless swapping cereal for almonds)
Always read product labels if serving anyone with allergies. Some cereals may contain hidden dairy or cross-contamination risks.
Troubleshooting & Common Mistakes
- Dough too sticky to shape? Chill for 15–20 minutes to firm up.
- Cereal won’t stick? Press more firmly and make sure the base is slightly tacky—not too dry.
- Pinecones collapsing? Your dough may be too warm—chill before shaping.
- Bald patches? Overlap cereal rows more closely, starting from the base.
If in doubt, reshape gently and keep cereal pieces snug and layered.
FAQs
Can I freeze Oreo pinecones?
Yes. Place them in an airtight container and freeze for up to 2 months. Thaw in the fridge overnight or on the counter for 1–2 hours.
My dough is too soft to work with—what can I do?
If your mixture is sticky or too soft to hold its shape, chill it in the refrigerator for 15–20 minutes before shaping. This firms up the cream cheese and makes molding easier.
Can I make snowy Oreo pinecones gluten-free?
Yes—use gluten-free Oreos and a gluten-free cereal. Always double-check ingredient labels to ensure they meet your dietary needs.
Can I make mini Oreo pinecones?
Absolutely. Just divide the mixture into smaller portions (about 10–12), shape as usual, and decorate with smaller cereal pieces or chopped almonds.
How long do snowy Oreo pinecones last?
Stored in the fridge, snowy Oreo pinecones stay fresh for up to 5 days. Just keep them sealed in an airtight container.
Conclusion
Snowy Oreo pinecones are more than just a cute holiday treat—they’re an easy, hands-on dessert that turns simple ingredients into something festive and fun. Whether you’re decorating a dessert table, crafting edible gifts, or looking for a kid-friendly baking activity, these pinecones deliver on flavor and flair.
Make them your own with flavor twists, texture changes, or presentation upgrades. However you serve them, snowy Oreo pinecones are sure to become a winter tradition. Give them a try this season—and don’t forget to share your creations.
More Tasty Ideas
- Oreo Cookie Balls: These no-bake Oreo cookie balls are dipped in chocolate and decorated for the holidays, making them a quick and festive treat that closely mirrors the flavor and ease of snowy Oreo pinecones.
- Snowman Oreo Balls: Adorably decorated and perfect for winter celebrations, these snowman-themed Oreo truffles combine creamy chocolate interiors with charming seasonal flair, similar to the snowy Oreo pinecones.
- No-Bake Gingerbread Cheesecake Cups: These spiced no-bake cups offer a creamy, festive twist in a simple dessert format, sharing the same effortless appeal and holiday-ready style as snowy Oreo pinecones.
Snowy Oreo Pinecones

These snowy Oreo pinecones are a no-bake holiday treat made with crushed Oreos, cream cheese, and chocolate cereal. Shaped to resemble pinecones and dusted with icing sugar, they’re festive, fun, and perfect for gifting or parties.
- Prep Time: 25 minutes
- Cook Time: 0 minutes
- Total Time: 25 minutes
- Yield: 6 pinecones
- Category: Dessert
- Method: No-Bake
- Cuisine: American
- Diet: Vegetarian
Ingredients
308g vanilla Oreos
150g full-fat cream cheese
55g Coco Pops Chocos cereal
Icing sugar, for dusting
Instructions
- Line a baking tray or plate with parchment paper.
- Place the Oreos in a food processor or high-powered blender and crush into fine crumbs. Ensure there are no large chunks remaining.
- Transfer the crumbs to a mixing bowl. Add the cream cheese and mix until fully combined, then use your hands to press the mixture into a large ball.
- Divide the mixture into 6 equal portions. Roll each into a ball, then shape into a pear or oval shape with your fingers. Place on the prepared tray.
- Press pieces of Coco Pops Chocos cereal into each shaped ball, starting from the base and working upward in overlapping rows to mimic pinecone scales.
- Lightly dust each pinecone with icing sugar to finish. Serve or chill until ready.
Notes
- If the mixture is too soft to shape, refrigerate for 15–20 minutes to firm up.
- Substitute slivered almonds or other shell-shaped cereals for a different texture or look.
- Use flavored Oreos like peppermint for a seasonal variation.