I created these Strawberry Santas on a snowy afternoon when my twin boys were bouncing off the walls and asking to “make something fun for Santa.” I wanted a treat that was festive, hands-on, and didn’t require me to fire up the oven or break out the cookie cutters. These charming little Santas came to life with just a few ingredients I already had on hand: strawberries, cream cheese, a bit of sugar, and a touch of vanilla.
Not only did we make memories while assembling them, but I also felt good knowing the treat was lighter, naturally gluten-free, and under 50 calories per piece. Whether you’re prepping for a holiday party, a classroom snack, or just some edible holiday cheer, these Strawberry Santas check every box.
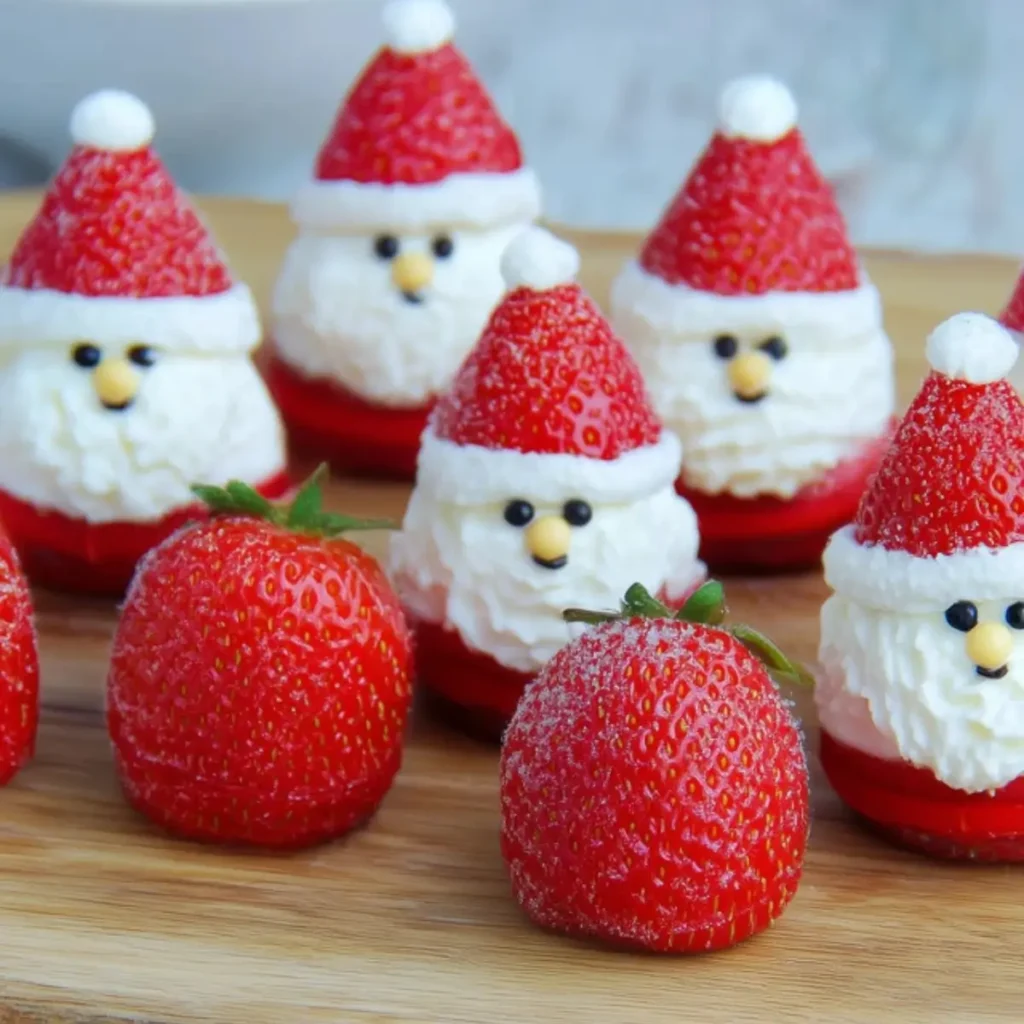
Table of Contents
Recipe Overview & Why You’ll Love It
Strawberry Santas deliver all the joy of holiday desserts with none of the guilt or fuss. With no baking required and only four main ingredients, you’ll have these playful, healthy Christmas treats ready in 15 minutes flat.
Strawberry Santas are delightfully festive and perfectly portioned. The creamy filling, made from whipped cream cheese and lightly sweetened with powdered sugar, balances beautifully with juicy strawberries. They’re light enough to enjoy guilt-free, yet rich enough to feel like a real treat.
Best of all, they’re approachable for kids and adults alike—no piping expertise or fancy tools required. You can decorate them as simply or elaborately as you like, making them ideal for cookie swaps, classroom parties, or cozy family movie nights.
Ingredients & Substitutions
Strawberry Santas use simple, whole ingredients that are easy to find during the holiday season.
Base Ingredients (yields 12 Strawberry Santas)
- 12 large strawberries, washed and dried
- 1 cup whipped cream cheese (full-fat or reduced-fat both work)
- 2 tablespoons powdered sugar
- ¼ teaspoon pure vanilla extract
- Red and black decorating icing, for the face (optional)
Smart Substitutions
- Dairy-Free: Use your favorite vegan cream cheese alternative.
- Extra Protein: Swap 2–3 tablespoons of the cream cheese with plain Greek yogurt.
- Lower Sugar: Use a monk fruit powdered sweetener instead of sugar.
- Flavor Variations: Add orange or lemon zest to the filling for a citrusy pop.
- Creative Faces: Mini chocolate chips or raisins can replace icing; tweezers help with precise placement.
Equipment You’ll Need
You won’t need any specialty tools to create Strawberry Santas, but a few kitchen basics help speed things along.
- Sharp paring knife – for precise, even strawberry cuts
- Small mixing bowl – to prepare the filling
- Spatula or spoon – for transferring the filling to your piping bag
- Piping bag with star tip – creates a decorative finish (or use a zip-top bag with the corner snipped)
- Flat serving plate or tray – for assembly and chilling
- Tweezers (optional) – to place tiny decorative details like chocolate chips
Step-by-Step Instructions
Step 1 – Prep the Strawberries
Start by washing the strawberries thoroughly. Pat them completely dry—this is crucial. Any leftover moisture will cause the filling to slide off.
Using a sharp knife, slice off the green stem so each strawberry has a flat base to stand upright. Then cut each strawberry about ⅓ from the top to create two parts: the larger bottom half (the body) and the smaller top half (the hat).
Step 2 – Make the Filling
In a small bowl, combine:
- 1 cup whipped cream cheese
- 2 tablespoons powdered sugar
- ¼ teaspoon vanilla extract
Stir until smooth and creamy. The whipped consistency allows for easy piping and a light, airy texture that doesn’t overwhelm the fruit.
Step 3 – Pipe the Filling
Transfer the mixture into a piping bag fitted with a star tip. If you don’t have one, a plastic sandwich bag with a small corner cut will work in a pinch.
Pipe the filling generously onto the flat base of the strawberry bottom, building upward to form Santa’s “face and beard.”
Step 4 – Assemble the Santas
Place the strawberry “hat” on top of the piped filling. Add a small piped dollop on the tip of the hat to mimic Santa’s pom-pom.
Use red and black icing to dot eyes and a nose on the face. If using chocolate chips or other substitutions, press them gently into the filling.
Step 5 – Chill and Serve
Serve the Strawberry Santas immediately or refrigerate them for up to 2 hours before serving. They look best fresh and hold their shape well during short chilling.
Why This Recipe Works
Strawberry Santas succeed because they combine visual appeal with practical simplicity. The natural shape and color of strawberries do the heavy lifting—no food coloring or shaping required.
Whipped cream cheese provides body without the heaviness of frosting, and its mild tang complements the fruit’s sweetness. The reduced sugar keeps the dessert from veering into overly rich territory, making it perfect for kids and adults alike.
The no-bake format means no oven, no rise/fall concerns, and no precise timing—just assemble and enjoy. It’s an accessible, approachable holiday dessert with crowd-pleasing charm.
Pro Tips & Variations
Technique Boosts
- Dry strawberries thoroughly to prevent filling slippage.
- Chill the cream cheese mixture for 10 minutes before piping for more defined shapes.
- Keep your piping tip clean for neater presentation—wipe as needed.
Flavor Swaps
- Add cocoa powder to the filling for a chocolate twist.
- Fold in crushed peppermint candies for crunch and holiday flair.
- Use maple extract instead of vanilla for a cozy depth.
Add-Ons & Garnishes
- Light dusting of powdered sugar mimics snow.
- Plate with rosemary sprigs or cinnamon sticks for visual interest.
- Garnish with edible glitter for party sparkle.
Scaling Guidance
- Halve the recipe for small gatherings (6 strawberries).
- Double or triple easily for party platters or classroom events.
Make-Ahead, Storage & Freezing
Strawberry Santas are best assembled close to serving time. If needed, you can prep them up to 2 hours ahead and refrigerate them.
For longer prep, make the filling the night before and store it covered in the fridge. Slice strawberries just before assembling.
Avoid freezing—strawberries turn mushy, and the filling may separate during thawing.
Serving Suggestions & Pairings
Strawberry Santas are versatile enough to appear at breakfast buffets, dessert tables, or even as edible place cards.
Serve alongside:
- Hot beverages: white peppermint cocoa, spiced tea, or cinnamon-infused coffee
- Savory contrast: cheese boards with sharp cheddar or spiced nuts
- Other sweets: chocolate bark, coconut snowballs, or peppermint energy bites
Arrange on a white tray with green herbs (like rosemary) for instant holiday table appeal.
Dietary Notes & Allergen Considerations
- Vegetarian: Yes
- Gluten-Free: Yes
- Dairy-Free: Use a plant-based cream cheese
- Nut-Free: Yes, as written
- Low-Carb/Keto: Use monk fruit or erythritol in place of powdered sugar
Always double-check ingredient labels if you’re serving to guests with allergies.
Troubleshooting & Common Mistakes
- Filling slides off → Strawberries weren’t dry enough; pat them well before cutting.
- Filling is runny → Mixture wasn’t chilled; pop it in the fridge for 10–15 minutes.
- Faces look messy → Let piped filling firm slightly before adding icing or decorations.
- Strawberries won’t stand up → Base wasn’t cut flat; trim carefully so they sit stable.
FAQs
Can I make Strawberry Santas the night before?
Strawberry Santas can be prepped a few hours in advance, but not overnight. Strawberries release moisture quickly, which can make them soggy and cause the filling to separate.
Can I use frozen strawberries?
No. Frozen strawberries become too soft and wet when thawed, and won’t hold the structure needed for this dessert.
How long can leftover Strawberry Santas be stored?
Use dairy-free whipped cream cheese and a plant-based powdered sweetener. Add a drop of almond or maple extract for flavor variety.
How long can leftover Strawberry Santas be stored?
They’ll hold for up to 2 days in the refrigerator, but their texture will decline. Enjoy them the same day for best results.
Can I double this Strawberry Santas recipe?
Absolutely. Just double all ingredients and assemble as normal. You can also make the filling ahead to save time.
Conclusion
Strawberry Santas bring magic to your holiday table without adding kitchen stress. They’re colorful, cheerful, and just the right amount of sweet. You’ll love how quickly they come together—and how quickly they disappear.
Try them once and you’ll find yourself making them every year. Whether it’s a party tray, a classroom snack, or a whimsical finish to Christmas dinner, these Strawberry Santas deliver charm, taste, and joy in every bite.
More Tasty Ideas
- No-Bake Gingerbread Cheesecake Cups: These festive cups combine warm gingerbread spice with creamy cheesecake filling in a no-bake format. Much like Strawberry Santas, they’re perfect for holiday entertaining and come together quickly without using the oven.
- Snowman Cake Pops: Whimsical and winter-ready, these snowman cake pops offer the same charming presentation and kid-friendly appeal as Strawberry Santas. Ideal for parties, they’re decorative, portable, and deliciously sweet.
- Cranberry Cream Cheese Crescent Bites: These bites feature the creamy tang of cheesecake paired with tart cranberry sauce in a festive, flaky shell. The flavor combo and creamy base mirror the fruity richness of Strawberry Santas, making them a great addition to your holiday spread.
Strawberry Santas

Strawberry Santas are adorable, no-bake holiday treats made with fresh strawberries, a light cheesecake filling, and simple decorative icing. They’re festive, fun to make, and perfect for Christmas parties or family activities.
- Prep Time: 15 minutes
- Cook Time: 0 minutes
- Total Time: 15 minutes
- Yield: 12 Strawberry Santas
- Category: Dessert, Snack
- Method: No-Bake
- Cuisine: American
- Diet: Vegetarian
Ingredients
12 large strawberries
1 cup whipped cream cheese
2 tablespoons powdered sugar
1/4 teaspoon vanilla extract
Red and black decorating icing
Instructions
- Wash the strawberries and dry them completely.
- Slice off the stem end to create a flat base, then cut each strawberry into two parts: one larger bottom and one smaller top (hat).
- In a small bowl, mix together the whipped cream cheese, powdered sugar, and vanilla extract until smooth.
- Transfer the mixture into a piping bag with a star tip or a zip-top bag with the corner cut off.
- Pipe the filling onto the flat side of the bottom strawberry half to create Santa’s “beard and face.”
- Place the top strawberry piece on top as the “hat” and add a small piped dot on top for the pom-pom.
- Use red and black decorating icing to dot eyes and a nose on the face.
- Serve immediately or refrigerate for up to 2 hours before serving.
Notes
- Ensure strawberries are thoroughly dry to help the filling adhere.
- Vegan cream cheese can be used as a dairy-free alternative.
- Decorative icing can be substituted with mini chocolate chips or raisins.
- Best consumed the same day to avoid sogginess from the strawberries.