Standing in my kitchen late at night, I get hit with cravings that don’t always play by the rules—cravings for something chocolatey, creamy, and unmistakably nostalgic. That’s typically when I reach for 3-Ingredient No-Bake Oreo Balls. These little chocolate truffles are pure, unfiltered joy: crunchy dark cookie crumb, a center so fudge-like it almost melts, and a glossy chocolate shell that cracks with your first bite. Every time I make a batch, it feels like the world’s simplest magic trick—combining pantry staples into something that absolutely disappears at any party (or let’s be honest, before anything gets shared).
What I really love is how these Oreo balls turn almost any ordinary moment into a celebration. There’s no oven, no elaborate prep, just a gloriously messy mass of cookie crumbs, a swirl of cream cheese, and the satisfaction of dunking each ball in melted chocolate. And the smell—the sweet, nearly roasted note of crushed Oreos blending with that faint tang of cream cheese, all drifting through the kitchen as you work (and, inevitably, taste test).
No Oven Required—and Instantly Addictive
There are recipes that demand attention, measuring, and timing, and then there are recipes like these 3-Ingredient No-Bake Oreo Balls that practically make themselves. You crush, you mix, you roll, and just like that, you’ve got a tray full of glossy, chocolate-cloaked confections that look like you spent all afternoon on them. The simplicity is what gets people talking after the first bite—nobody guesses these came together without any baking or specialty equipment.
When I make them for gatherings or holiday cookie trays, something wild always happens: a handful disappears while I’m still cleaning up melted chocolate from the counter, and I end up wishing I’d stashed a few away for myself. That’s how you know you’ve found a keeper. These Oreo balls don’t just satisfy a sweet tooth—they wreck any willpower left in the room. The fact that you can whip them up in under an hour, with no oven drama, means they fit into the busiest days or the laziest nights.
The Ingredients That Bring These Oreo Balls to Life
You’ll only need three things, but each one pulls serious weight in the final treat. Here’s why these ingredients matter:
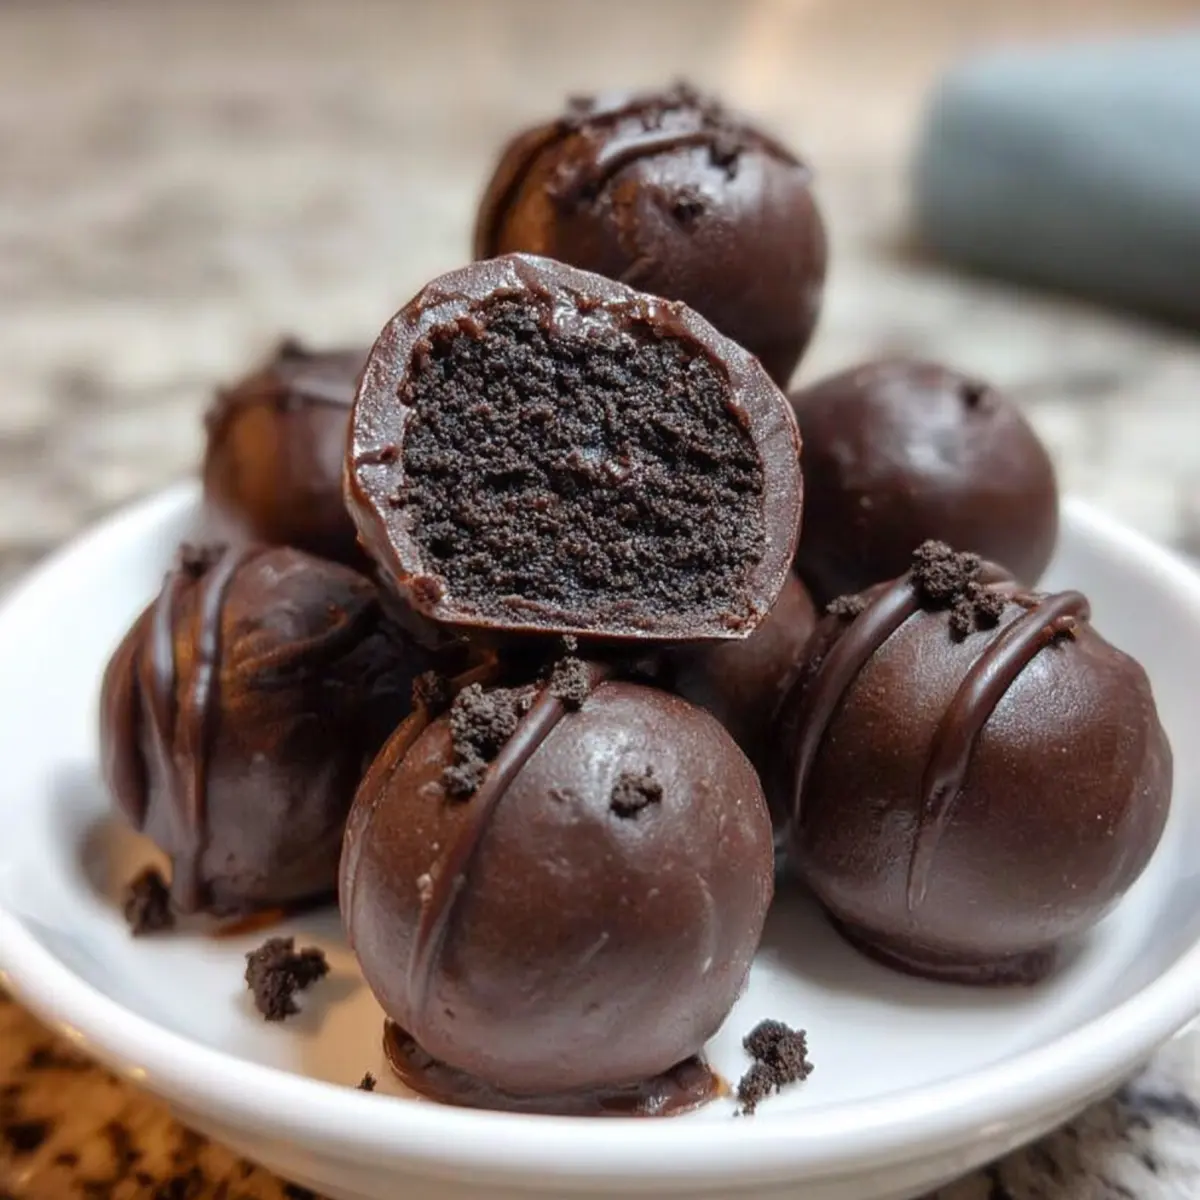
- Oreo cookies – the classic chocolate sandwich cookies bring that deep, cocoa flavor and a touch of salt, plus the creamy center that turns to fudge after a whirl in the food processor.
- Cream cheese – binds everything into a rich, smooth dough; adds just enough tang to balance the sweetness, making every bite taste like a cross between cheesecake and brownies.
- Semi-sweet chocolate – for the glossy, snappy shell that seals in the creamy middle and gives a hint of bittersweet finish—use baking chocolate or good-quality chocolate chips for best results.
See the recipe card below for the full list of ingredients and measurements.
From Cookie Crumbs to Chilled Truffles
Let’s get into the delicious, hands-on bit. If you have a food processor, you’re already halfway there—if not, a little elbow grease and a strong rolling pin will do.
- First, toss all your Oreo cookies (yes, filling and all) into a food processor. Blitz them until you’re left with fine, soft, almost sandy crumbs. If you’re smashing by hand, seal the cookies in a bag and roll until there’s not a single crunchy chunk left.
- Scoop the crumbs into a mixing bowl and add your softened cream cheese. Now, things get a little messy in the best way—mix until everything is evenly combined and you’re looking at a soft dough that holds together when pinched.
- Pinch off small pieces and roll between your hands to shape balls, aiming for something about bite-sized. I like to line a tray with parchment here, so nothing sticks and cleanup is blessedly simple.
- Slide the tray into the fridge. These need a solid chill—about half an hour—so the balls set up and can handle their chocolate bath later on.
- When they’re firmed up, melt your semi-sweet chocolate in a microwave-safe bowl. Go in short bursts and stir often so you don’t scorch it; the goal is silky and totally smooth.
- Drop each chilled ball into the melted chocolate. Use a fork to dunk and turn, letting the excess drip off so the coating isn’t too thick (unless you’re into that—no shame). Place each chocolate-dipped ball back on your parchment.
- Once every ball is gleaming and coated, let them chill in the fridge again. This round is all about patience—give the chocolate time to set and crackle when you bite in, usually around an hour. If you can wait that long, you’re stronger than me.
During all of this, don’t be afraid to get your hands a little sticky. If the dough seems too soft, give it extra fridge time—or sneak one for quality control; that’s kitchen law.
What Happens When You Bite Into an Oreo Ball
This is the texture dream if you love contrast. The outside shell gives a satisfying snap, shattering just enough to reveal a center so soft and creamy you could mistake it for a ganache. That black-as-night cookie layer is hearty, chocolatey, and full of nostalgia—comforting and exciting all at once. There’s a mellow tang from the cream cheese, like a secret whisper beneath all that chocolate, and the richness lingers in your mouth a few seconds past every bite.
If you make them right, the inside should almost melt on your tongue, but still hold its shape. When they’re fresh from the fridge, the cold shell just heightens those layers—sometimes I stash one at the back, just to enjoy when no one’s looking.
Little Twists, Trouble-Shoots, and Perfect Pairings
You can stick with tradition or play around with flavor—the base recipe is wild about variations. Swap in dark chocolate or white chocolate for a different shell, or even stir a dash of instant espresso powder into the dough for grown-up depth. A sprinkle of sea salt, colored sprinkles, or crushed nuts on top says “these are for a party,” even if it’s just a Tuesday.
If your dough seems too sticky, try chilling it longer or dusting your hands with cocoa powder as you roll. Chocolate too thick? Stir in a touch of oil to make dipping easier. These Oreo balls can be made days ahead; just keep them chilled in a sealed container so they don’t sweat or soften. For freezing, place finished truffles in a single layer, let them freeze solid, then transfer to a freezer bag—they’ll last for weeks, ready for snacking when your sweet tooth strikes out of nowhere.
Serving couldn’t be easier. Pile them high on a platter for the holidays, pop into cellophane bags for homemade gifts, or set out with hot coffee for a simple but luxurious dessert after dinner. I’ve yet to see anyone, big or small, resist their pull.
FAQs about 3-Ingredient No-Bake Oreo Balls
How long can 3-Ingredient No-Bake Oreo Balls be stored in the fridge?
Oreo balls can be refrigerated in an airtight container for up to five days. Their texture stays best when kept cold—the chocolate coating helps seal in freshness, so they never get soggy.
Can I use a different type of cookie instead of Oreos?
Absolutely! Any sandwich-style or crisp chocolate cookie will work. Just aim for a cookie with a similar texture and sweetness; adjust cream cheese slightly if the dough seems too dry or wet.
Is it possible to freeze 3-Ingredient No-Bake Oreo Balls?
Yes, these Oreo balls freeze beautifully. Arrange them in a single layer to freeze solid, then store in a freezer-safe bag or container. Thaw in the fridge and enjoy with nearly the same texture as fresh.
Can I make 3-Ingredient No-Bake Oreo Balls ahead for parties?
These are perfect make-ahead treats. Prepare and coat them one or two days before your event, then store chilled until serving. If decorating with sprinkles or a drizzle, add those after the chocolate sets for the best look.
When all’s said and done, there’s something almost irresistible about a big plate of 3-Ingredient No-Bake Oreo Balls—especially when the kitchen is quiet, the fridge is open, and there’s just enough chill in the air to make that chocolate shell snap perfectly. These are more than just party sweets—they’re those little luxuries you can whip up for yourself, any time the craving hits. One bite in and you’ll see why they never last long around here.
More Delicious Recipes
- Christmas Coffee Blend Recipe: Perfect for pairing with sweet treats like Oreo balls, this coffee blend brings a touch of festivity to any gathering.
- Crispy Loaded Hasselback Potato Bites: These savory bites offer a delightful contrast to your sweet Oreo balls, making for a well-rounded snack platter.
- Spicy Buffalo Chicken Sliders: Adding a bit of spice with these sliders makes for an excellent balance when served alongside the rich sweetness of Oreo balls.
Easy 3-Ingredient No-Bake Oreo Balls
Ingredients
Equipment
Method
- Place all Oreo cookies, filling included, into a food processor. Pulse until you have fine crumbs.
- Transfer the crumbs to a medium bowl. Add the softened cream cheese.
- Mix the crumbs and cream cheese together using a hand mixer or clean hands until fully combined and a dough forms.
- Roll the mixture into small balls, about 1 inch in diameter. Place them on a parchment-lined baking sheet.
- Chill the balls in the refrigerator for at least 30 minutes to firm up.
- Melt the semi-sweet chocolate in a microwave-safe bowl in 30-second intervals, stirring between each interval until smooth.
- Dip each chilled Oreo ball into the melted chocolate, ensuring it is fully coated. Use a fork to lift the ball out.
- Return the coated balls to the parchment-lined sheet.
- Refrigerate the finished Oreo balls for at least 1 hour, or until the chocolate coating is set.