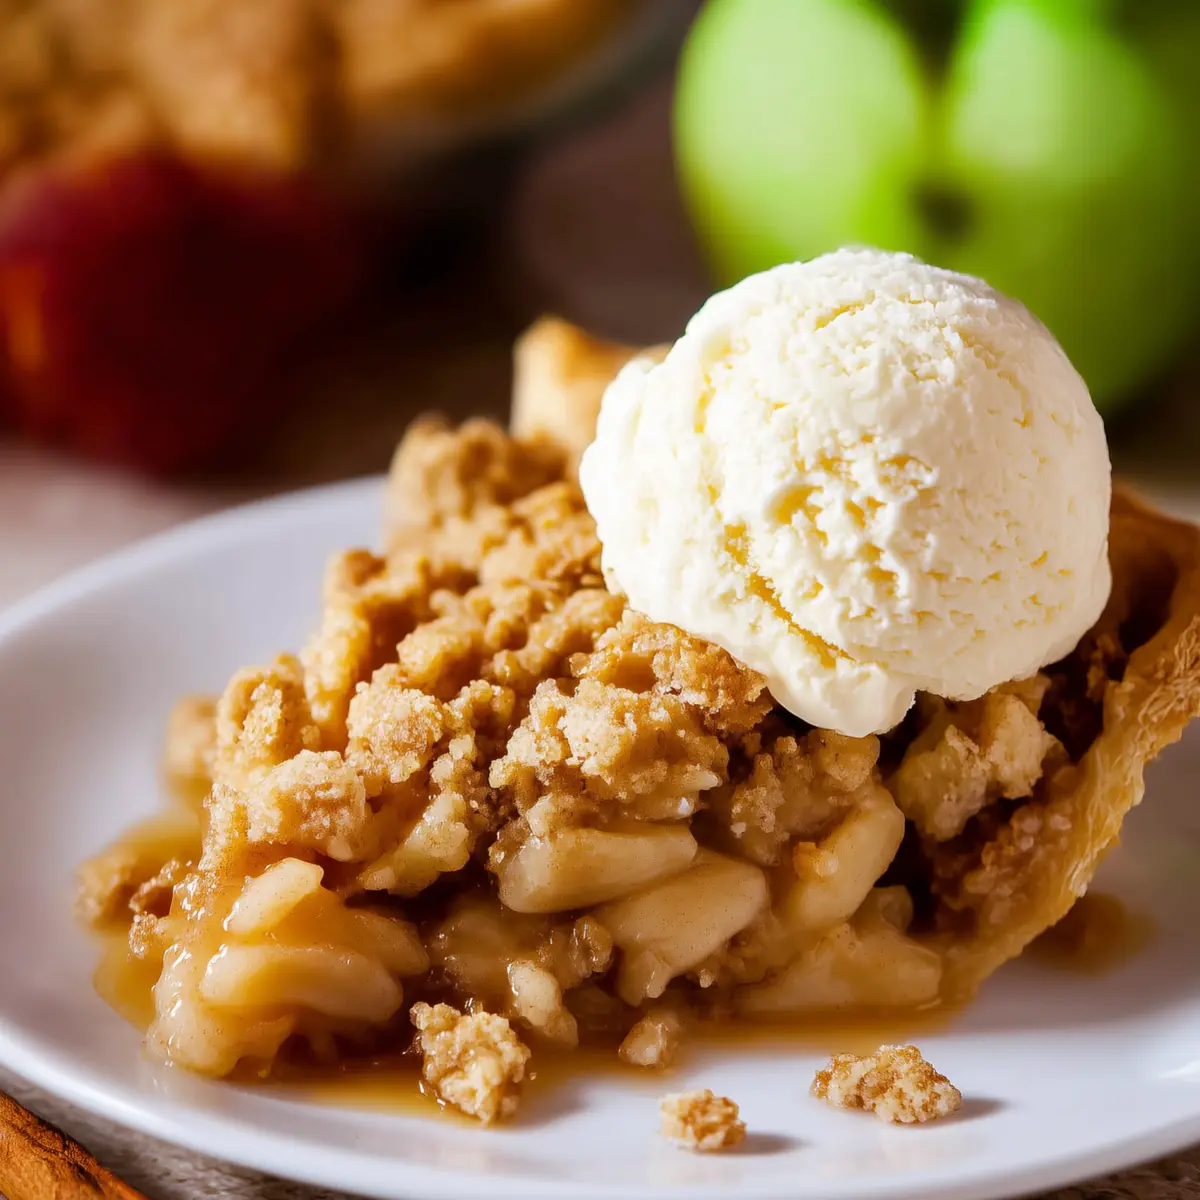
If you’ve been chasing that perfect slice of Dutch Apple Crumble Pie—one that nails the right amount of sweet, bright, gooey, and buttery—pull up a chair. This isn’t some sad grocery store knockoff; this is the real deal: a pie with a flaky crust, apples soft and juicy yet not mushy, and a streusel crumb so golden and crisp you’ll want to eat it first.
I used to cringe a little whenever someone brought apple pie to a potluck—so often dry, bland, or sprinkled with miserable canned topping. But then I got stubborn and started making this version at home. The first bite is always: shattering crust, a sweet-tart flood of cinnamon apples, and then the crumb, buttery and crunchy and impossible to resist.
You’ll make this Dutch Apple Crumble Pie not just for the promise of cozy, bubbling fruit, but because it’s one of the rare desserts that feels like home and makes the entire kitchen smell alive.
Why This Dutch Apple Crumble Pie Actually Stands Out
There are loads of apple pies out there, but Dutch Apple Crumble Pie has a few tricks up its sleeve that leave regular pies in the dust. For starters, you get a crisp, buttery crust as your base—tender and just salty enough to keep that sweet apple filling in check.
Then there’s the crumble. It’s not a garnish; it’s a crown. Each bite crackles with brown sugar, cinnamon, and golden, toasted bits. The apples themselves are a mix of tart and sweet, left with just a bit of bite after cooking—never mush, always juicy. Think of this as the mash-up of a classic apple pie with a bakery-style crumble, all in one forkful.
The best part? It’s not just a holiday showstopper. You’ll want to bring this pie out for Sunday suppers, rainy afternoons, or whenever you’re craving something equal parts comfort and celebration.
Building Blocks of Flavor: Dutch Apple Crumble Pie Ingredients
- pie crust: forms the foundation, buttery and flaky, holding everything together.
- Fresh apples: the real heart of the pie; combining different varieties gives you depth and balance—think tart, firm, and a touch sweet.
- Lemon zest and juice: brightens the filling and helps the apples keep their color.
- Brown sugar: adds a gentle richness and caramel notes to both the apples and the crumble topping.
- Granulated sugar: brings straightforward sweetness, keeping the overall flavor from being too heavy.
- All-purpose flour: thickens the filling and makes that crumbly topping so satisfying.
- Kosher salt: enhances everything, grounding both sweet and spiced elements.
- Cinnamon and nutmeg: the aromatic duo that signals “classic apple pie” from across the room.
- Cardamom (optional): gives a hint of something special, like your grandma’s secret ingredient.
- Vanilla extract: smooths out the flavors and makes the aroma unmissable.
- Butter, melted: brings the crumble together, creating those irresistible golden nuggets.
See the recipe card below for the full list of ingredients and measurements.
Switch Things Up: Ingredient Ideas for Every Pantry
If you’re low on apples, try mixing in pears for a mild, juicy twist—they play nicely with all those fall spices. No cardamom on hand? Just lean in harder on the cinnamon, or toss in a little ground ginger for warmth. If you need a gluten-free version, swap the flour with your favorite 1:1 gluten-free blend, both in the filling and the topping.
Craving a nuttier crunch? Add a handful of chopped walnuts or pecans to the crumble. If you’re out of brown sugar, coconut sugar can step in without missing a beat. For the crust, feel free to use store-bought dough if you don’t want to wrestle with homemade—Dutch Apple Crumble Pie will still come out stunning.
How to Bake Dutch Apple Crumble Pie Step by Step
Here’s how you turn a basket of apples into the ultimate crumble-topped pie. Let’s get into the details, because when it comes to homemade pie, it’s those little moves that take you from “pretty good” to “can I get the recipe?”
- Pick your apples and prep them. Go for a blend of tart and sweet apples for complex flavor and texture—think Granny Smith, Honeycrisp, and Golden Delicious. Peel, core, and slice the apples thin, tossing them as you go with lemon juice and zest to keep them bright.
- Cook the apples on the stovetop. This is one of those game-changers. Sauté your sliced apples with brown sugar, granulated sugar, flour, salt, cinnamon, nutmeg, and cardamom until everything softens and there are no raw pockets left. Keep them just tender, not falling apart—you want them to hold up after baking. Stir in vanilla at the end for an extra hit of aroma.
- Chill the filling completely. Pour the cooked apple mixture onto a tray or wide dish and cool it down fast in the fridge or freezer. This not only keeps your crust crisp when baking, but it also stops the apples from getting mushy.
- Roll out your pie crust and chill it. Fit the dough into your pie dish and give it a fancy crimp or just a rustic edge—nobody’s judging as long as it tastes good. Pop the crust in the fridge or freezer to get it nice and cold for maximum flakiness.
- Make the crumble topping. In a bowl, combine flour, sugars, salt, and melted butter. Stir just until you have a sandy, clumpy mixture—no need to fuss over perfection. Bigger clumps give bigger crunch (always a good thing).
- Assemble the pie. Once your filling is cold and crust is firm, pile the apples evenly into the shell, scraping in all their syrupy goodness. Add a layer of crumble, but don’t use it all—about half the amount at first is just right. The rest is coming in later for max texture.
- Bake, then add more crumble. Bake the pie in a hot oven until the crust is starting to color. Carefully pull it out, top with the remaining crumble, and shield the crust edges with foil. Pop it back in the oven to finish baking, so the topping turns golden and crunchy without burning the edges.
- Cool completely before serving. This is the hardest part, no doubt. But letting the pie rest turns the filling from juicy soup into the perfect sliceable pie, and keeps the crumble topping from getting soggy.
- Serve it right. Once cool, cut generous wedges and don’t hold back on the vanilla ice cream or a drizzle of salted caramel if you’re feeling fancy.
Pro Tips for Pie Perfection
Use a mix of apples rather than just one variety—it’s the number one way to up your flavor game. If you want to get ahead, cook your apples and prep your crust a day early; both can hang out in the fridge overnight. When it’s time to bake, make sure your oven and baking sheet are hot before the pie goes in—this sets the bottom crust fast so it stays flaky.
Don’t skip the chilling steps, even if you’re in a rush. Cold filling and crust keep everything crisp and keep the butter from melting too soon. Snap on a homemade foil shield for the edges toward the end of baking if they’re browning too quickly (or grab a store-bought pie shield if you’re a gadget person).
Letting the pie cool for a few hours makes all the difference in the final slice. Resist the urge to dig in straight from the oven, unless you like your filling swimming in syrup and your crumb topping limp. For leftovers, cover loosely and leave at room temperature for a day or two, moving to the fridge after that.
Serving Twists: What to Pair and Try Next
Dutch Apple Crumble Pie practically begs for a scoop of vanilla ice cream—classic, but there’s a reason. Want a little drama? Warm caramel sauce or a spoonful of crème fraîche adds a tangy edge. If you’re aiming for autumnal overload, pair your pie with a cup of hot cider, spicy chai, or even a strong coffee for that café-feel finish.
Double down on apple flavor by repurposing leftover slices for breakfast with a scoop of Greek yogurt. You can even switch up the fruit entirely—pear, blueberry, or sour cherry crumble pies are all fair game using this exact blueprint.
If prepping ahead, fully cool the pie before wrapping tightly and freezing. Thaw overnight in the fridge, then crisp it back up in a medium oven before serving. The crumble topping stays surprisingly crisp, and the spices mellow beautifully.
FAQs about Dutch Apple Crumble Pie
What type of apples work best for Dutch Apple Crumble Pie?
The best Dutch Apple Crumble Pie uses a blend of apples like Granny Smith, Honeycrisp, and Golden Delicious for complex flavor and texture. Mixing tart and sweet apples brings brightness without becoming cloying, and helps the apples keep a bit of bite after baking.
How do I keep the bottom crust from getting soggy?
To avoid a soggy crust, make sure your apple filling is cooled before adding it to the crust, and bake the pie on a hot preheated baking sheet or stone. These steps help set the crust quickly and keep it crisp under the juicy fruit filling.
Can I make Dutch Apple Crumble Pie in advance?
Yes, Dutch Apple Crumble Pie can be made a day or two ahead and stored loosely covered at room temperature, or in the fridge for longer. You can also freeze a completely cooled pie, then reheat it gently in the oven before serving to restore the crumb topping’s texture.
Is it possible to make this pie gluten-free or vegan?
Absolutely; swap in a 1:1 gluten-free flour blend for the flour and use a vegan butter alternative for the crust and crumble. Make sure your pie crust and other add-ins are vegan or gluten-free as needed—flavor and texture hold up well to these substitutions.
Final Thoughts on Dutch Apple Crumble Pie
Dutch Apple Crumble Pie proves that apple pie doesn’t have to be predictable or fussy. Between the crisp base, jammy spiced apples, and the generous crumble, it’s the kind of dessert that sparks requests for second slices and recipe repeats.
So if you’re craving that golden, bakery-style crust-meets-crumb experience, don’t just wait for the holidays—make this pie any time you want something lovingly homemade and entirely irresistible.
More Delicious Recipes
- Irish Apple Cake with Custard Sauce: This cake features apples in a moist base, echoing the comforting flavors of your Dutch Apple Crumble Pie.
- Cherry Cobbler Muffins: If you love the fruity filling in apple pies, these muffins are packed with juicy cherries for a similar delightful experience.
- Creamy Irish Coffee Pie: For a twist on traditional desserts, this coffee-infused pie pairs beautifully after enjoying a slice of apple crumble pie.
Dutch Apple Crumble Pie Recipe
Ingredients
Method
- Choose your apples. You need 5 pounds of apples for this recipe, which is about 11 large apples. I like to use a mix of apples for the best flavor. For this pie I used Granny Smith, Honeycrisp, and Golden Delicious.
- Make the filling: Use a microplane grater to zest 1/4 teaspoon lemon peel into a 12-inch high sided skillet. The heat should be off.
- Add the juice from half the lemon to the skillet, about 2 tablespoons. Don't use much more than this, you're not making a lemon apple pie. We just want to wake up the apples a bit and keep them from browning.
- Use a potato peeler or this handy apple peeler to peel the apples. Slice the apples into 1/8 inch pieces. Check out the photos above to see my method for slicing apples. I like to peel and slice one apple at a time so that they don't get brown: I peel one apple, then stop and slice it, add it to the pan with the lemon juice, and then move on to peeling the next apple. Stir the apples in the pan occasionally to coat everything with lemon juice.
- Once you have all the apples peeled and sliced in the pan, set it over medium heat on the stove.
- Add 1/2 cup packed brown sugar, 1/2 cup granulated sugar, 1/3 cup flour, 1/2 teaspoon kosher salt, 1 and 1/2 teaspoons cinnamon, 3/4 teaspoon nutmeg, and 1/2 teaspoon cardamom (optional). Stir it together gently so you don't break all the apples.
- Once the mixture is all moistened and you don't see patches of flour or cinnamon, set a timer for 20 minutes. Cover the mixture completely with a lid, but don't walk away. Stick around and stir the mixture every 3 minutes or so, replacing the lid each time. Cook for 20 minutes, until the apples are fork tender but still hold their shape. The apples will not soften more while baking in the oven. So have a taste and see if you want to cook a longer or shorter time. Only you can know your apple al dente perfection level. If your apples start to stick to the pan, add 1 tablespoon water (plus more as needed); use sparingly.
- Remove the pan from heat and stir in 1 teaspoon vanilla.*
- Transfer the apple pie filling (including all the the brown caramel gooeyness) to a half sheet pan, or any pan with a lip. Spread the apples all the way to the edges. Cool the apple pie filling completely by placing it in the fridge or the freezer. If you put it in the freezer, it only takes 30 minutes or so. (If you have plenty of time, you can just leave the apples in the pan to cool down; it will take a couple hours.)
- Roll out your pie dough and place in a 9-inch pie dish. Fold the edges underneath and crimp them with your fingers and thumbs. See my pie crust recipe for lots of photos and details.
- Place the pie crust in the fridge or freezer for about 30 minutes, for a really flaky crust.
- While the crust and filling are chilling, place a baking sheet or pizza stone in the center rack of your oven and preheat to 425 degrees F. Let it heat up for at least 20-30 minutes to make sure it's really hot.
- Make the sugar crumble: In a medium bowl, add the dry ingredients for the crumble: 1 and 1/2 cups flour, 1/3 cup white sugar, 3/4 cup packed brown sugar, and 1/2 teaspoon kosher salt (use less for table salt). Whisk together.
- In a small bowl, melt 3/4 cup butter (1 and 1/2 sticks). Pour the butter over the dry ingredients and stir together gently. You should end up with a pretty wet sandy mixture with some large clumps. See photos. Let it chill in the fridge until you are ready to assemble. Try not to eat it all.
- When the apple pie filling in the freezer is completely cooled, and the pie shell is mostly frozen, take them out of the freezer. Use a rubber spatula to scrape all the chilled apple pie filling into the pie shell. Don't forget to scrape in every last bit of the gooey filling.
- Use your hands or a fork to break the crumble into smaller bite size pieces. Top the pie with about a cup or two of the sugar crumble, not all of it! You only want to add enough to cover all the apples, we are not piling it on. (That's for later.) Place the remaining crumble back in the fridge to chill.
- Bake the pie: Place the chilled pie onto the baking sheet in the oven and let bake for 15 minutes at 425 F. The crust on the edge should be turning light brown.
- Meanwhile, get a square of tin foil that is the same size as your pie. Fold it in half, then in half again. Cut out the center. Open it up again. You should have a square of foil with a circle cut out of the center (or use a pie shield). See pie crust post for more details.
- After baking at 425 for 15 minutes, reduce the heat to 350 degrees F. Don't take the pie out of the oven. Just change the temperature. Bake at 350 for an additional 10 minutes.
- At this point, remove the pie from the oven and quickly shut the oven door. Sprinkle the remaining chilled crumble all over the top of the pie. Break up large pieces with your fingers. Place the foil on top of the pie crust (the center of the pie should be exposed). Loosely crimp it around the crust on the edge. This will protect the edges from burning.
- Don't forget that your oven temperature should be at 350. Place the pie back on the hot baking sheet in the oven and bake at 350 for about 25-35 more minutes. (the pie should be in the oven for a total of about 55-65 minutes)
- You will know the pie is done when the edges of the crust are brown and the crumble is turning a light golden brown in the center. If you want your crust and crumble to brown a little more, remove the foil shield and bake another 5-10 minutes.
- Let the pie cool on a wire rack for about 4 hours. I know, this is killer. But if you cut into it now, the juices will be lava hot and way too liquid-y. Your crumble will get wet and soggy sad. You have to wait for it to cool to room temperature to get the right texture for the filling AND to not ruin the crumble. Pie! A lesson in patience indeed.
- Once the pie is completely cool, slice and serve! My husband Eric considers it a crime to serve this without vanilla ice cream, and I tend to agree. Treat yoself right. Drizzle on some Salted Caramel Sauce for a really decadent treat!
- Store the pie on the counter for up to 2 days, covered with plastic wrap or foil. After that transfer it to the fridge.
- See notes for detailed freezing instructions!