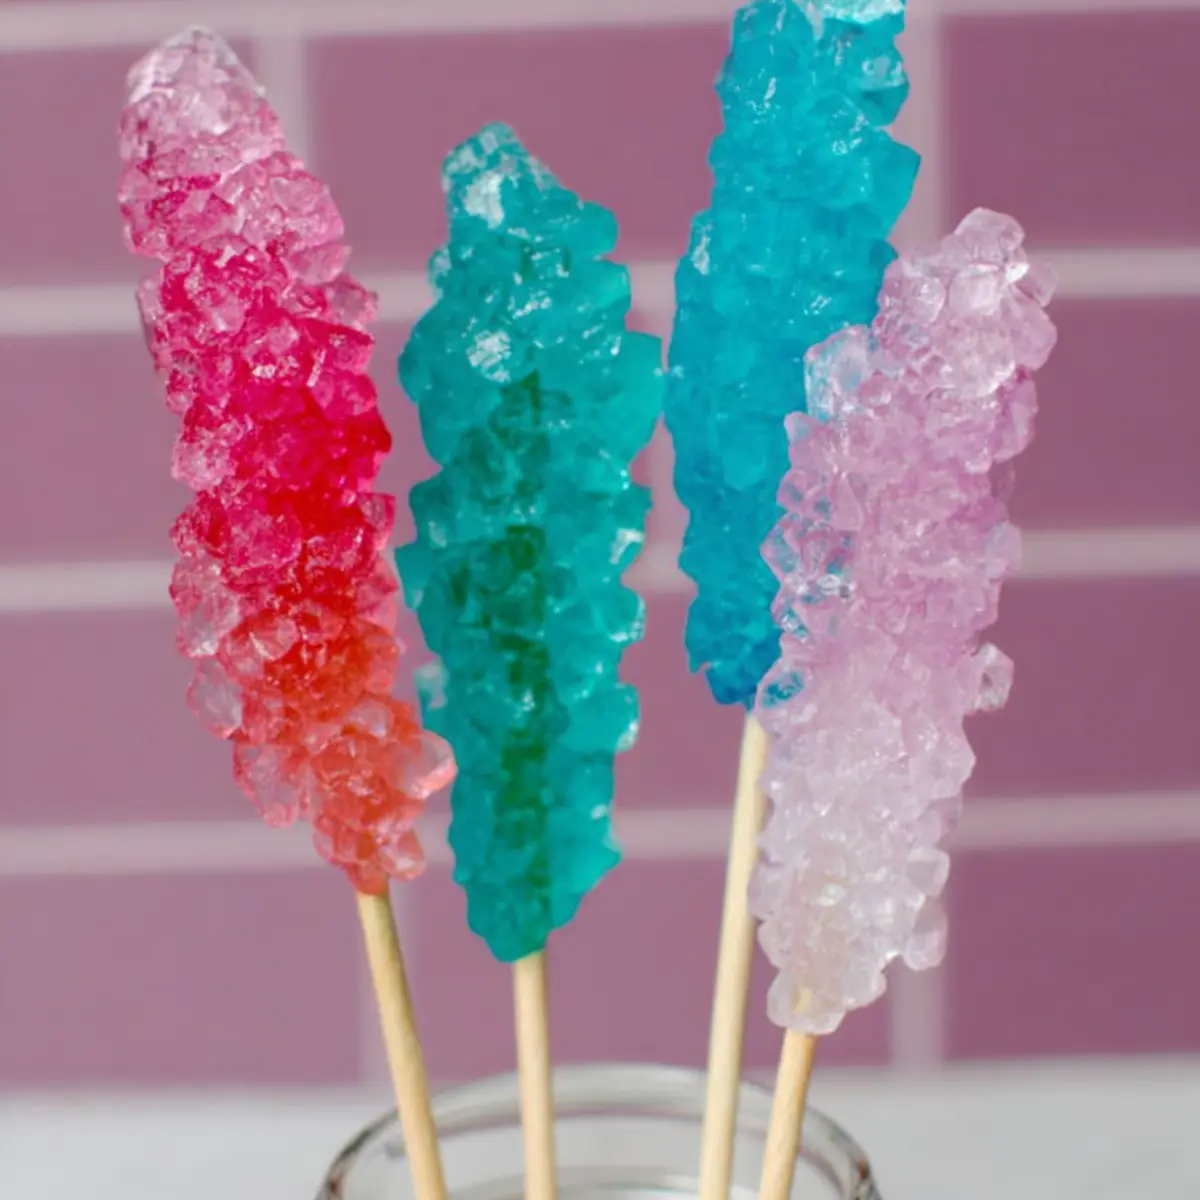
It starts with crystals. If you’ve ever pressed your face up to a candy shop window and admired those jewel-toned, glistening sticks, you know the sparkle of curiosity DIY rock candy brings. Sweet and showy, this homemade treat is part dessert, part edible science project, and 100% the sort of thing you can’t help but hover over, checking for signs of those first sugar crystals clinging to their sticks.
The appeal here isn’t just sugar—though you’ll need plenty. It’s the sense of anticipation as the crystals slowly form over several days, turning a simple syrup into something crunchy, beautiful, and nostalgic. DIY rock candy is the rare “recipe” where waiting is half the experience—and dragging kids (or, let’s be honest, grownups) into the process only adds to the fun.
Why Homemade Rock Candy Is Worth It
You might wonder—why bother making DIY rock candy when it’s easy to snag a box at the store? For starters, nothing beats the feeling of seeing those sparkling, jagged crystals forming in your kitchen. It’s hands-on fun that feels both magical and scientific, giving you the thrill of “cooking” without ever needing to fuss with candy thermometers or sugar stages.
This project delivers big wins if you’re looking for interactive treats with kids, need an affordable and memorable party favor, or just want to scratch that childhood nostalgia itch. You can control the colors, play with flavors, and shape each stick to make a one-of-a-kind edible jewel. DIY rock candy takes patience, but the reward is pure, crunchy, glittery satisfaction.
DIY Rock Candy Ingredient Guide
For the best flavor and color, start with the highest quality basics you can manage. Here’s what goes into making classic homemade rock candy:
- Wooden skewers: The “stick” your crystals cling to—soak and coat these to help crystals grab on.
- Mason jars: Sturdy glass jars create the perfect little home for sugar crystals to grow undisturbed.
- Clothespins or chip clips: These hold the skewers in place so your rock candy doesn’t touch the bottom.
- water: Key for dissolving the sugar and creating a super-saturated solution.
- Granulated sugar: The backbone of rock candy; this is where all the sparkle and crunch starts.
- Food coloring: Adds personality and makes each stick unique. Gel or liquid both work.
See the recipe card below for the full list of ingredients and measurements.
Creative Ways to Customize Your Candy
Running low on something? Want to put your own spin on classic rock candy? There’s plenty of room to play. Swap in lollipop sticks or bamboo chopsticks if you’re out of skewers. Small glasses or recycled jars double as crystal-growing vessels—they don’t need to match.
If you want your DIY rock candy to be extra vivid, use gel food coloring for deeper hues, or try natural dyes like beet or matcha for subtle shades. For the sugar, stick with pure white granulated sugar for the best clarity and defined crystals—but a pinch of flavored extract (orange, mint, almond) stirred in with the coloring takes each batch from basic to memorable.
Step-by-Step: How to Make DIY Rock Candy at Home
Making rock candy is less about tricky technique and more about a dash of patience. Each stage adds to the anticipation—and that’s a big part of the adventure. Here’s how you’ll make these sugar-studded sticks from scratch:
- Prep the skewers. Soak each skewer in water, roll in granulated sugar, and let them dry thoroughly. This encourages early crystals to form and stick, giving your candy a jump start.
- Get your jars ready. Make sure each jar is clean and warm—chilled jars can cause sugar to crystallize too quickly or unevenly. Rest a clothespin or chip clip across the mouth of each jar, clipping the top of the skewer so it hangs upright about a finger’s width from the bottom.
- Mix up a super-saturated syrup. Gently heat your water in a large saucepan until simmering, then stir in sugar—a little at a time—letting each handful dissolve before you add more. The syrup will grow thick and almost glossy by the end, with the sugar resisting more as you go.
- Let the syrup cool slightly. Take the pan off the heat and give it a short rest. This helps you safely pour without cracking your jars and keeps the food coloring vivid.
- Divide the syrup between jars. Move them to wherever they’ll live for the next week—this is their new home because you don’t want to be shifting them later. Add a few drops of color to each jar, swirling for a burst of vibrancy. Set your prepped skewers back in place, making sure they’re suspended and not touching the glass or each other.
- Sit back and watch the magic. Within a few hours, you should spot the beginnings of crystals. Let them chill, undisturbed, until dramatic, chunky sugar gems form (about a week). The hardest part is keeping your hands off!
- Harvest your rock candy. Gently break through any sugar crust covering the top of the jar and coax the stick out. Let it drip dry over a bowl before crunching in—or packing up for friends.
Pro Tips for the Best Crumbly Crystals
Experience (and more than a few sticky fingers) says a little strategy makes all the difference. Avoid moving the jars once the skewers are set—any jostling will slow down or disrupt crystal growth. If you want extra big crystals, stretch out the waiting game for a few days longer.
Humidity is the enemy of sharp rock candy. Choose a dry spot—away from the oven or windows—and don’t cover the jars. If you’re prepping for a party, wrap the finished sticks in wax paper so they stay crunchy, not tacky.
Leftovers rarely last, but finished rock candy keeps well at room temperature, stored in an airtight container away from heat and moisture. And don’t worry about little flecks of colored syrup—some color variation just adds to the homemade charm.
Pairing Ideas and Candy Variations
Rock candy is a scene-stealer on its own, but it also shines as a party favor or eye-catching drink stirrer. Drop one into a mug of hot tea or cocoa for built-in sweetness and a pop of color.
If you want a twist, try adding peppermint extract or a dash of vanilla to the syrup before pouring. For an ombre effect, gently swirl two food coloring shades in one jar. Mixing in citrus zest or edible glitter right before the syrup sets can create surprisingly fancy sticks that feel fit for a celebration.
Want rock candy to double as edible science? Encourage kids to keep a daily “crystal diary,” tracking changes as their edible gems slowly take shape. It’s dessert and a STEM project rolled into one.
FAQs about DIY Rock Candy
How long does it take for rock candy crystals to grow?
DIY rock candy crystals generally take about a week to reach their full size. The longer you let them grow, the larger and more defined the crystals become.
Can I use brown sugar or other sweeteners?
Brown sugar or other sweeteners won’t produce the same clear, dramatic crystals as white sugar. Stick with plain granulated sugar for classic, glassy rock candy results.
Is it possible to make rock candy without food coloring?
Yes, you can make clear rock candy or use natural colorings like beet juice or tea for subtle hues. The candy will be just as tasty even without artificial dyes.
How do I keep the crystals from sticking to the jar?
Make sure the skewers hang freely and don’t touch the sides or bottom of the jar. This setup allows the crystals to grow evenly and come out cleanly when finished.
Bringing It All Together
DIY rock candy is about more than just a crunchy, sweet treat—it’s the anticipation, the little daily checks for crystals, and that burst of childhood science in your own kitchen. Once you try it, you’ll want to share the wonder with friends or bring it out for every party.
It’s a project that lets you play with color, experiment, and get hands-on. And best of all, you get to eat your experiment when it’s done—sky-high sugar crystals, crackling between your teeth. Making your own rock candy isn’t just easy—it might just make you feel like a kid again, no matter how old you are.
More Delicious Recipes
- Peppermint Hot Chocolate: This festive drink pairs well with rock candy as a sweet treat that enhances the holiday spirit.
- Mock Mimosa: A delightful non-alcoholic beverage that adds a festive touch to your gatherings, perfect for sipping while waiting for your candy to crystallize.
- Christmas Coffee Blend Recipe: Enhance your holiday celebrations with this aromatic coffee blend that complements the sweetness of your homemade rock candy.
DIY Rock Candy
Ingredients
Equipment
Method
- Submerge skewers in water, coat them in sugar, and then set out to dry. I like to do this a day ahead of time, but as long as you let them dry for an hour, they should be fine.
- Make sure your jars are clean and not cold (run hot water through them if necessary). Attach a clothespin or chip clip to the top of each skewer and then balance over the top of jars. Be sure your skewer is hanging about an inch from the bottom of the jar as the rock candy crystals will stick to the bottom of the jar and will make it tough to remove skewers.
- In a large saucepan, bring water to a boil. Add sugar in one cup at a time, stirring with a wooden spoon and letting each cup fully dissolve before adding the next. You'll notice it becomes harder and harder for the sugar to dissolve as you add more in.
- Once your final cup of sugar has been dissolved, let mixture simmer for about 5 minutes before removing from heat. Let mixture rest off the heat for about 15 minutes.
- Divide sugar solution amongst the 5 prepared jars. Stir in food coloring at this time. I recommend bringing your jars to where they'll be resting for the next 6-7 days at this time. Be sure to use caution as the jars will be very hot. Once they're in their resting spots, place prepared skewers into solution. You'll want to try your best not to move jars around much once skewers are in place.
- You'll likely see little crystals forming within hours, but you'll want to let the jars rest for 6-7 days to let sugar crystals fully form.
- When ready to remove rock candy sticks from jars, use your finger or a fork to gently crack the hardened sugar on top of the jar and gently wiggle the stick to release. Let solution drizzle from stick (I recommend setting the candy over an empty jar or bowl to let it drip) before enjoying the candy.