Some desserts just know how to steal the show, and Banana Pudding Easter Truffles are definitely in that category. There’s something about the combination of creamy banana pudding, the crunch of crushed vanilla wafers, and a smooth, pastel-colored chocolate shell that feels both nostalgic and a little bit magical. Every year around Easter, I find myself drawn to anything that makes the table pop with spring color—bonus points if they’re easy to make ahead and irresistible to people of every age.
I first made these Banana Pudding Easter Truffles out of desperation for something more playful than another carrot cake or plain sugar cookie platter. Their appeal is immediate: you bite through glossy, melt-in-your-mouth chocolate, past a rainstorm of sprinkles, right into a soft, rich center that tastes exactly like the best banana pudding you can imagine—only handheld, even better the next day, and just right for gifting or showing off. What turns this into an Easter favorite is the chance to roll each one in pastels and glittery sprinkles, letting kids (or anyone, really) join in on the fun.
When Truffles Step into the Easter Spotlight
Certain recipes instantly announce, “Spring is here!”—and these Banana Pudding Easter Truffles truly carry that message. Whether you tuck them into an Easter basket, line them up on a dessert board, or just sneak one from the fridge after dinner, they always feel like a tiny celebration. The bright colors alone make them festive, but it’s really the familiar comfort of banana pudding in a brand-new form that gets people interested—and, if I’m being honest, a little greedy.
Easter desserts don’t have to be fussy, and these truffles are proof. You can mix the filling in minutes, play with decorations, and let the anticipation build as the chocolate shell sets. There’s always someone hovering nearby, waiting for just one more sample—my kitchen turns into an unofficial truffle taste-test lab every year.
The Ingredients That Build Flavor and Fun
Every bite of Banana Pudding Easter Truffles comes down to the marriage of humble pantry staples and playful finishing touches. Here’s what you’ll want on hand:
- Crushed vanilla wafers – The backbone for both structure and flavor; they give the truffles that classic banana pudding “crust” feeling in every bite.
- cream cheese (softened) – Brings silkiness and helps everything bind together, plus adds a gentle tang to offset the sweetness.
- Banana pudding mix (dry) – The secret to getting that pudding taste without needing to cook; the dry mix infuses the whole dough with banana-flavored nostalgia.
- Milk – Just enough to loosen the mixture and bring it together into a dough you can shape easily.
- Vanilla extract – Rounds everything out with a subtle, fragrant sweetness that plays beautifully with the wafers and banana.
- White chocolate chips or candy melts – Used as the truffle shell; go for good-quality white chocolate if you can for the smoothest dip and richest taste.
- Food coloring (pastel colors) – Totally optional, but highly recommended for Easter—soft yellows, pinks, or even mint greens all look adorable.
- Crushed vanilla wafers – Extra for an easy garnish with texture and more of that cookie crunch.
- Easter sprinkles – For serious holiday flair. Think pastel pearls, bunny shapes, or anything that makes you smile.
- Colored chocolate drizzle – Adds a playful finish; you can use leftover melted chocolate in a coordinating color for a little extra pop.
See the recipe card below for the full list of ingredients and measurements.
Transforming Basic Ingredients Into Easter Truffles
Making Banana Pudding Easter Truffles is a hands-on process, but hardly complicated. It’s the kind of project where you can listen to your favorite playlist, test the dough as you go, and feel like you’re crafting edible gems for everyone who walks through your door.
- Mix up the filling: Start with a bowl of crushed vanilla wafers—think fine crumb, but not total powder. Add the softened cream cheese, then sprinkle in the dry banana pudding mix. Pour in the milk and hit it with a splash of vanilla extract. When you start mixing, it’ll look a bit dry and crumbly, but keep at it. Just when it seems hopeless, the dough will suddenly come together, pliable and pleasantly sticky, ready to be shaped.
- Roll and chill: Scoop out pieces small enough to fit in the palm of your hand and roll into balls. Try for uniform sizes so they set evenly and look good grouped together. Drop them on a parchment-lined tray, then pop the tray into the fridge. They need a good chill—half an hour at least—so they’ll hold their shape for dipping.
- Melt the chocolate: Grab your white chocolate chips or candy melts. Melt them in short bursts in the microwave, stirring thoroughly every time to avoid scorching. If the chocolate feels thick, you can stir in a tiny bit of neutral oil. Squeeze in a drop or two of food coloring (pastel shades scream Easter, but any color works), and swirl until you get the shade you like.
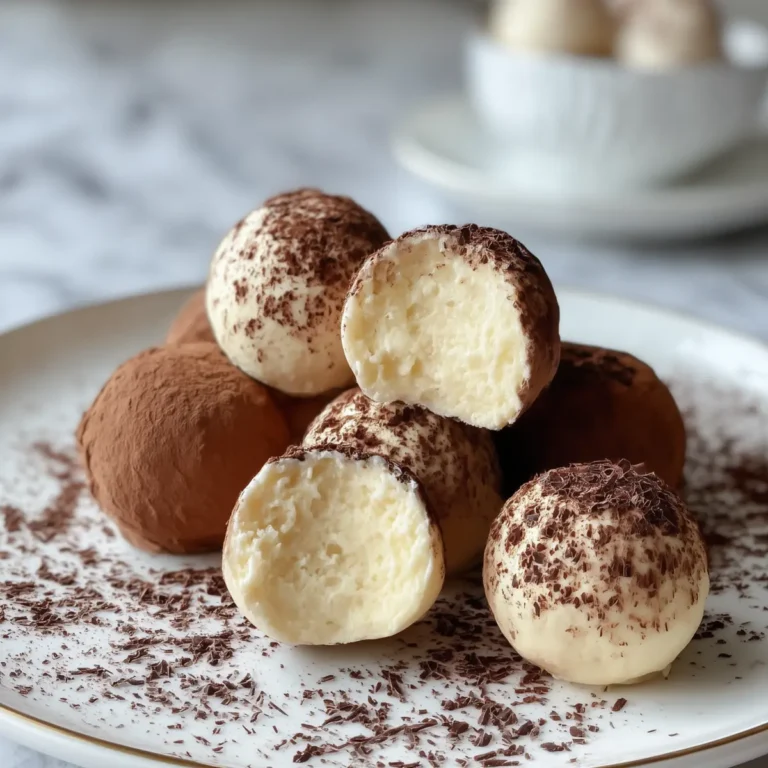
- Dip and decorate: Once the truffle centers are chilled and firm, dunk them into the melted chocolate—use a fork to lift them out and let the excess drip back in. Line them up neatly on that parchment again, and move quickly to decorate before the shell hardens. Sprinkle the tops with crushed vanilla wafers, pastel sprinkles, or drizzle them with more colored chocolate.
- Let them set and serve: Give the truffles about twenty minutes at room temperature or in the fridge to let the shell firm up. Once set, they’re ready for snacking, gifting, or proud display on the holiday buffet.
The Texture and Flavor Journey in Every Bite
What makes Banana Pudding Easter Truffles so satisfying isn’t just the flavor—it’s the way the experience unfolds, bite by bite. There’s the satisfying snap of the chocolate shell, especially when you serve them cold. Next, your teeth sink straight into a silky, creamy filling—the kind that feels both airy and rich, almost like cheesecake but with banana pudding’s unmistakable softness. Crushed wafers sneak in little pockets of crunch, while a hint of vanilla lingers throughout.
The magic is that these truffles hit that sweet spot between classic and new. On the nose, you pick up the scent of ripe bananas and vanilla, layered beautifully with sugar and white chocolate. The aftertaste isn’t heavy or cloying—just enough sweetness to leave you wanting another. If you close your eyes between bites, you might catch memories of family picnics, spring brunches, or the scent of cookies cooling in a busy kitchen.
Tips, Tricks, and Festive Variations to Try
You don’t have to be a candy-making pro to pull off an impressive batch of Banana Pudding Easter Truffles. A few notes I’ve picked up—sometimes the hard way—might help you nail your first batch:
- Keep your hands cool: If the dough gets sticky as you roll, rinse your hands in cold water and dry them off before continuing. Chilled dough is much easier to shape and dip.
- Go wild with decorations: Colored sugars, pastel mini marshmallows, or even a dusting of edible glitter can all turn these truffles into instant showstoppers. Let kids or friends help with decorating for a true celebration.
- Storing and making ahead: These truffles keep best in an airtight container in the refrigerator, where the filling stays firm and the chocolate keeps its shine. They last several days—ideal for prepping before any Easter chaos begins.
- Variation ideas: Try swapping out some of the vanilla wafers with shortbread or graham crackers for a different kind of crunch. If you like a deeper banana flavor, add a few drops of banana extract to the dough. For a grown-up twist, slip a little bourbon or dark rum into the filling (just a dash—don’t overdo it).
- Allergy-friendly adjustments: Use gluten-free vanilla wafers and dairy-free cream cheese and chocolate for a version everyone can enjoy. Banana-flavored instant pudding mixes also come in sugar-free styles if anyone at your gathering is watching their sugar.
Making Them Shine on Your Easter Table
Banana Pudding Easter Truffles are at their best when the entire table is buzzing with springtime energy—colorful napkins, pastel plates, the works. They line up beautifully on tiered cake stands, sparkle in cellophane bags as party favors, or look right at home tucked into “grass” in a nest of Easter basket goodies. Try pairing these truffles with a glass of cold milk or even a bubbly mimosa at brunch.
If you want to lean hard into the Easter theme, nestle each truffle in a mini cupcake liner, arrange them in a circle like a springtime wreath, or tuck a little jelly bean beside each one before serving. They’re perfect for sharing, but don’t be surprised if more than a couple “disappear” even before the main meal is cleared from the table.
FAQs about Banana Pudding Easter Truffles
Can I make Banana Pudding Easter Truffles ahead of time?
Absolutely! These truffles are ideal for making ahead. They actually taste even better if the flavors have some time to mingle, so you can prep them the night before or even two days in advance and store them in the fridge until you’re ready to serve.
Can Banana Pudding Easter Truffles be frozen?
You can freeze these truffles, though the texture of the chocolate shell and filling may be a bit softer after thawing. If you do freeze them, use an airtight container and let them thaw slowly in the refrigerator before serving to avoid condensation spoiling the shell.
What can I use if I don’t have banana pudding mix?
If banana pudding mix isn’t available, try using vanilla or white chocolate pudding mix with a splash of banana extract. While it won’t be quite the same as classic banana pudding, you’ll still get a sweet, creamy truffle that pairs beautifully with the vanilla wafers.
How should I store leftover truffles, and how long will they last?
Keep any leftover Banana Pudding Easter Truffles in a sealed container in the fridge. They’ll stay fresh and delicious for up to a week, though they rarely last that long once family and friends find out where you’ve stashed them!
The Sweet Finish: Spring in Every Bite
There’s a simple kind of joy in a tray of homemade Banana Pudding Easter Truffles—their gentle pastel colors and soft, creamy centers invite that second (or third) taste without a shred of guilt. Every truffle is a little burst of spring on your tongue, bringing back childhood celebrations and making space for new traditions. Make a batch, share them around, and watch every face light up as the chocolate cracks open and banana pudding clouds melt away inside. Some treats just feel right for the moment—and these fit Easter like a glove.
More Delicious Recipes
- Easter Egg Fruit Pizza: This vibrant dessert is perfect for spring gatherings and features a colorful assortment of fruits, making it a delightful companion to the truffles.
- Loaded Leprechaun Popcorn: A fun and festive treat that’s easy to make, it adds a playful touch similar to the colorful sprinkles on your truffles.
- St. Patrick’s Day Truffles: These truffles are a great alternative to your Easter treats, offering a festive twist with shamrock-inspired flavors and designs.

Banana Pudding Easter Truffles
Ingredients
Method
- Make the Filling: Mix the crushed vanilla wafers, cream cheese, banana pudding mix, milk, and vanilla extract until a dough forms.
- Shape the Truffles: Roll the mixture into 1-inch balls and place them on a parchment-lined baking sheet. Chill for 30-45 minutes.
- Melt the Chocolate: Melt the white chocolate in the microwave, stirring every 30 seconds until smooth. Add food coloring if desired.
- Coat the Truffles: Dip the chilled truffles into the chocolate, letting the excess drip off.
- Decorate: Sprinkle with crushed wafers, sprinkles, or chocolate drizzle.
- Set and Serve: Let the truffles set for 15-20 minutes, then serve in a decorative bowl or gift box.