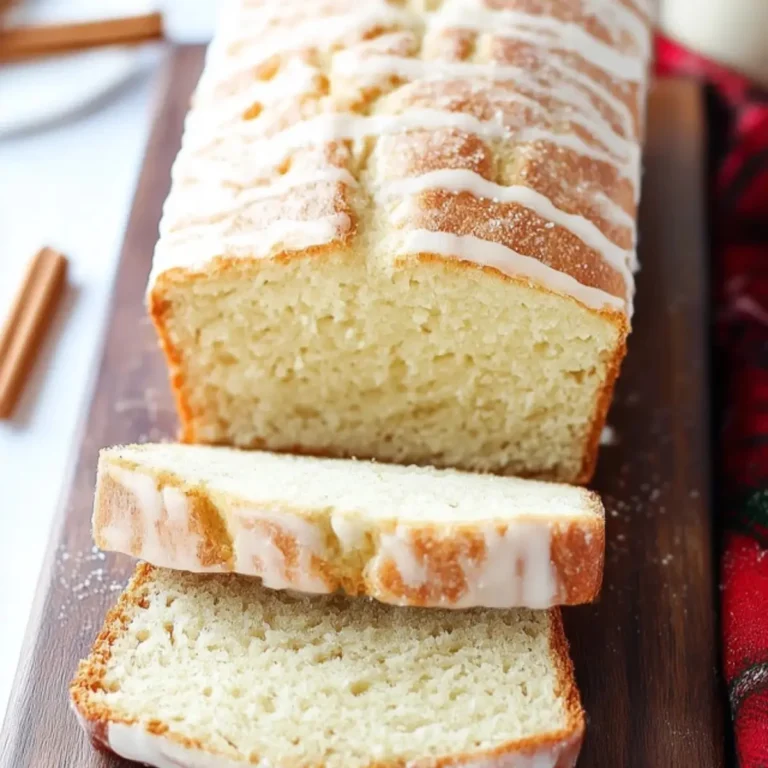
The scent of freshly baked Irish scones takes me right back to cozy mornings, when the kitchen feels warm and alive and all you want is to linger over a good cup of tea. There’s something so simple and honest about a batch of golden, crumbly scones, still oven-warm, eager to be split open and slathered with jam and melting butter. Irish scones are a staple for weekend breakfast or a spontaneous afternoon treat—little clouds of buttery dough with crisp tops and tender middles, perfect for sharing (or not sharing, honestly).
What makes these Irish scones so delightfully tender
Irish scones are all about contrast—crisp, golden tops giving way to soft, fluffy centers. There’s a reason so many people fall for their humble charm. The secret lies in cold, diced butter blended just so into the dry ingredients, creating tiny pockets of richness that steam up into a delicate crumb as the scones bake. Buttermilk brings a gentle tang and a sturdy lift, while a single egg binds everything without weighing the scones down.
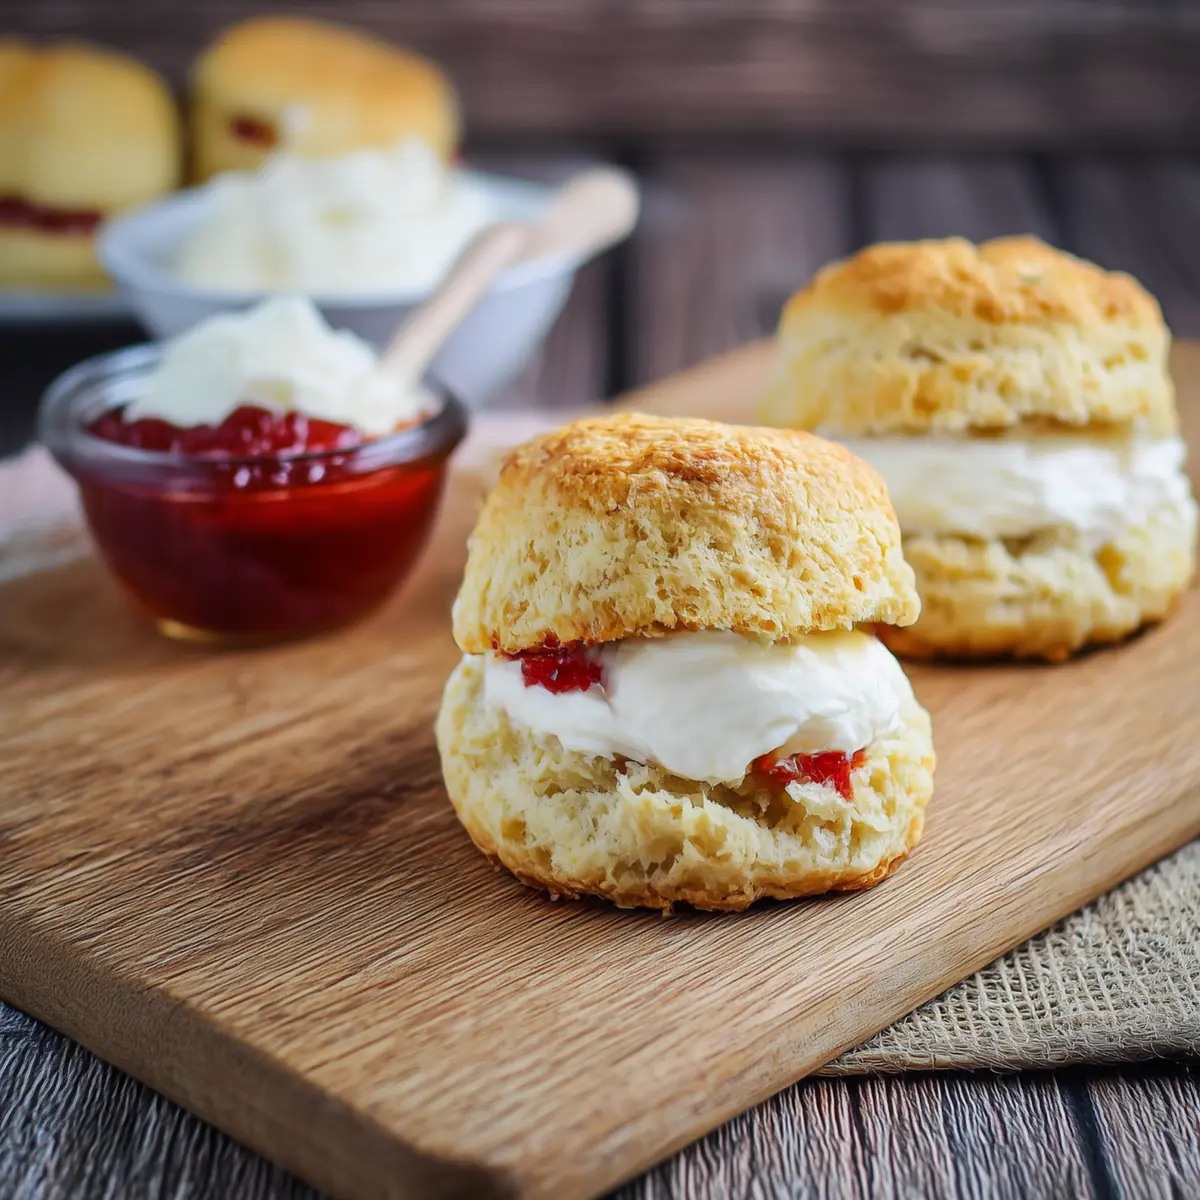
Imagine breaking open one of these scones while it’s still warm. The tender crumb yields easily and soaks up a smear of raspberry jam or clotted cream. That first bite is pure comfort, with buttery layers and a mellow sweetness that’s never overpowering. These are the kind of scones that feel just as right at a special brunch as they do on a lazy Sunday morning.
The ingredients that bring authentic Irish scones to life
Great scones start with everyday ingredients, each one there for a reason. Here’s what goes into building their classic flavor and texture:
- Flour – gives the scones their structure; use a good all-purpose variety for a light, balanced crumb.
- Granulated sugar – just a hint brings out the natural sweetness and helps with browning.
- Baking powder – ensures the scones rise beautifully for that high, fluffy profile.
- Salt – balances the flavors so nothing tastes flat or one-note.
- Unsalted butter (cold and diced) – chills are key! Cold butter means lovely flakes and a tender interior.
- Egg – adds richness and helps hold the scones together without making them heavy.
- Buttermilk (cold, plus extra for brushing) – brings moisture, a subtle tang, and reacts with the baking powder to lift the dough.
See the recipe card below for the full list of ingredients and measurements.
Bringing these Irish scones together in your own kitchen
There’s a rhythm to making Irish scones that never loses its appeal, even after a dozen batches. Here’s how to bring them to life in your own kitchen:
- Begin by preheating your oven, so it’s good and hot when the dough is ready. Prepare a large baking sheet with parchment paper or a light dusting of flour.
- Tip all the dry ingredients—flour, sugar, baking powder, and salt—into a large mixing bowl and blend them together well.
- Toss in the cold, diced butter. Using a pastry cutter, two forks, or even your fingertips, work the butter in gently until the mixture looks like coarse crumbs, with some small bits of butter still visible (nothing larger than a pea).
- In a small bowl, whisk the egg with most of the buttermilk until completely combined. Pour this mixture into the dry ingredients and stir gently with a wooden spoon or your hand. Add more buttermilk, little by little, just until the dough comes together (don’t overdo it; you want the dough to be soft, not sticky).
- Turn the dough onto a lightly floured surface and pat it out into a circle about as thick as your thumb.
- Take a round or biscuit cutter and cut out circles from the dough, pressing straight down—no twisting. Gently push together any remaining scraps and cut a few more scones.
- Transfer each round to your prepared baking tray. Brush the tops with an extra swoosh of buttermilk for lovely golden crowns.
- Slide them into the oven and let them bake until they’re risen and tinged with golden edges. The kitchen will fill with a toasty, buttery aroma that’s nearly impossible to resist.
Mastering that fluffy-soft yet golden finish
A perfect Irish scone is unmistakable even from afar: slightly rustic with a proud rise, pale golden all over, with a gorgeous aroma that hints at butter and warmth. Achieving this magic is less about fancy technique and more about respecting the dough. Work quickly, keep everything cold, and resist the urge to knead or squash the dough smooth—that slightly ragged look is what keeps scones tender.
A gentle hand means you’ll get those fluffy, pillowy middles, while the final brush of buttermilk on top adds a soft shimmer and subtle color. And remember, baking scones until just golden (not too brown) is the secret to their signature texture: a bit of outer crunch, but soft and yielding at the very first bite.
Fresh ideas for serving, storing, and variations on Irish scones
There’s nothing quite like enjoying Irish scones warm from the oven, split open and layered with cool butter and your favorite jam. If you’ve ever tasted them with a spoonful of whipped cream or clotted cream, you know why they’re so beloved on breakfast and tea tables across Ireland.
For a little twist, add in a handful of dried fruit—currants or raisins are the classics. On quiet mornings, serve scones with a good pot of tea or coffee. They’re also a treat alongside a rich hot chocolate for an afternoon pick-me-up.
If you want a slightly lighter version, you can swap in half-and-half or even milk for the buttermilk (the flavor will shift slightly, but the scones will stay soft). Leftover scones store well in an airtight container at room temperature for a day or two. If you want to keep them longer, freeze them individually and reheat in a low oven until just warmed through—they’ll taste nearly as good as fresh.
FAQs about Irish Scones
Can I make Irish scones with self-raising flour?
Yes, you can substitute self-raising flour for the flour and baking powder, but be sure to omit or reduce the additional baking powder in the recipe. The texture will still be fluffy, though the rise might vary a little bit.
How do I store leftover Irish scones to keep them fresh?
Keep leftover Irish scones in an airtight container at room temperature for up to two days. For longer storage, wrap each scone and freeze; reheat directly from frozen in a warm oven for best results.
Can Irish scones be made ahead of time?
Absolutely! You can prepare the scone dough, cut out the rounds, and refrigerate them (covered) overnight. Bake as usual in the morning for freshly baked flavor without the early wake-up call.
What’s the best way to reheat Irish scones?
To bring scones back to their just-baked warmth, pop them in a low oven (around 150°C) for 5–10 minutes. This brings back their outer crispness and softens the crumb, perfect for serving.
Can I add fresh or dried fruit to Irish scones?
Dried fruit like currants or raisins are classic additions to Irish scones, and they blend right in with the dough before shaping. Fresh fruit tends to add extra moisture, so use diced apple or berries sparingly and expect a more cake-like texture.
Just one bite of these Irish scones—a little crisp, a little tender, all buttery and comforting—and your kitchen might never feel quite the same again. Baked fresh, split open, and savored with your favorite toppings, these scones have a way of turning a simple morning into something quietly special.
More Delicious Recipes
- Irish Cream Poke Cake: This cake features the rich flavors of Irish cream, perfect for those who love the essence of Ireland in their sweets.
- Irish Apple Cake with Custard Sauce: Combining the delightful fruitiness of apples with a comforting custard makes this cake an ideal partner for scones.
- Irish Shortbread: These buttery cookies complement your scones well, enhancing that delightful Irish baked goods experience.
Irish Scones
Ingredients
Method
- Preheat oven to 400˚F (200˚C). Line a large baking sheet with parchment or lightly flour.
- In a large bowl, combine the flour, sugar, baking powder, and salt.
- Cut in the cold butter using a dough blade, forks, or your fingers until texture becomes coarse and no pieces are larger than a pea.
- In a small bowl, beat together egg and 3/4 cup (177 milliliters) buttermilk. Pour into the flour mixture and gently mix using your hands or a wooden spoon.
- Slowly add the remaining 1/4 cup (60 milliliters) buttermilk only as needed to bring the dough together.
- On a lightly floured surface, gently pat the dough into a circle about 1 inch (2.5 centimeters) thick.
- Use a 2 1/2 inch (6 centimeter) round or biscuit cutter to cut out circles of dough. Gently bring together the leftover scraps of dough to cut out more circles.
- Transfer to prepared baking sheet. Brush the tops with additional buttermilk.
- Bake in preheated oven until golden, 15-20 minutes.