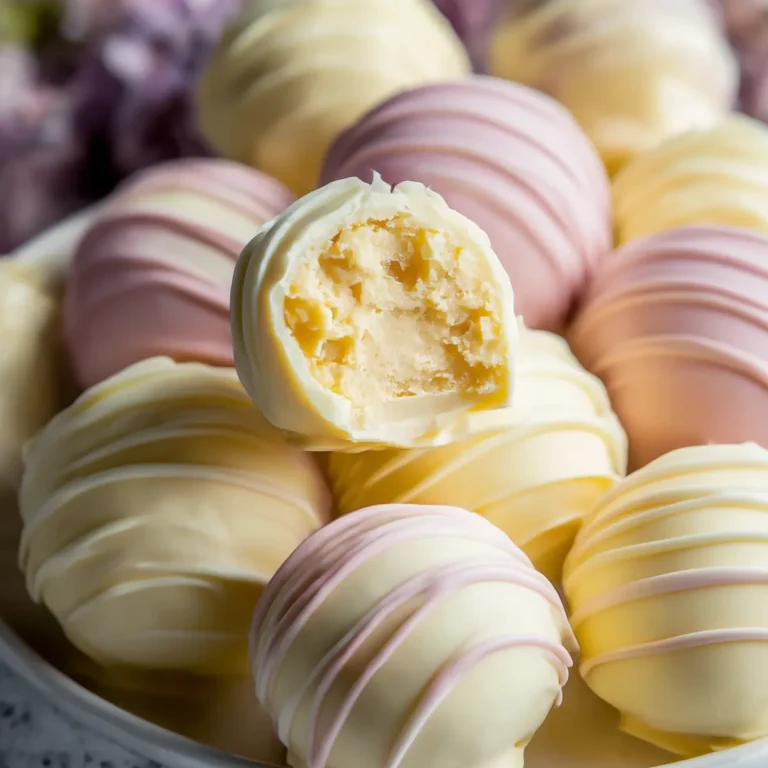
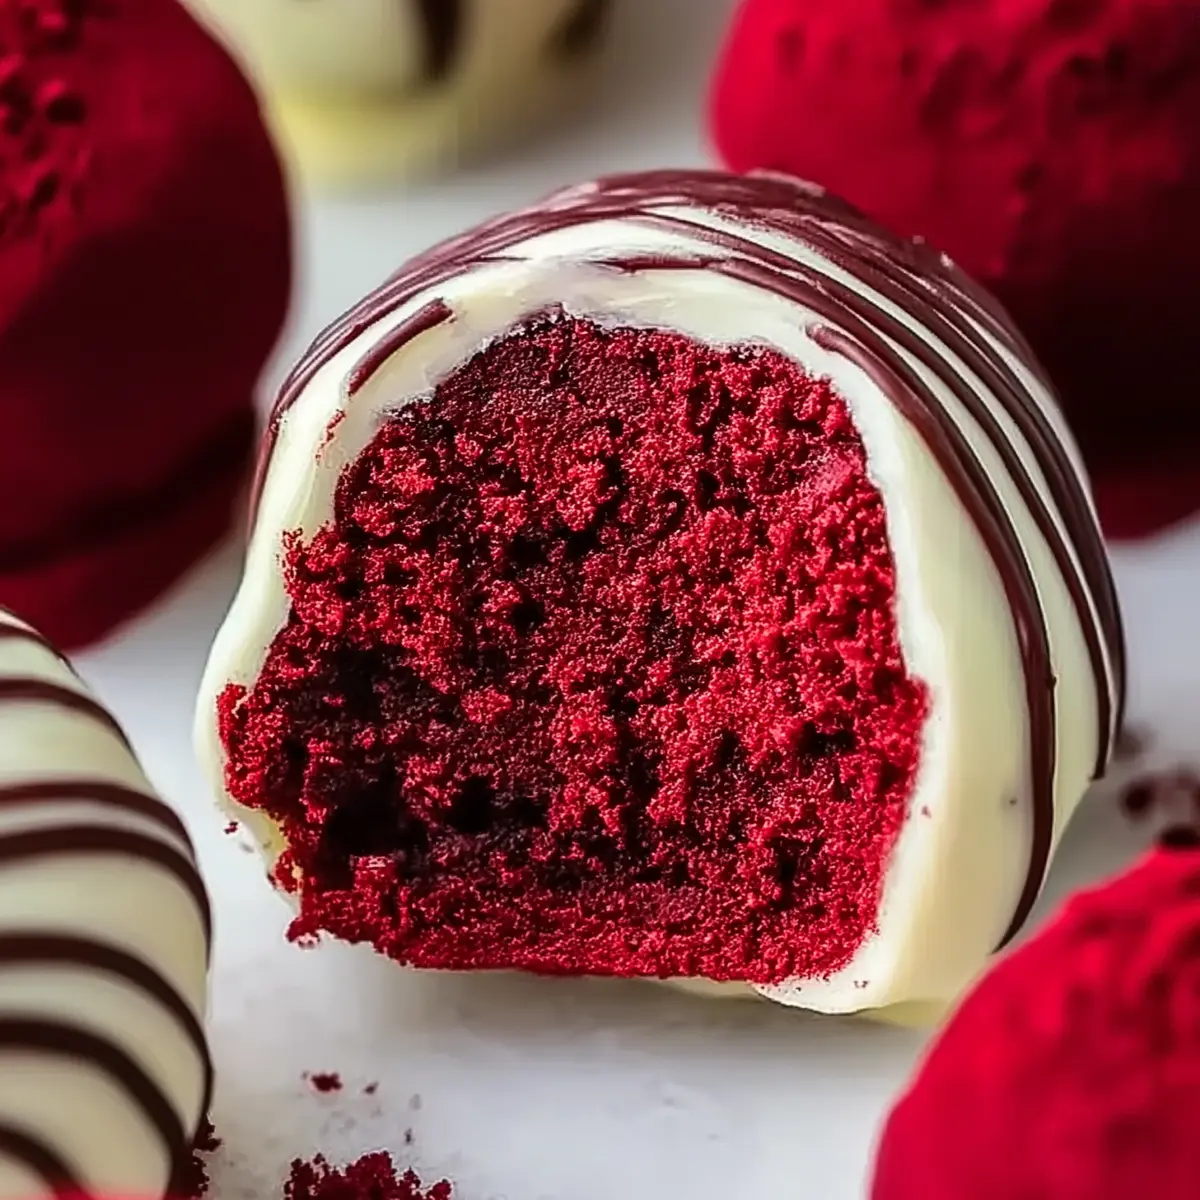
If you’ve ever felt that holiday desserts are either too complicated or too plain, Red Velvet Truffles are that sweet spot you’ve been searching for. The aroma, the deep red cake, that creamy tang from the cream cheese—all wrapped in smooth, snowy white chocolate. These truffles are just as beautiful on the table as they are easy to pop into your mouth or tuck into a festive box for someone you love. When December rolls around, I always crave something festive but not fussy. This recipe checks all the boxes.
The secret? You don’t need to be a pastry chef. Most of the magic happens with a boxed cake mix and a few easy steps in your own kitchen. Once you see those truffles sitting prettily on a plate, you’ll wish you made a double batch.
Why These Red Velvet Truffles Are an Instant Holiday Favorite
Do you ever get that urge during the holidays for something special—something that makes people pause and say, “Wait, you made these?” That’s exactly the vibe with Red Velvet Truffles. They’re gorgeously red on the inside, blanketed in creamy white chocolate, and finished with whatever drama you want on top (think chocolate drizzle or a flurry of festive sprinkles). The flavor balance just works: a little tang from the cream cheese, a touch of cocoa in the red velvet, plenty of rich sweetness, and a smooth finish.
What I love most? You really don’t need any fancy kitchen gadgets or hours of prep to impress with these. They’re party-perfect yet so simple, and if you have kids, they’ll love rolling and decorating them with you. In my family, the truffles have started to edge out more traditional cookies—people can never stop at just one. Between their bite-sized convenience and showstopper looks, they’ll easily steal the spotlight at any gathering.
Key Ingredients That Make These Red Velvet Truffles Shine
Every standout holiday treat is built from a handful of smart, flavorful choices. Here’s what gives these Red Velvet Truffles their personality:
- cake mix – This shortcut ensures those familiar red velvet notes and springy crumb, without the from-scratch stress (plus, it’s foolproof even for baking newbies).
- Cream cheese – Delivers a gentle tang and creamy richness that pulls the cake into a fudgy, truffle-like texture. Cream cheese frosting can work in a pinch if you’re short on time.
- White chocolate – Melts into a glossy, sweet coating that firms up with the perfect snap and adds a classic wintery look.
- Semi-sweet chocolate – For that luscious contrast when you drizzle, or use dark chocolate for a richer, more grown-up edge. You can skip this, but it really takes the presentation up a notch.
See the recipe card below for the full list of ingredients and measurements.
Easy Steps to Perfect Red Velvet Truffles at Home
You’ll have a whole tray of stunning Red Velvet Truffles in just a few simple stages. Here’s how I like to do it:
- Start by baking your red velvet cake. Follow the instructions on your box, and pour that striking red batter into a greased pan. When it’s finished, the cake will spring back lightly to the touch and fill your kitchen with that buttery, cocoa-rich aroma. Let it cool fully so it doesn’t turn gummy later.
- Once it’s cool enough to handle, crumble the cake into fine, fluffy crumbs. Drop everything into a big bowl. Add cream cheese and work it in with clean hands or a sturdy spoon—you want everything to meld into a thick, smooth dough with a just-barely sticky feel. The mixture should hold together easily if you pinch some with your fingers.
- Roll pieces of dough into small balls, aiming for consistency in size—this helps the chocolate shell coat evenly and makes for a prettier presentation. Lay each one onto a parchment-lined tray, without letting them touch. After rolling, set the pan in the fridge. This little chill in the fridge firms the truffles and makes coating later a breeze.
- Melt your white chocolate gently. If you’re using the microwave, go slow and stir regularly to avoid scorching or seizing. The double boiler method is even safer. You’re aiming for a smooth, pourable consistency that ribbons off the spoon.
- Using a fork, gently dip each chilled truffle into the white chocolate, spinning slightly to coat all sides. Lift it out, let the excess drip off, and return it to the baking sheet. If desired, now’s the moment to drizzle with melted semi-sweet chocolate or scatter over some festive toppings before the shell sets.
- Once all the truffles are coated and decorated, let them sit so the chocolate hardens to a glossy, photo-ready finish. When you tap the chocolate, it should give a satisfying crack. Tuck the finished truffles into an airtight container and pop them in the fridge until you’re ready to wow your friends or family.
Little Tricks for Red Velvet Truffles with Wow Factor
Here’s what I’ve learned after a few holiday seasons of turning out trays of Red Velvet Truffles: it’s the tiny details that make these irresistible.
Always make sure your cake layer is completely cooled before crumbling, or you’ll end up with sticky, lumpy blobs instead of light crumbs. When adding cream cheese, go slow—a bit more or less will shift the texture, so trust your eyes and hands. The truffle mixture should feel rich and pliable, not overly wet or crumbly.
When melting white chocolate, patience is key. White chocolate scorches and seizes much more easily than dark, so keep your microwave or double boiler heat gentle. If your chocolate thickens as you work, a small splash of neutral oil can help loosen it up to a perfect dipping consistency.
If you’re doubling the recipe or making these for a crowd, I recommend setting up an assembly line: rolling, dipping, and decorating becomes oddly soothing in batches. For clean, spotless truffles, use two forks for dipping and let the excess drip away before setting them on the baking sheet. And if the kitchen runs warm, pop them back in the fridge for a few minutes between stages to keep everything firm.
To store, line a container with parchment and arrange the truffles in layers, separated with another parchment sheet. They stay freshest in the fridge, but the flavor keeps beautifully—sometimes it’s even better a day later.
Serving Ideas and Twists You’ll Want to Try
Red Velvet Truffles are a blank canvas for all sorts of creative spins and elegant finishes. For parties, I love piling them onto a tiered dessert tray next to citrusy Madeleines or salted caramel brownies for a stunning holiday dessert bar. For something special, add a pinch of cinnamon or a drop of peppermint extract to the dough, or swap dark chocolate in for a more dramatic, grown-up treat.
If you want to dress up your truffles, try rolling them in crushed freeze-dried raspberries, sparkling sugar, or toasted coconut before the chocolate sets. For Christmas, a sprinkle of red and green sanding sugar looks fantastic. These truffles also make killer edible gifts packed into little boxes and tied with ribbon—no one ever turns down a homemade treat.
Hosting brunch or afternoon tea? Pair them with spiced chai, strong black coffee, or even a glass of bubbly for a seriously indulgent snack. And if you’re making them ahead, you can freeze the uncoated cake balls, then thaw and dip whenever dessert emergencies strike. Whether you lean classic or go wild with the toppings, there’s no way to make these wrong.
FAQs about Red Velvet Truffles
How long do Red Velvet Truffles last?
You can keep these truffles fresh in the fridge for about a week in an airtight container. For longer storage, freeze the undipped cake balls and coat them with chocolate after thawing for best texture.
Can I use homemade red velvet cake instead of a boxed mix?
Absolutely! If you have a favorite homemade red velvet cake recipe, go for it—the truffles might even take on an extra level of richness. Just make sure the cake isn’t too dry, since you want the finished texture to be soft and fudgy.
Do Red Velvet Truffles need to be refrigerated?
Yes, because there’s cream cheese in the truffles, they need to stay chilled when you’re not eating them. Serve them cold or let them sit a few minutes at room temperature to soften up before you dive in.
Can I decorate these truffles with something other than chocolate drizzle?
Definitely. Sprinkles, crushed peppermint, cookie crumbs, or even a dusting of cocoa powder all work beautifully. Let your creativity (or your holiday pantry stash) lead the way.
There’s just something irresistible about making a batch of Red Velvet Truffles—watching that creamy filling meet crisp white chocolate, then seeing everyone reach for seconds before you can blink. These truffles bring a celebration to any table, whether piled high at a party or wrapped up as a thoughtful holiday treat. If you’re looking for a festive bite that’s as easy as it is delicious, give these Red Velvet Truffles a spot in your dessert lineup—they’re sure to become a new seasonal classic.
More Delicious Recipes
- Andes Mint Chocolate Cupcakes: These cupcakes combine rich chocolate and mint flavors, making them a perfect festive treat to accompany your truffles.
- St. Patrick’s Day Truffles: Similar in method to your Red Velvet Truffles, these delightful treats bring a festive flair and creamy textures for any occasion.
- Loaded Leprechaun Popcorn: This sweet and salty snack is a fun treat that can add a playful twist to your dessert table alongside truffles.
Red Velvet Truffles: Festive No-Bake Delights to Savor
Ingredients
Equipment
Method
- Preheat your oven to 350°F (175°C). Prepare the red velvet cake mix according to the package instructions, pouring the batter into a greased cake pan. Bake for about 25-30 minutes, or until a toothpick inserted in the center comes out clean. Allow the cake to cool completely on a wire rack.
- Once the red velvet cake is completely cool, crumble it into a large mixing bowl. Add 8 ounces of cream cheese and mix until smooth, resembling cookie dough.
- Roll the mixture into bite-sized balls, about 1 inch in diameter, and place them on a parchment-lined baking sheet. Refrigerate for at least 30 minutes to firm up.
- Melt the white chocolate in a microwave-safe bowl in 30-second intervals, stirring in between, or use a double boiler. Ensure the chocolate is silky and fluid.
- Using a fork or dipping tool, dip each truffle into the melted white chocolate until evenly coated. Shake off excess chocolate and return them to the baking sheet.
- While the coating is still soft, drizzle melted semi-sweet chocolate over the tops and add decorative items like crushed peppermint or sprinkles. Let the truffles sit until the chocolate coating has fully set.
- Once hardened, store the truffles in an airtight container in the refrigerator. Enjoy within a week, or freeze uncoated truffles for longer storage.