The first time I made Bunny Butt Cupcakes, the entire kitchen seemed to fill with this bright, citrusy burst—the kind you get right after zesting a fresh lemon. The real joy kicked in once the decorations started: bits of buttercream, marshmallow fluff, and the giggle that comes from balancing white chocolate “feet” on plump cupcake mounds. These Bunny Butt Cupcakes are more than just a novelty—they’re tender, moist lemon cupcakes dressed up with sweet whimsy, creamy frosting, and a playful pop of color. Whether you’re baking for an Easter brunch, a spring birthday, or just need a treat that doubles as a conversation starter, these cupcakes never fail to charm.
What Makes These Bunny Butt Cupcakes Impossible to Ignore
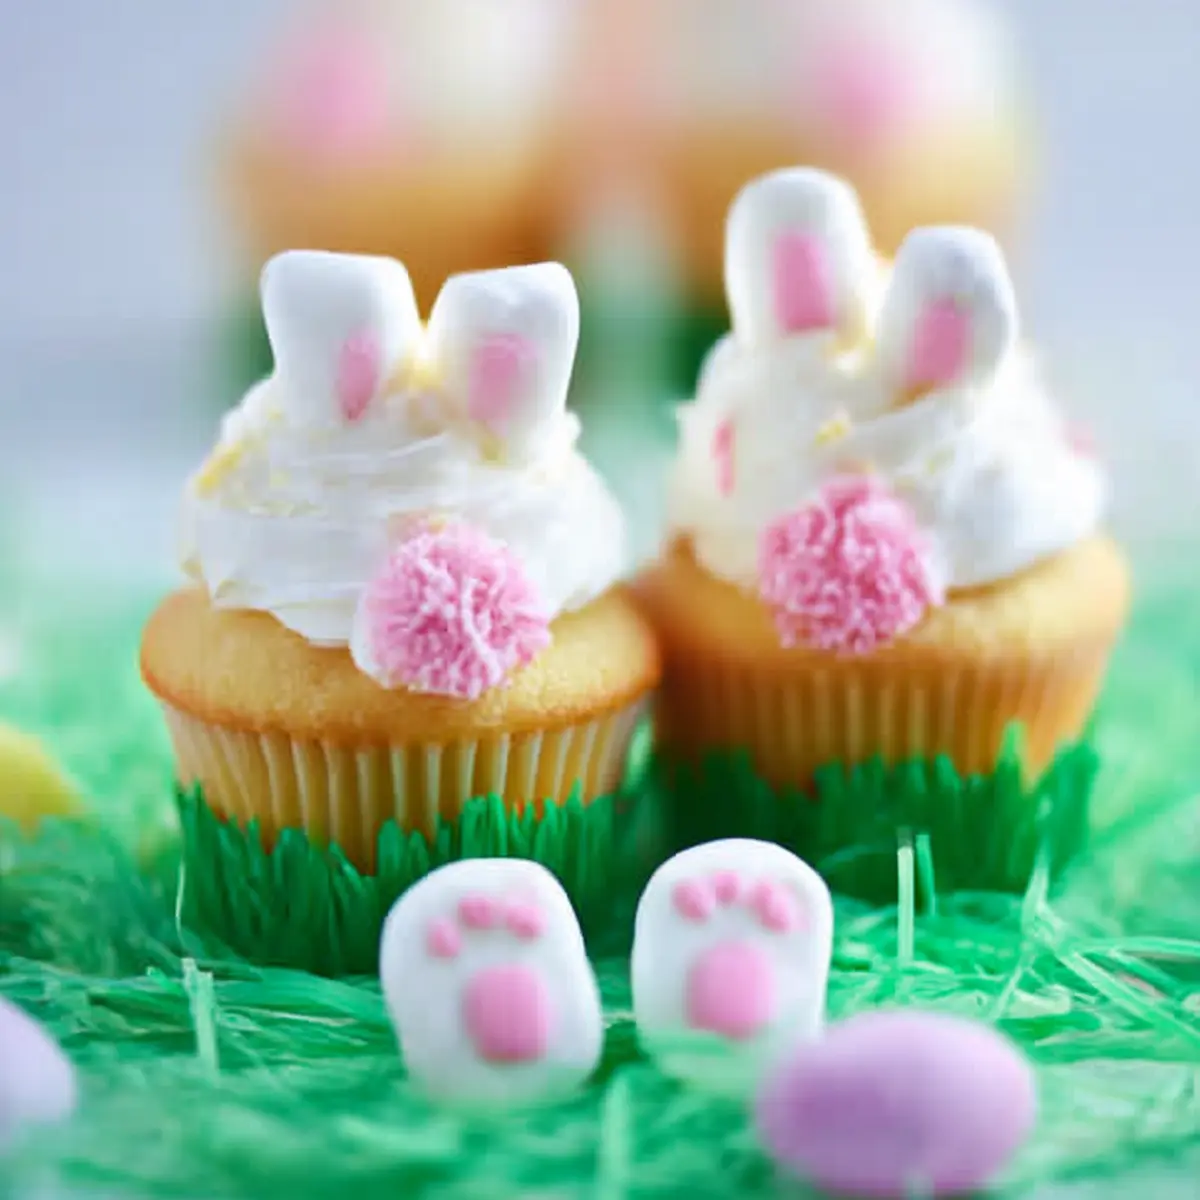
There’s just something irresistible about a dessert that looks as adorable as these Bunny Butt Cupcakes—soft lemony cake, a mountain of vanilla buttercream, and those unmistakable bunny bottoms peeking out of tufts of green “grass.” Every bite is bright, zesty, and playful: perfect for any spring gathering where you want treats that get people talking. Kids crowd around for a chance to stick on the bunny feet; adults secretly angle for the one with the most buttercream. From the first swirl of pastel frosting to the last chocolate toe, these cupcakes manage to tick all the boxes—delicious, charming, and downright fun.
The Essential Ingredients That Shape These Cupcakes
- cake mix – a simple shortcut for soft, tender cupcakes every time, no stress or fuss required.
- Pure lemon extract – brings brightness and a fresh, springy flavor that sets these apart from plain vanilla.
- White chocolate chips – essential for sculpting those perky bunny feet, and they add a creamy richness to every nibble.
- Unsalted butter – forms the base of your buttercream, delivering that creamy, dreamy texture.
- Vanilla extract – helps round out the sweetness in the frosting and enhances the lemon in the cupcakes.
- Confectioners’ sugar – an absolute must for cloud-light buttercream.
- Whole milk – just enough to loosen up the frosting and keep it smooth.
- Green food coloring – creates whimsical “grass” piping for the bunnies to nestle in.
- Red food coloring – just a drop or two gives you the perfect pink for decorating the bunny paws.
- Large marshmallows – form the adorable bunny bottoms—you’ll cut and shape these for that fluffy look.
- White nonpareil sprinkles – these, or mini marshmallows, make for the best little tails.
See the recipe card below for the full list of ingredients and measurements.
Step by Step: Building Your Bunny Butt Cupcakes
Bunny Butt Cupcakes come together in layers, so you get both taste and plenty of hands-on fun. Here’s how the process unfolds:
- Line a muffin tin with your favorite cupcake liners, then whip up the cake batter according to the instructions on the box, mixing in the lemon extract right at the start. Dollop the bright, fragrant batter into each liner and bake until lightly golden around the edges. Let them cool completely so that buttercream doesn’t slip and slide.
- While the cupcakes are baking and cooling, move on to your bunny feet: Melt the white chocolate gently in short bursts in the microwave, stirring until smooth. Pour it into a piping bag (or even a zip-top bag with the tip snipped off), and pipe out pairs of oval “feet” on a parchment-lined tray. Chill them quickly in the freezer so they set firm.
- Next up: buttercream. Beat soft butter together with vanilla until almost fluffy, then gradually sift in confectioners’ sugar. Add milk a splash at a time until you have a frosting that’s billowy and easy to spread. Portion this into three bowls—one stays white, one gets tinted green (for grass), and the last a pale pink for the bunny foot details.
- Time for assembly: Pipe or spoon the green buttercream onto each cupcake to look like grass. Cut marshmallows in half and press one half, cut side down, into each cupcake—these are your bunny butts.
- To make tails, roll tiny bits of white buttercream in nonpareil sprinkles until they’re totally covered, then attach one to each marshmallow using a dab of buttercream.
- Now take your white chocolate feet—pipe little pink pads and toes onto each using a small bit of pink frosting, then nestle them against the “butt” so they peek out just right. You’ll end up with a sweet scene that looks like bunnies diving headfirst into spring grass.
Getting That Fluffy Buttercream and Bold Lemon Flavor
If there’s one thing that sets these Bunny Butt Cupcakes apart, it’s the way the fluffy vanilla buttercream plays off that zesty lemon base. You want a buttercream that’s as cloudlike as it is sturdy, able to hold its green “grass” shape beneath a marshmallow bunny bottom. The key is beating your butter well—don’t rush this step. Once the sugar is worked in, taste, and adjust with extra milk for spreadability. On the cupcake front, don’t be shy with the lemon extract—its freshness lifts every bite and keeps these from feeling like your average box-mix cupcake. The result: cupcakes that are moist, with a pronounced citrus pop, balanced by creamy, sweet vanilla frosting.
Playful Twists, Troubleshooting, and Serving Bunny Butt Cupcakes
If you want to swap up your Bunny Butt Cupcakes, try a strawberry or orange extract for a new spin, or even fold a touch of zest into the batter before baking. If you run out of white chocolate, lightly pressed fondant works for the bunny feet in a pinch; just pipe the pink details on the same way. For the “grass,” use a multi-opening piping tip if you have one, or zigzag the green buttercream with a plastic baggie for a rustic look.
When it comes to storage, keep cupcakes in an airtight container at room temperature for up to two days. If you make them ahead, decorate just before serving to keep the marshmallows soft and fresh. Bunny Butt Cupcakes are a standout addition to kids’ parties, baby showers, or any spring table—you’ll find that even adults can’t resist nabbing a bunny off the tray.
FAQs about Bunny Butt Cupcakes
Can I use a homemade white cake recipe instead of cake mix for Bunny Butt Cupcakes?
Absolutely, a homemade white cake recipe works beautifully here. Just add the lemon extract to your batter to keep that signature citrus note. The structure and decorating process remain exactly the same.
How do I store Bunny Butt Cupcakes if I want to make them a day ahead?
Store undecorated cupcakes in an airtight container at room temperature. Add the buttercream, marshmallows, and bunny feet the day you plan to serve them, as this keeps everything looking and tasting fresh.
Can I freeze Bunny Butt Cupcakes?
Yes, you can freeze the plain, unfrosted cupcakes. Let them cool fully, wrap tightly, and freeze for up to one month. Avoid freezing with marshmallows or decorated buttercream, as the texture can change once thawed.
What can I use instead of white chocolate for the bunny feet?
If you don’t have white chocolate, you can use fondant or modeling chocolate shaped into small ovals. These options hold shape well and are easy to decorate with the pink buttercream details.
What’s the best way to serve Bunny Butt Cupcakes at a party?
Arrange them on a flat platter or cupcake tier so each “bunny” gets shown off. If you’ve decorated just before serving, they’ll stay soft and whimsical for the whole event, making them a true centerpiece treat.
With just a bit of piping, a swirl of pastel frosting, and plenty of laughter in the kitchen, Bunny Butt Cupcakes transform an ordinary day into something playful and memorable. Every bite is a blend of sweet lemon cake and creamy frosting, finished with that irresistible marshmallow softness. They never last long—between sticky fingers and lingering smiles, you’ll find plenty of reasons to bake another batch soon.
More Delicious Recipes
- Easter Egg Fruit Pizza: This bright and colorful dessert complements the playful vibe of Bunny Butt Cupcakes for spring festivities.
- Strawberry Cheesecake Ice Cream: A delightful, fruity treat that is perfect for any warm day or celebration, just like the Bunny Butt Cupcakes.
- Meyer Lemon Mini Muffins: These muffins offer a similar zesty lemon flavor that matches beautifully with the essence of the Bunny Butt Cupcakes.
Bunny Butt Cupcakes
Ingredients
Equipment
Method
- Line cupcake tins with liners.
- Prepare cake mix as directed on the package, adding 1 tablespoon of lemon extract.
- Spoon approximately 3 tablespoons of batter into each of the lined muffin cups.
- Bake as directed for cupcakes. Transfer to a wire rack to cool.
- As you bake the cupcakes, melt the white chocolate for bunny feet.
- Line a baking sheet with parchment paper.
- In a microwave-safe bowl, melt the white chocolate chips for 30 seconds. Stir and continue to heat in 10-second increments until melted and smooth.
- Spoon the melted chocolate into a pastry bag or a sealed plastic bag. Cut a tiny portion of the corner of the bag and begin to pipe out the melted white chocolate onto the lined baking sheet. Try to make pairs of feet that are the same size. You will want to make 24 pairs (48 feet). If you have any remaining white chocolate, pipe out more sets just in case of breakage. It is a good idea to have a toothpick nearby to smooth out any bumps or rough edges. Allow the chocolate to harden (2 minutes in the freezer or 15 minutes in the refrigerator).
- Place the pink buttercream into a pastry bag and cut off a very small portion of the tip. Pipe out three toes and the padding of the bottom of the bunny foot. Once the frosting has set (about an hour) you can go back and gently press down on the pink frosting with your finger. This can help create a smoother, cleaner look.
- In a large bowl, beat butter and vanilla until light and fluffy.
- Gradually add confectioners' sugar, beating well after each addition and scraping sides and bottom of bowl frequently.
- Add milk. Beat until light and fluffy. If the frosting is too thick to spread, gradually add additional milk until the buttercream reaches your desired consistency.
- Remove half of the frosting and place into a medium bowl. Add 10 drops of green food coloring. Mix until combined and then place into a pastry bag.
- Of the remaining frosting, remove half and add 1-2 drops of red food coloring. You want a light pink. Mix until combined and then place into a pastry bag.
- The remaining white frosting will be used for the bunny tail.
- Place the green frosting into a pastry bag fitted with a grass tip (#233). Pipe green grass onto the cupcake, covering the tops of the cupcakes completely.
- Take a large marshmallow and cut it in half lengthwise. Place the cut side down onto the upper portion of the cupcake. (You want to make room for the bunny feet to stick out.)
- Take a very small dollop of white buttercream (about the size of a dime) and drop it into a bowl of white nonpareils. Roll the buttercream around until it is completely covered in nonpareils. Dab some pink (or white) buttercream onto the marshmallow and gently place the nonpareils tail onto the marshmallow.
- Place one of the bunny feet against the base of the marshmallow. Finish the Bunny Butt Cupcake by placing the final bunny foot on the cupcake.
- Enjoy!