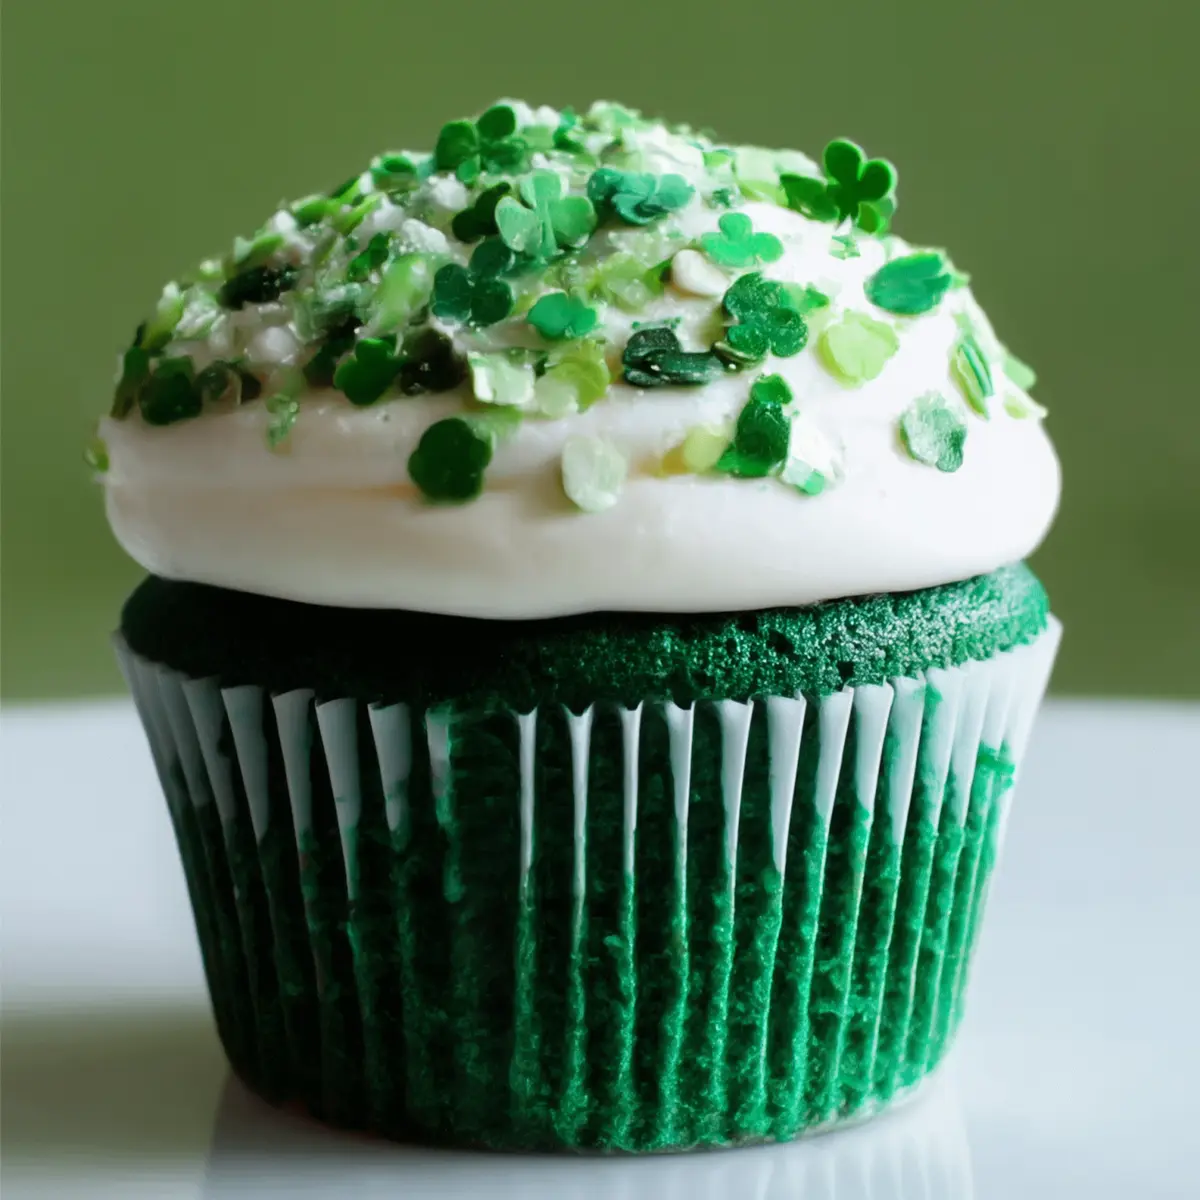
Green Velvet Cake is the kind of treat that instantly grabs your attention—from its boldly colored crumb to its signature tangy, buttery richness. If you love all things festive, want a show-stopping centerpiece for your table, or simply crave a classic comfort dessert with a twist, this cake has you covered. The best part? The method is simple enough for any home baker to master, yet the results look (and taste) like a professional bakery delight.
I’ll never forget the first time I pulled a tray of these stunning emerald cupcakes from the oven—the sweet scent filling the kitchen, the soft spring of the cake under my fingertip, and the pure fun of swirling tangy cream cheese frosting on top. Green Velvet Cake is more than a recipe. It’s a mood booster, a conversation starter, and a guaranteed crowd pleaser.

Green Velvet Cake magic: Tools to have on hand
Every great cake starts with the right tools. For Green Velvet Cake, you won’t need anything fancy, but having these ready will make the whole process extra smooth:
- Oven – To bake your layers or cupcakes to golden, fluffy perfection.
- Cake pan or cupcake pan – Whether you’re after a classic round cake or festive cupcakes, just be sure to grease well.
- Mixing bowls – At least two; one for wet ingredients, one for dry.
- Whisk – For blending eggs and liquids until silky and smooth.
- Electric mixer – Not strictly necessary, but makes combining everything (and whipping up dreamy cream cheese frosting) a breeze.
Each ingredient invites that signature silky green flavor
Here’s what goes into the magic:
- flour – The essential backbone for a light, tender crumb.
- Sugar – Brings sweetness and helps the cake brown just right.
- Cocoa – A classic hint of cocoa gives depth to the velvet texture and flavor.
- Salt – Makes the sweet flavors pop and adds balance.
- Baking soda – Gives the cake lift and airiness so each slice is soft and plush.
- Eggs – Bind everything together and add moisture and richness.
- Oil – For that supremely moist, never-dry cake crumb you crave.
- Buttermilk – Tanginess makes the signature “velvet” flavor and helps with tenderness.
- Vinegar – Balances pH for color and tender crumb.
- Vanilla – Adds warmth and rounds out the cocoa notes.
- Green food coloring – Delivers the eye-popping, festive color that makes this cake unforgettable.
- Cream cheese – The heart of the frosting; creamy and just a little tangy.
- Butter – Melds with the cream cheese for a rich, fluffy topping.
- Vanilla extract – Brightens and flavors the cloud-like frosting.
- Powdered sugar – Sweetens and gives the frosting its signature whipped texture.
- Milk – Brings the frosting to the perfect, spreadable consistency.
See the recipe card below for the full list of ingredients and measurements.
Bringing it all together: The simple bake for Green Velvet Cake
- Preheat the oven to 175°C. The warm air instantly gets you in the baking groove.
- Grease your chosen pan—layer cake, cupcakes, or whoopie pie—ensuring every nook is ready to release that springy cake later.
- In a medium bowl, lightly whisk the eggs. Add all liquid ingredients (oil, buttermilk, vinegar, vanilla), whisking until perfectly blended. Stir in the green food coloring until the color sings. Set aside—the color will deepen as it sits.
- Combine all dry ingredients (flour, sugar, cocoa, salt, baking soda) in your mixing bowl. Stir together until you see a uniform powder with no streaks.
- Pour the wet mixture into your dry ingredients and mix well—medium-high speed if you have a mixer, or a sturdy whisk works too. After a minute or two, the batter should look thick and wildly green, smooth, and ready to pour. Make sure you scrape down the sides so no dry pockets remain.
- Pour batter evenly into your prepared pan(s). The color will look bold—trust the process.
- Bake according to your choice:
- One 20 cm cake pan: About 22 minutes, until the center springs back to touch and a toothpick comes out clean.
- Standard cupcakes: Check at 16 minutes—the tops should look set and bounce back when gently pressed.
- Mini cupcakes or whoopie pie pans: About 13 minutes; look for dry tops and that unmistakable cake aroma wafting from the oven.
- Let cool completely before frosting, otherwise the heat will melt your beautiful topping.
- For the frosting: Cream together softened cream cheese, butter, and vanilla until smooth and fluffy. Gradually add powdered sugar, mixing until it’s thick but cloud-like. Drizzle in milk as needed for your desired spreadable consistency—it should glide on without running. Store any extra frosting in the fridge, along with your frosted cake or cupcakes.
Tips, troubleshooting, and common mistakes that happen with velvet cakes
Mistakes can sneak up on even seasoned bakers, but you’ll be ready with these tips:
- The cake sinks or feels dense: Usually means underbaking or mixing too little/too much. Always check with a toothpick—when it comes out clean, you’re safe. Gently fold, don’t beat the batter to keep air in.
- Frosting is runny or won’t hold: If your frosting gets too soft, chill it for a few minutes before spreading. Add more powdered sugar for a stiffer texture or a touch more milk if it’s too thick.
- Color isn’t vibrant: Make sure to mix the food coloring in with your wet ingredients thoroughly. A decent-quality food coloring gives the deepest hue without affecting flavor.
- Sticking to pans: Don’t skimp on greasing your pans—go right up the edges. For cakes, a parchment circle at the bottom works wonders in preventing heartbreak.
- Cake dries out quickly: Always store frosted cake in the refrigerator, well-covered, to lock in moisture.
Pairing ideas and fun variations for your Green Velvet Cake
A slice of Green Velvet Cake is lovely on its own, but here’s how you can make it part of a full celebration—or change things up for your mood:
- Pair with fresh berries for a juicy pop and a pretty plate.
- Serve with a scoop of vanilla ice cream—hot tip: the cold creaminess makes every bite of vibrant cake even more decadent.
- Hot drinks like coffee or a spiced chai are perfect contrasts to the sweet-tangy cake.
- For a festive twist, swap green food coloring for your favorite color—it’s a showstopper at Easter in pastels, or a playful birthday pick.
- Mini cupcakes or whoopie pies work great for parties or lunchbox treats.
- Add orange zest to the frosting for a subtle citrus lift that pairs beautifully with the cocoa base.
FAQs about Green Velvet Cake
Can I make Green Velvet Cake ahead of time?
Yes, you can! Bake the cake or cupcakes a day in advance, and once completely cooled, store wrapped (unfrosted) at room temperature. Frost on the day of serving for the freshest taste and look.
What’s the best way to store leftover Green Velvet Cake?
After frosting, keep your Green Velvet Cake in the fridge to maintain the moistness and keep the cream cheese topping safe. Cover well and enjoy within three days for best texture.
Can Green Velvet Cake be frozen for later?
Absolutely! Wrap unfrosted cake layers or cupcakes tightly and freeze for up to one month. Thaw at room temperature and frost fresh for perfect results—just avoid freezing the assembled, frosted cake, as the texture of the cream cheese frosting can change.
An irresistibly soft slice: Conclusion
There’s nothing quite like the joy of slicing into a plush, vibrantly colored Green Velvet Cake—especially when that first bite is all tenderness, subtle cocoa, and creamy tang. It’s the dessert that livens up any table and makes special occasions—or any day—feel a little more magical. Whip this up when you want to wow, and serve generously. Every forkful is a little taste of celebration.
More Tasty Ideas
- St. Patrick’s Day Chocolate Guinness Bundt Cake with Stout Glaze: This cake is a rich and moist chocolate treat that pairs wonderfully with festive celebrations, similar to the Green Velvet Cake vibe.
- Baileys Irish Cream Cookies: These cookies are indulgent and creamy, echoing the cream cheese frosting experience of the Green Velvet Cake.
- St. Patrick’s Day Brownie Trifle: A layered dessert that combines rich flavors and textures, perfect for those who love chocolate and festive occasions, just like your cake.
Green Velvet Cake
Ingredients
Equipment
Method
- Preheat your oven to 350 degrees.
- Grease your cake pans, muffin tins, whoopie pie pans, whatever method you decide to go with.
- Lightly stir eggs in a medium bowl with whisk. Add in remaining liquid ingredients. Whisk until blended, then stir in food coloring and sit aside.
- Place all dry ingredients in your mixing bowl and stir together well.
- Pour your wet ingredients into your dry ingredients and mix on medium-high for about a minute or two until well combined.
- Pour the batter into cake pans or cupcake pans.
- Baking times will vary based on what you are using. For one 8″ cake pan, it was about 22 minutes. Regular size cupcakes were around 16 minutes, mini cupcakes and whoopie pie pans were both about 13 minutes.
- Cream together cream cheese, butter and vanilla in a bowl until smooth. Gradually add in powdered sugar and continue mixing. Add in milk as needed to reach the desired consistency. Store frosting and frosted cupcakes in refrigerator.