If you’ve got even a shred of kid-at-heart left in you, making homemade rock candy is one of those kitchen projects that just calls your name. It’s a full-on sensory experience—from the steamy, sweet sugar solution swirling in a pot to the thrill of seeing crystals grow day by day. When I was small, I’d press my nose up against the jars on day three, convinced today was the day the crystals would finally take over. Nostalgia overload, in the very best way.
But honestly, you don’t need a holiday, party, or tiny helpers as an excuse. Maybe you just want to wow your inner mad scientist, or you’re looking for an edible homemade gift idea that’s actually fun to create. Whatever your “why,” homemade rock candy always delivers sparkle, crunch, and a touch of old-school magic.
Why Homemade Rock Candy Is So Much Fun
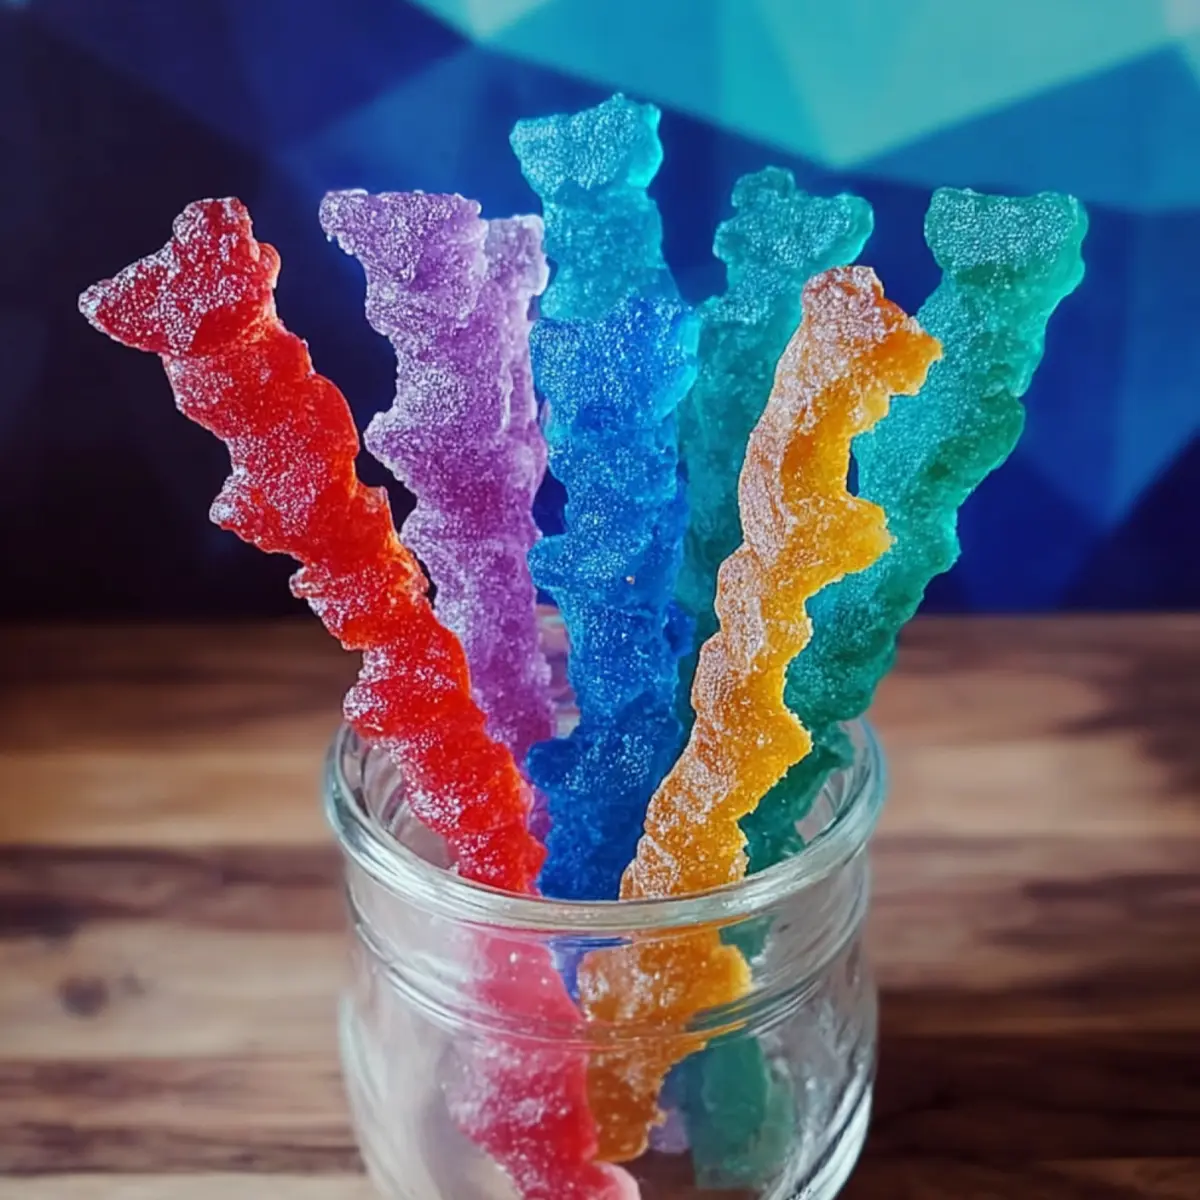
There’s something truly irresistible about rock candy—the color, the crunch, the way it sparkles when light hits those chiseled sugar crystals. But part of the fun is in the journey, not just the candy itself. Making homemade rock candy lets you watch pure science unfold right on your countertop, no fancy gadgets required.
It’s the ultimate kitchen experiment, whether you want a solo project or an easy, hands-on activity for a rainy day with kids. Every batch can be different: bold blue, pastel pink, clear as ice, or rainbow bright—plus you get to choose flavors if you want something beyond classic sweet. The best part? It doubles as a show-stopping edible gift or party favor, with much more personality than anything store-bought.
If you’re after a sweet treat that’s as mesmerizing to look at as it is to eat, you’ll be hooked on this homemade rock candy recipe. And believe me—pulling a stick out of the jar covered in shimmering crystals never gets old.
What You Need for Homemade Rock Candy
Time to raid your pantry and a few craft supplies. Here’s what goes into a batch of homemade rock candy:
- water – The base of your sugar solution; make sure it’s hot so it dissolves sugar completely.
- Granulated sugar – The building blocks of those beautiful, crunchy crystals.
- Wooden lollipop sticks – Your crystal “canvas.” Popsicle sticks can work in a pinch, but lollipop sticks give better definition.
- Popsicle sticks – Used to suspend your lollipop sticks over the mason jars.
- Clothespins – Key for holding the sticks in just the right spot, making sure the sugar crystals have room to grow.
- Wide-mouth mason jars – Where the candy magic—and crystal growth—happens. Quart-sized jars are ideal.
- Gel food coloring (optional) – For playing with vivid colors and making candy to match any mood or occasion.
- Flavor extract (optional) – Take your pick: vanilla, peppermint, cherry…almost anything you dream up.
See the recipe card below for the full list of ingredients and measurements.
Step-by-Step: How to Make Rock Candy
Making rock candy isn’t hard, but it does reward a little patience and some gentle hands. Here’s how it all comes together, from start to finish:
- Start by prepping your lollipop sticks: dip each one in water, then roll the wet part in granulated sugar. Let them dry fully on a tray. This gives the new crystals something rough to latch onto once they hit the sugar solution.
- Make your sugar syrup: In a large pot, combine hot water and granulated sugar over medium heat. Stir constantly and watch as everything dissolves—the mixture gets clear and a bit thick, almost syrupy. When it starts to bubble, you’re golden.
- Once the sugar’s dissolved and the syrup is clear, take the pot off the heat. Now’s the time to swirl in a few drops of gel food coloring if you want brilliant hues, or a splash of your favorite extract for a blast of flavor.
- Let your sugar solution cool down a bit—not too long, but enough that it won’t start melting the sugar off your sticks the second they touch. You’re aiming for warm, not piping hot.
- Pour the syrup into your clean mason jars, filling each one almost to the top but leaving some space. This makes it easy to lower the sticks in later without any sticky overflow.
- Set up each jar: rest a popsicle stick across the jar’s rim, then use a clothespin to attach a sugared lollipop stick. Lower it into the solution so the sugar-coated end floats near the center, without touching the bottom or sides.
- Find a quiet, undisturbed spot to let the jars sit. Resist the urge to move or peek too much—this is the one time “hands-off” is actually your secret weapon. Now it’s a waiting game while the crystals slowly, steadily grow. You’ll spot changes after a day, but real rock candy takes a handful of days to reach its dazzling potential.
- When you’re happy with the crystal growth, carefully break any hard surface film and gently wiggle each stick out of its jar. If a candy stick is stuck to the side, a thin knife loosens it—just don’t rush it or you’ll break the crystals.
- Let the finished rock candy dry upright in a cup or put it straight into clean jars for gifting or snacking. The hardest part? Waiting until they’re completely dry and shatteringly crisp!
Tips to Get the Best Homemade Rock Candy Crystals
Homemade rock candy is easy, but a few small tweaks make the crystals bigger, clearer, and just plain prettier. Here’s what I’ve learned from countless kitchen experiments:
- Let those sugar-coated sticks dry completely before dipping—any moisture makes the first crystals slide right off.
- Clean jars are a must. Any stray grains or dust on the inside can pull crystals away from your sticks.
- Keep your solution saturated, but fully dissolved—if you see any undissolved sugar in the pot, heat and stir until it’s vanished.
- If your crystals don’t look clear or you’re after a classic glassy result, steer clear of liquid food dyes. Gel colors keep things vibrant without clouding the syrup.
- Your home’s temperature and humidity can play a part. If the air is super damp, it may take longer for the syrup to evaporate and crystals to build up. Find the driest, warmest (but not hot) corner in your house for best results.
- Be patient. Really. The longer the sticks sit, the larger and less crumbly the crystals will be. Rushing it just gives you gritty, short clusters instead of those dazzling, sugar-spun jewels you’re after.
- Make sure the sticks aren’t touching each other, the sides, or bottom of the jar at all—otherwise, you end up with lopsided crystals or they just refuse to grow.
And don’t toss leftover syrup! You can use it to make a second (smaller!) round if you’re still in the crystal-growing spirit.
Fun Ways to Flavor and Serve Rock Candy
Homemade rock candy is a blank canvas, waiting for you to get creative. Here are some of my favorite ways to make each batch special:
- Flavor twists: Sure, you can go classic, but why not add a splash of peppermint for a holiday vibe, lemon for a zesty shock, or even coconut for a surprise tropical moment?
- Color explosions: Mix up the shades—do a rainbow batch for birthdays, theme colors for baby showers, or simply your favorite bold hue.
- Personalized gifts: Tie a ribbon around each stick and pop it into a cellophane bag for an instant party favor or holiday gift. Kids love adding homemade rock candy to treat bags!
- Drink stirrers: Drop a finished rock candy stick into hot tea, cocoa, or coffee for a sweet stir—instant flavor boost and a touch of whimsy with every swirl.
- Dessert toppers: Use rock candy as cupcake toppers, sprinkle shards over frosted cakes, or scatter them onto a dessert platter for a festival of sparkle.
- DIY science lesson: Make a few jars at once, experiment with different colors, and let kids see which crystals grow fastest or biggest.
You can store finished sticks in airtight containers for a few weeks at room temperature, so don’t be afraid to make an extra-big batch and stash for later.
FAQs about Homemade Rock Candy
How long does homemade rock candy last?
Homemade rock candy can stay fresh for several weeks if you store it in an airtight container at room temperature. Keep it away from moisture and direct sunlight, and those glossy crystals will keep their crunch as long as you can resist eating them.
Can I use natural food coloring or do I need gel colors?
Gel food coloring is the gold standard because it gives bold color without watering down your sugar solution, which can affect crystal growth. If you’d prefer to avoid artificial dyes, you can try natural food coloring—but some versions may lead to slightly cloudier crystals or softer hues.
What’s the best way to store homemade rock candy?
Once your rock candy sticks are fully dry, place them in a clean, airtight jar or tuck them into sealed bags. Avoid the fridge or freezer, since condensation can make the candy gummy or dull. Room temperature in a dry spot is perfect.
Can I add flavors other than the basic extract suggestions?
Absolutely! This recipe works well with all sorts of extracts—orange, almond, coconut, even a dash of rosewater. Add just a few drops at a time to the syrup; some flavors are more potent than others, so taste as you go.
Homemade rock candy taps into something playfully nostalgic and downright satisfying. It’s one-part kitchen science, one-part edible art, and a pure joy to make—whether you’re sharing with kids or channeling your own childhood. So grab your jars, pick your favorite colors, and let the magic of growing sugar crystals fill your kitchen with sparkle. I hope your first bite is as crunchy, sweet, and smile-inducing as you dreamed!
More Delicious Recipes
- Peppermint Hot Chocolate: This festive drink pairs perfectly with the sweet crunch of rock candy, making for a cozy treat.
- Christmas Coffee Blend Recipe: Enjoy a warm cup of coffee alongside your homemade candies for a delightful holiday experience.
- Honey Sesame Chicken: This savory dish balances the sweetness of rock candy in a fun meal that combines flavors perfectly.
Homemade Rock Candy
Ingredients
Equipment
Method
- Step 1: Dip each wooden stick into water, then roll in granulated sugar to coat. Lay sticks flat and let dry completely to help crystals cling.
- Step 2: In a large pot over medium heat, combine 1 cup water and 3 cups sugar. Stir constantly until sugar dissolves and the mixture boils.
- Step 3: Remove pot from heat. Stir in gel food coloring and flavor extract if using, to customize your candy.
- Step 4: Let sugar solution cool for about 20 minutes to prevent sticks from cooking the sugar too quickly.
- Step 5: Pour cooled solution into mason jars, leaving space at the top to prevent overflow.
- Step 6: Lay a popsicle stick across each jar’s top. Attach a clothespin to a prepared lollipop stick and lower it into the jar, sugar-coated section submerged but not touching the bottom.
- Step 7: Place jars in a clean, undisturbed spot. Avoid moving or shaking for about 5 days while crystals grow.
- Step 8: After 5 days, gently break surface sugar film and carefully remove sticks. Loosen any crystals stuck to jar sides with a knife.
- Step 9: Transfer finished rock candy to clean jars or stand upright in a cup to dry completely before enjoying or gifting.