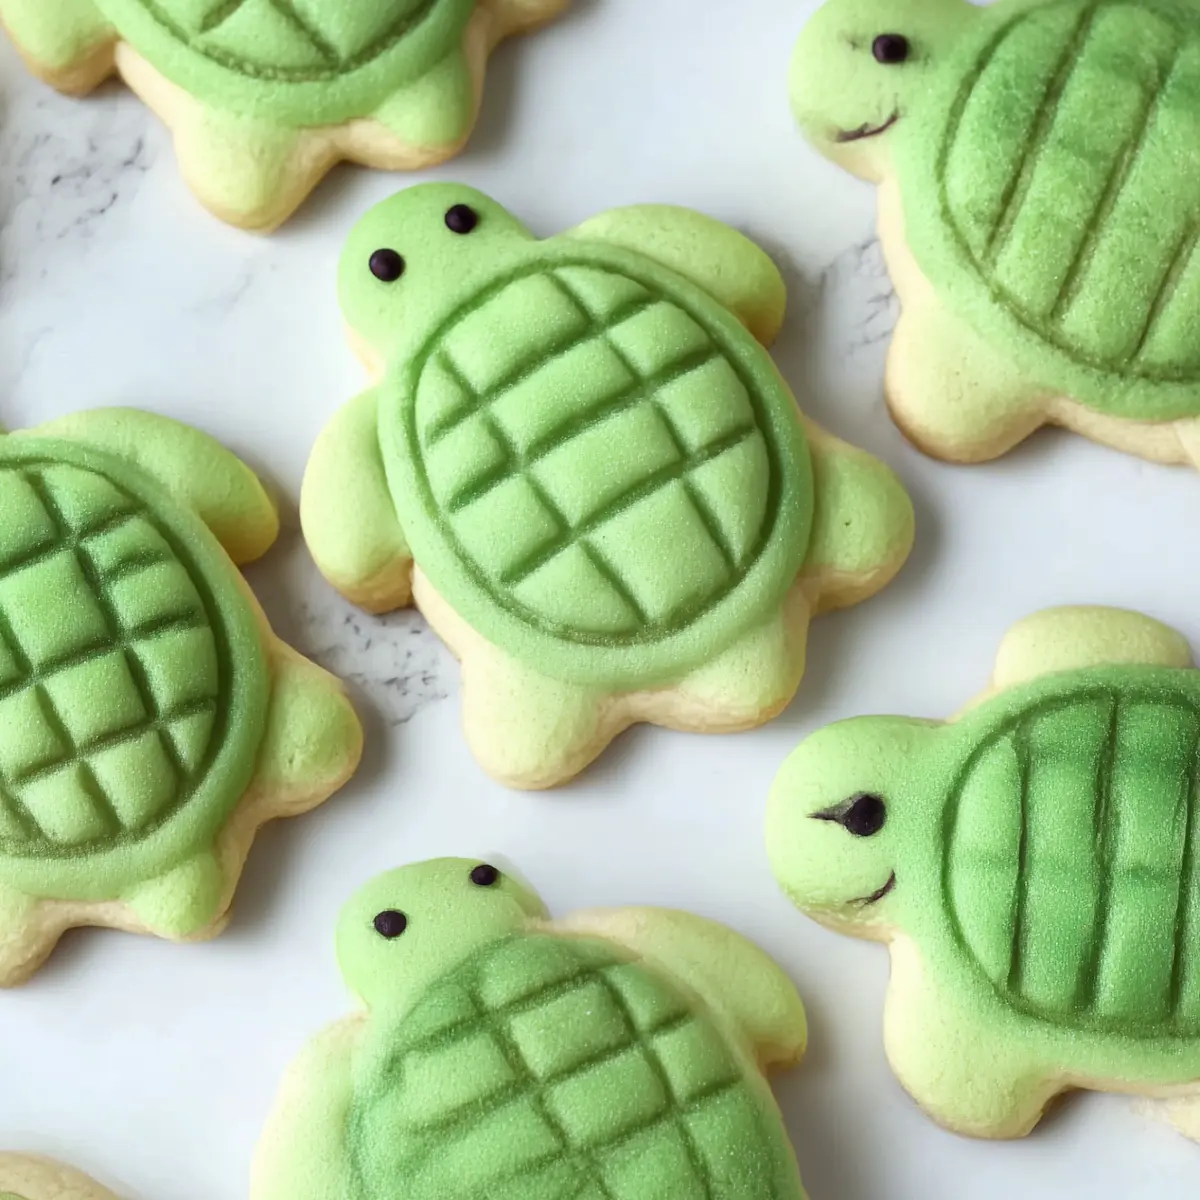
The first time I made turtle sugar cookies, I remember the kitchen filling with the scent of buttery vanilla and just a hint of excitement—because let’s be honest, shaping cookie dough into adorable little turtles isn’t your average baking day. There’s a playful magic that happens when you transform a classic soft sugar cookie into something whimsical and unforgettable, with a shell pattern pressed gently into each green round. These cookies are always the first to disappear at parties and bake sales, and they turn even an ordinary afternoon into a bit of an occasion. Turtle sugar cookies aren’t just sweet treats—they’re edible, hand-crafted smiles, ready to spark a bit of childhood wonder in anyone who sees (or tastes) them.
What Makes These Turtle Sugar Cookies a Standout Treat
There’s something truly special about cookies that don’t just taste amazing—they look like tiny masterpieces too. Turtle sugar cookies strike that rare balance between soft centers and just-set edges, every bite giving way to a buttery crumb kissed with vanilla. But it’s not only about flavor here. Each cookie shaped into a little turtle, with a bright green hue and adorable shell marks, brings a smile before you even take a bite. They’re perfect for birthday tables, summer bake sales, sea creature-themed parties, or just as a fun baking project with kids on the weekend. Their chewy, slightly crisp texture makes them irresistible, while the whimsical shape guarantees they’ll be talked about long after the last crumb is gone.
The Ingredients That Bring Turtle Sugar Cookies to Life
Start with a short, classic list and you’re halfway to these showstopping turtle sugar cookies. Here’s a closer look at the ingredients and why each one matters:
- Sugar – provides the essential sweetness and helps create that soft, chewy interior every good sugar cookie needs.
- Butter – softened butter brings richness and a melt-in-your-mouth quality that sets the foundation for flavor and texture.
- Vanilla – just a splash lifts every other flavor, making the finished cookies fragrant and inviting.
- Egg – adds structure and moisture for those perfectly puffy, chewy rounds.
- Flour – the backbone that ties everything together, giving just enough structure so you can shape the turtles without losing tenderness.
- Baking powder – works with baking soda to help each cookie rise and hold shape during baking.
- Baking soda – helps the cookies spread just the right amount while lending a nice bit of tang to the background flavor.
- Salt – a small pinch wakes up every other flavor and keeps the cookies from taste bland or overly sweet.
- Green gel food coloring – brings each turtle to life; gel ensures vibrant color without thinning out the dough.
See the recipe card below for the full list of ingredients and measurements.
Crafting Each Step for Perfect Turtle Sugar Cookies
Shaping and baking these cookies is just as much fun as eating them. Here’s how the magic unfolds in the kitchen:
- Start by preheating your oven—hot and ready so your cookies bake up with just the right texture. Line or lightly grease your baking sheet in anticipation.
- In a large bowl, beat together the sugar, butter, and vanilla until the mixture is pale and fluffy. It’s that whipped texture that brings air and softness to each bite.
- Add the egg and beat again until fully incorporated, ensuring the dough stays smooth and homogenous.
- Gently mix in the dry ingredients—flour, baking powder, baking soda, and salt—until a soft, easy-to-shape dough forms. Avoid overmixing here to keep the cookies tender.
- Next, blend in the green gel food coloring. Start with a little, then add more until you hit your perfect turtle shade. Make sure to mix until the color is even throughout, and there are no pale streaks left.
- Now for the fun part: scoop rounds of dough for each turtle’s body, roll them smooth in your hands, and set onto your prepared baking sheet. Use a fork to gently press a crosshatch pattern on each round, mimicking a turtle’s shell—crucial for both looks and that classic sugar cookie texture.
- Roll out smaller bits of dough to form each turtle’s head and four stubby little feet. Attach them to the bodies, pressing gently so they stay put during baking.
- Bake for several minutes, just until the bottoms are starting to turn golden and the tops are set to the touch. Avoid overbaking—the goal is soft and chewy, not crisp.
- Cool the cookies on a rack. Once fully cooled, draw on tiny eyes with an edible marker to bring the turtles to life.
Achieving the Ideal Soft, Chewy Texture in These Cookies
Great sugar cookies are all about timing and technique, especially with a playful recipe like turtle sugar cookies. The secret to a soft, pillowy bite lies in not overmixing your dough once the flour is added—stir until just combined. For shaping, rolling the dough balls smooth and keeping the turtle limbs compact helps prevent spreading and ensures everything bakes evenly. Pressing the shells with a fork does more than add that signature look; it helps the centers stay tender while the edges pick up a hint of golden crispiness. Always err on the side of underbaking by a minute if you’re unsure—cookies continue to cook on the sheet after leaving the oven, so you’ll get those dreamy, chewy middles every time.
Baking Tips, Smart Swaps, and Serving Ideas for Turtle Sugar Cookies
If you want your turtle sugar cookies to really shine, start with room temperature ingredients for smooth mixing and a dough that’s easy to shape. Can’t find green gel? Regular liquid food coloring works in a pinch—just add it slowly and keep the dough consistency in check. For a flavor twist, swap the vanilla for almond or coconut extract for a different aroma and subtle nuttiness. These cookies hold onto their softness for days when stored in an airtight container, so you can bake ahead for parties or school events without worry. For serving, pile them on a platter with blue napkins underneath to mimic ocean waves, or tuck them into goodie bags for a birthday treat kids will talk about long after the party ends. If you’re thinking of freezing, shape the turtles and freeze the unbaked dough on a tray, then pop them straight into the oven whenever cookie cravings strike.
FAQs about Turtle Sugar Cookies
Can I make turtle sugar cookies ahead of time and freeze them?
Absolutely—you can shape the dough into turtles, arrange them on a tray, and freeze until solid. Store in a freezer-safe container, then bake straight from frozen, adding an extra minute or two to the baking time.
What can I use instead of green gel food coloring for the turtles?
If you don’t have gel food coloring, regular liquid food coloring works too. Just use it sparingly and expect a slightly softer dough, so chill it a bit before shaping if needed.
How do I keep my turtle sugar cookies soft after baking?
Let your cookies cool completely, then store them in an airtight container at room temperature. Adding a slice of plain bread to the container can help maintain moisture and keep them soft for several days.
Can I use a different extract to flavor my turtle sugar cookies?
Yes, you can swap vanilla for almond, coconut, or even citrus extracts for a fun twist. Just remember that stronger extracts may overpower the classic sugar cookie taste, so use less and taste as you go.
Do turtle sugar cookies need to be decorated with eyes, or can I leave them plain?
The eyes add a lot of personality but aren’t essential to the flavor or fun of these cookies. If you don’t have an edible marker, try tiny dots of melted chocolate or simply leave your turtles au naturel—they’ll still be adorable and delicious.
After baking a batch of turtle sugar cookies, it’s nearly impossible to resist grabbing one while they’re still just a touch warm, the buttery aroma still hanging in the air. With every soft, chewy bite, you’re reminded there’s joy in slowing down, shaping something playful by hand, and sharing sweet moments with people you love. Whether you serve these cookies for a special occasion or just enjoy them alongside an afternoon coffee, each little turtle promises a bite of comfort and a small spark of delight.
More Delicious Recipes
- St. Patrick’s Day Sugar Cookie Bars: These colorful cookie bars are perfect for festive celebrations and share a similar soft and chewy texture with turtle sugar cookies.
- Green Velvet Cake: This vibrant cake is another fun green-themed treat that would complement the playful spirit of turtle sugar cookies.
- St. Patrick’s Day Mint Blossom Cookies: These mint-flavored cookies offer a delightful twist and are great for celebrating special occasions, just like turtle sugar cookies.
Turtle Sugar Cookies
Ingredients
Equipment
Method
- Preheat oven to 400ºF.
- In a large mixing bowl, beat sugar, butter, and vanilla until creamy.
- Add egg and beat again.
- Add dry ingredients until dough is smooth.
- Add green gel food coloring to the dough and beat again until the color is uniform throughout. The amount used will depend on the type of food coloring you are using.
- Using a 1-tablespoon cookie scoop, scoop dough and roll it into round balls to form the bodies of the turtles. Place them on a greased cookie sheet.
- Using a fork, press the dough balls down in two different directions to create the shell design. Cookies should be about ½-inch thick after being pressed down.
- For each turtle, roll a head and four small feet. Gently connect them to the bodies.
- Bake cookies for 5-7 minutes or until bottoms begin to brown.
- Place cookies onto a cooling rack to cool.
- When cookies are cooled, carefully draw eyes on with an edible marker.