There’s nothing quite like welcoming spring with a fun kitchen project you can actually eat. These Bunny White Chocolate Covered Strawberries give you that satisfying mix of sweet, fresh, and playful—plus, they’re genuinely simple to whip up in less than an hour. If you want a treat that’s both adorable and irresistible for Easter, baby showers, picnics, or just chasing away winter blues, you’re exactly where you need to be.
Imagine plump berries, crisp and juicy, peeking out from a glossy layer of Ghirardelli white chocolate with little bunny faces and blushing ears. You don’t need fancy skills or special gear, and there’s lots of room to make them your own with creative toppings or bunny expressions, too. The only thing better than seeing these vanish at a party is enjoying that first sweet, creamy bite yourself.
Equipment to make chocolate-dipped bunny berries
- Baking tray – Essential for resting your dipped strawberries as they set; wax or parchment paper lining prevents sticking.
- Microwave-safe bowls – Perfect for gently melting chocolate wafers without burning.
- Toothpicks – Handy for dipping berries and easy precision when crafting bunny ears and faces.
- Spatula or knife – Useful for scraping off excess chocolate and making decorative drizzles.
What you’ll need for Bunny White Chocolate Covered Strawberries
- strawberries – Juicy, fresh, and completely dried so the chocolate sticks beautifully.
- Ghirardelli white chocolate melting wafers – They melt super smooth for that classic creamy coating and set with a gorgeous shine.
- toppings (finely chopped nuts, shredded coconut, sprinkles, etc.) – For adding extra crunch, color, or a hint of flavor—make your berries extra special.
- Ghirardelli milk or dark chocolate melting wafers – Just a bit, to create sweet little bunny faces and fine details.
- pink or red food coloring – Oil-based works best; a dab brings those inner bunny ears and cheeks to life.
See the recipe card below for the full list of ingredients and measurements.
How to create these sweet bunny treats step-by-step
- Line a baking tray with wax or parchment paper, setting the stage for dipping and drying your strawberries without any sticky mishaps.
- Insert toothpicks into the leafy end of each berry. They’ll act as sturdy handles, keeping your coating experience fuss-free and less messy.
- Add Ghirardelli white chocolate melting wafers to a microwave-safe bowl. Melt them in 30-second bursts, stirring in between, until the chocolate looks silky and lump-free. Don’t rush—chocolate should feel warm and pourable, not scorching.
- If making traditional white chocolate strawberries: Dip each berry fully, letting the creamy chocolate envelop the fruit. Gently scrape off any extra chocolate at the edge of the bowl for a neat finish, then lay each berry on the lined tray. Decorate with nuts, coconut, or sprinkles while the chocolate is still soft, or wait until it’s dry to drizzle with more melted chocolate for a textured, glossy look. Leave them to set at room temperature; you’ll know they’re ready when the chocolate loses its tacky shine—usually about 5 minutes.
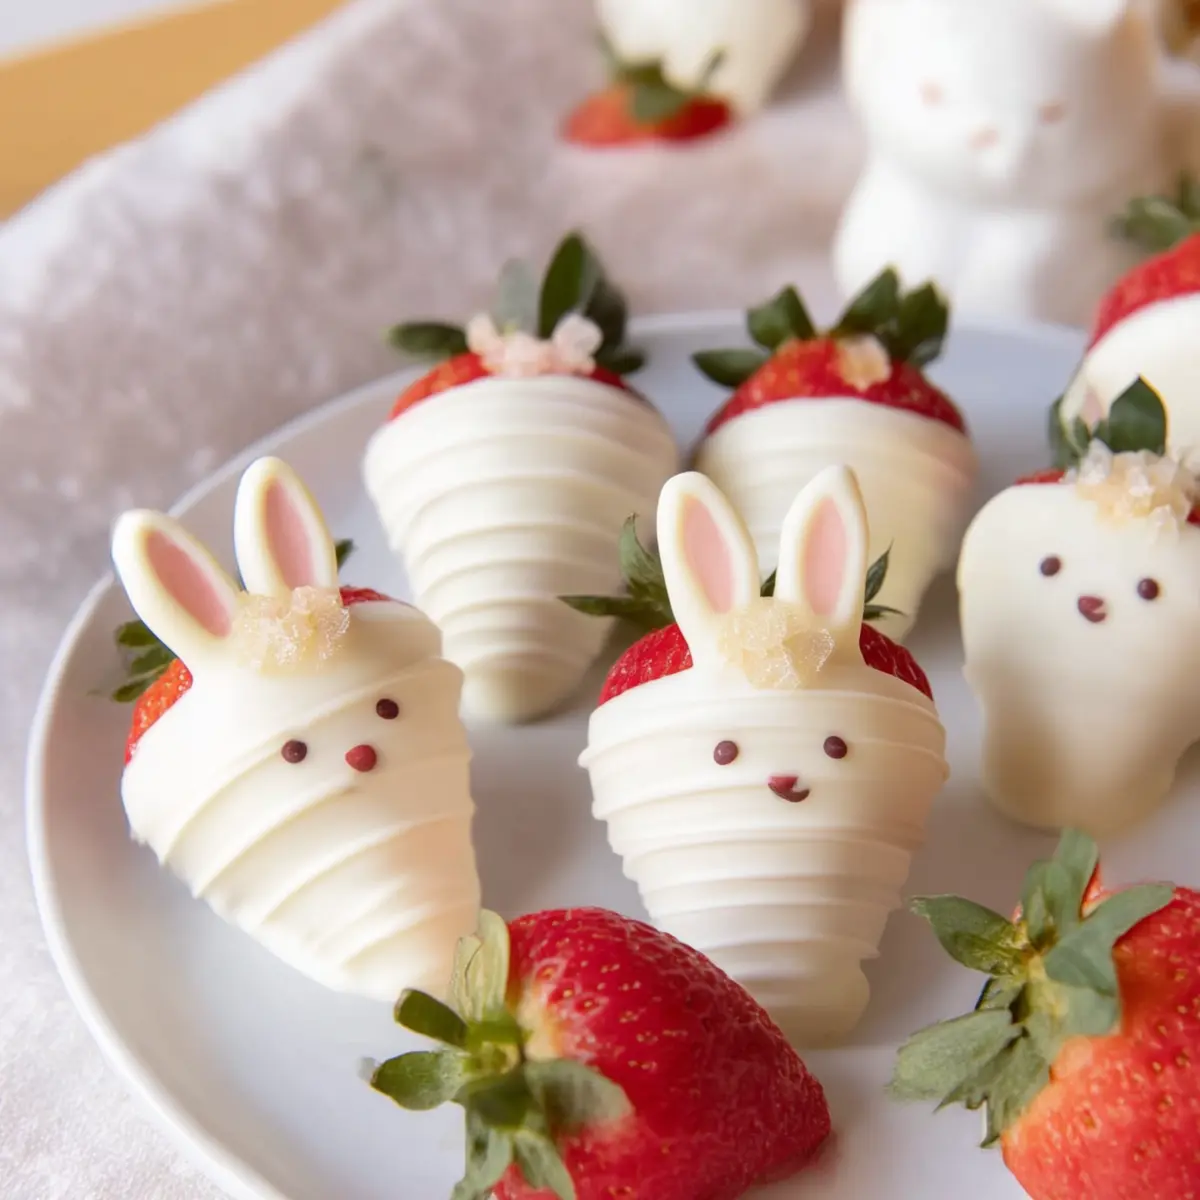
- For Bunny White Chocolate Covered Strawberries: Dip each berry halfway into the melted white chocolate for that “bunny body” look. Scrape the bottom edge to avoid puddling, then place on the tray. Use a toothpick dipped in white chocolate to paint on tall bunny ears. Melt a few chocolate (milk or dark) wafers in a separate bowl; with a toothpick, draw eyes and a sweet little mouth on each bunny. Swirl a tiny bit of pink or red food coloring into leftover white chocolate to add the prettiest blush and color those inner ears. Let everything set at room temp—you’ll see the chocolate matte over and hold its shape.
- Once dry, slide out the toothpicks gently. Arrange your bunnies on a platter or box. The chocolate coating will feel crisp but not brittle, and the berries beneath should look plump and glossy when you bite in.
Tips, troubleshooting, and common mistakes
- Chocolate not melting smoothly? Pause between microwave bursts to stir thoroughly, making sure residual heat helps melt the wafers. Avoid overheating—it can make the chocolate seize or become grainy.
- Berries not holding chocolate? Any water will break the chocolate’s grip! Make sure your strawberries are completely dry before dipping. If a berry feels cold but moist, pat with a kitchen towel and let it air dry a few extra minutes.
- Food coloring causing chocolate to seize? Oil-based coloring mixes easily. If you only have regular food coloring and the chocolate thickens, stir in ½–1 teaspoon of a neutral oil (like canola or vegetable) until smooth again.
- Chocolate puddling underneath? Always scrape off excess chocolate before setting the berry down. A quick, gentle twist against the bowl’s rim helps every time.
- Bunny faces not coming out right? Try practicing faces on parchment first. Don’t worry about symmetry—each one’s charm is in its little differences.
- Chocolate not firming up? Rest at room temperature, not in the fridge, for the best shine and snap. Humidity or heat may slow the process, so be patient.
Pairing ideas and playful variations for bunny berries
Bunny White Chocolate Covered Strawberries shine as a dessert centerpiece at brunch, next to a fluffy carrot loaf, or topping a platter of pastel macarons. Serve with lemon iced tea, sparkling water, or a fruity fizz to keep things fresh and light. For more decadence, add them to a dessert board with brownies, truffles, and shortbread. Want to switch things up?
- Dip in different chocolates: Try dark or milk chocolate for bunnies with a cocoa twist, or swirl them together for marbled “fur.”
- Swap toppings: Go festive with rainbow sprinkles, edible glitter, crushed pistachios, or coconut “fur.”
- Make it allergy-friendly: Use vegan chocolate or dairy-free white chocolate to keep everyone happy.
- Play with faces: Switch up the bunny expression—add whiskers, silly ears, or even mini chocolate chip “teeth.”
- Holiday inspiration: Use green-dyed coconut or mini eggs for an Easter nest, or pastel colors for baby showers and garden parties.
FAQs about Bunny White Chocolate Covered Strawberries
How long can I store Bunny White Chocolate Covered Strawberries?
These treats are best enjoyed the day they’re made, but you can store them in an airtight container in the fridge for up to two days. The chocolate shell may develop condensation, so keep layers separated with wax paper and try to serve them as fresh as possible.
Can I make Bunny White Chocolate Covered Strawberries ahead of time?
Absolutely! You can dip and decorate the day before your event. Just store the berries in a single layer (not stacked) in the fridge to keep their decorations crisp and the fruit juicy under the chocolate coating.
What if I don’t have oil-based food coloring for the bunny’s ears and cheeks?
If you only have water-based or gel food color, you might notice the chocolate thickening or seizing. Fix it by stirring in a little neutral oil—about ½–1 teaspoon—until the chocolate smooths out again. Oil-based food coloring blends in hassle-free every time.
Why these bunny berries are impossible to resist
There’s something magical about the way Bunny White Chocolate Covered Strawberries combine creamy chocolate, juicy berries, and creative decorating in one sweet, no-fuss package. With their melt-in-your-mouth coating and little bursts of fruit, they bring smiles at any spring gathering—or honestly, whenever you need a sprinkle of joy in your kitchen. Your batch won’t stick around for long, so enjoy making, sharing, and savoring these adorable treats while they last.
More Tasty Ideas
- Easter Egg Fruit Pizza: This vibrant and fun dessert features a fruit-topped base, perfect for adding color to your spring celebrations.
- Strawberry Cheesecake Ice Cream: Cool and creamy with fresh strawberries, this ice cream is a delightful treat that complements your bunny berries perfectly.
- Loaded Leprechaun Popcorn: This festive snack adds a playful touch to any gathering, making it a fun pairing with your springtime treats.
Bunny White Chocolate Covered Strawberries
Ingredients
Equipment
Method
- Line baking tray with wax or parchment paper.
- Insert toothpicks in the top of each strawberry and line up the strawberries on your tray. The toothpicks will be your handles for dipping.
- In a microwave-safe bowl, add 10 oz Ghiradelli white chocolate melting wafers. Heat in 30-second intervals, stirring in between, until fully melted.
- For regular white chocolate-covered strawberries: Fully dip strawberry in melted chocolate. Gently scrape excess chocolate off the bottom on the rim the bowl, then set on lined tray. While chocolate is still wet, add any sprinkles, finely chopped nuts, etc. Otherwise, let white chocolate fully dry. Then, drizzle on extra chocolate using an offset spatula or knife. Let the chocolate harden at room temperature, which should take about 5 minutes. Tip: reheat chocolate in 15-second intervals as needed.
- For bunny white chocolate-covered strawberries: Dip halfway into melted white chocolate. Gently scrape excess chocolate off the bottom on the rim of the bowl, then set on lined tray. Use a toothpick to draw on bunny ears. In another microwave-safe bowl, melt 2-3 pieces Ghiradelli milk or dark chocolate melting wafers and use this to draw on the eyes + mouths. Lastly, dye any remaining white chocolate with pink/red food coloring and use this for the inner ears and blush. Let the chocolate harden at room temperature, which should take about 5 minutes. Tip: reheat chocolate in 15-second intervals as needed. Note: If using oil-based food coloring, the chocolate will not seize. If using regular food coloring, the chocolate may seize and thicken. You can reverse this by stirring in ½-1 tsp of neutral oil (canola, vegetable) until it smooths out.
- Remove toothpick skewers and enjoy!