If you’ve ever hunted for the ultimate treat that’s buttery, gooey, and all about golden nostalgia, Canadian Butter Tarts might just be your new favorite craving. The moment that rich aroma of bubbling maple syrup and caramelized sugar floats from the oven, you’re practically a kid again, sneaking into the kitchen, hoping for dessert before dinner. I can’t count the number of potlucks, holidays, and “just because” afternoons where a platter of these glossy, chewy tarts has disappeared in a flash.
The crackle of tender pastry, the sticky center that oozes just enough when you bite in, and that unmistakable blend of sweet maple and toasted butter—this recipe is all about pure, unfiltered Canadian comfort. If you grew up anywhere near Ontario, or just wish you did, you know it’s nearly impossible to resist just one.
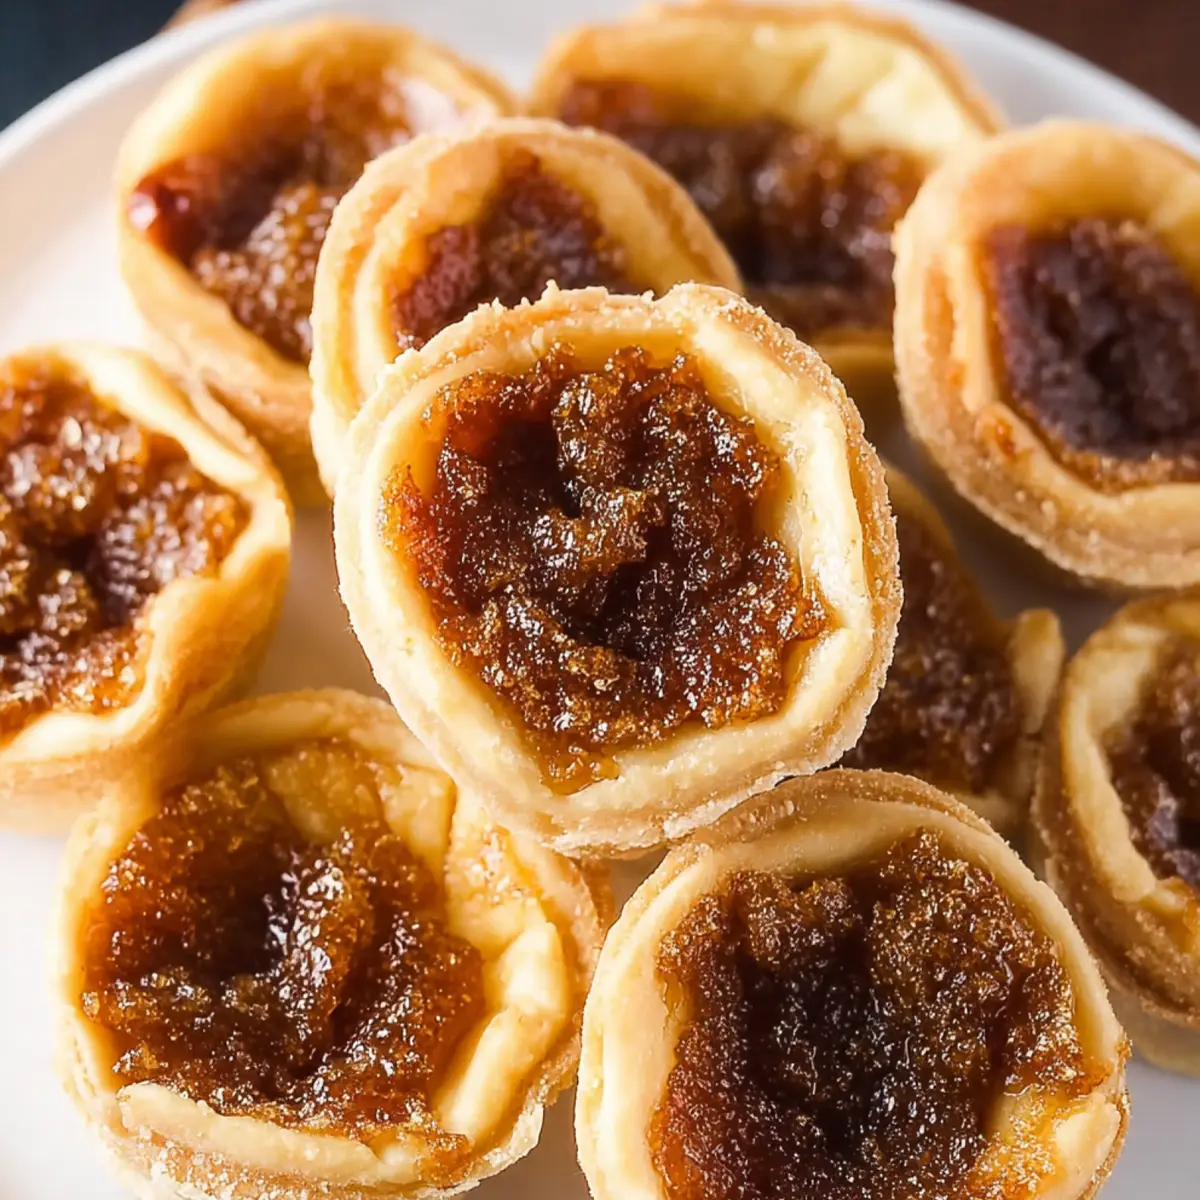
Why Canadian Butter Tarts Always Steal the Show
A classic Canadian Butter Tart isn’t just a dessert—it’s a whole mood. Maybe it’s the flaky, buttery pastry that shatters gently with every bite, or maybe it’s the way the caramelized filling oozes just enough to demand you lick your fingers. Maple syrup takes the lead, making every mouthful taste like sugared snow and snowy afternoons.
These tarts aren’t fussy or fancy, but they have a sort of quiet magic when they show up at your table. Great for holidays, family get-togethers, or last-minute bake sales, they win hearts with their old-school simplicity and undeniable sweetness. They’re quick to whip up, travel well, and have the unique gift of making almost everyone grin like a five-year-old.
Have you ever tried to hide a batch for later? Good luck—these little guys go fast. People love the hint of salt that balances the sugar rush, and if you tuck a few extras away in the freezer, you’ll be thanking yourself for the surprise treat down the road.
Ingredient Guide for Irresistible Butter Tarts
Let’s break down what goes into these crowd-pleasing Canadian Butter Tarts. Each ingredient pulls its weight—swap carefully and you keep the spirit alive.
- flour – This is the backbone of the tart shells, giving a tender structure that cradles the sticky filling.
- Unsalted butter – Essential for both the crust and filling. It brings out richness and deepens the buttery flavor, whether cold for flakiness or soft for creamy blending.
- Sugar – A pinch goes in the crust for a subtle touch of sweetness, while brown sugar in the filling adds a deep, caramel note that plays well with maple syrup.
- Fine sea salt – Just a whisper, but it sharpens flavors and tempers the sweetness so every bite pops.
- Cold water – The secret to a pastry that doesn’t turn tough. It brings the dough together without melting the butter.
- Eggs – At room temp, eggs help set the filling, making sure it’s custardy and lush, not runny.
- Maple syrup – The soul of Canadian sweets. It creates that signature gooey, sticky center you dream of.
- Vanilla extract – A little hug of vanilla rounds everything out, giving depth and warmth to the whole tart.
See the recipe card below for the full list of ingredients and measurements.
Making Canadian Butter Tarts from Scratch
A little patience and a few simple steps will bring you straight to Canadian dessert perfection. Here’s how it all unfolds:
- Begin by preparing your crust. Toss flour, a touch of sugar, and salt into a food processor. Pulse in cold, cubed unsalted butter—aim for a mixture dotted with buttery bits just the size of small peas, never fully blended for maximum flakiness.
- Add a stream of cold water, pulsing gently until the dough starts to come together. It’s not supposed to be smooth, just shaggy and a little sticky (don’t worry, that’s right!). Divide onto plastic wrap, press into discs, and chill until firm—proper chilling is your ticket to a melt-in-your-mouth result.
- Once your dough is chilled, sprinkle a little flour on the counter and roll it out to a thin sheet, about the thickness of a coin. Use a round cutter or even an upturned glass to stamp out pastry circles, then gently press each into greased muffin tin wells to form the tart shells. Pop these back in the fridge so they keep their shape while you tackle the filling.
- For the filling, cream together softened butter and brown sugar until smooth and light. Crack in the eggs, one at a time, whisking gently to work in some air, then stir in maple syrup, a scatter of salt, and that splash of vanilla. Let this loose, shiny mixture sit for a bit—the sugar will partly dissolve, making the filling extra smooth.
- If you’d like to add nuts or raisins (for the butter tart purists and rebels alike), scatter them into the base of each empty tart shell before filling.
- Pour the filling almost to the top of each pastry. A small jug or a measuring cup makes pouring neat and less messy. Bake until the pastry is golden and the centers are bubbling and set at the edges but still just a tad jiggly in the middle. That little wobble is what makes them legendary.
- Cool the tarts in the pan until safe to touch, then gently twist and lift onto a wire rack. The custard will settle and the shells finish crisping up as they cool.
How to Nail Perfect Butter Tarts Every Time
Even the most forgiving recipes have their quirks—here’s how to make sure your Canadian Butter Tarts are always next-level:
- Chill your dough well before rolling and again after lining the tins. Cold dough hits the oven and puffs beautifully, giving you a tender, flaky bite rather than anything tough or greasy.
- Don’t overwork the pastry. Mix only enough to bring it together, leaving little visible bits of butter for the flakiest crust.
- If the filling seems a bit too runny, let it rest for a few more minutes before pouring. Some settling is normal, but over-whisking can make the filling too fluffy and bake up oddly.
- Keep a close watch in the last minutes of baking. Ovens vary, and you’re looking for a tart with golden edges and a slightly puffed, still-just-jiggly center—better a little underdone than overbaked.
- Let the tarts cool before attempting to remove them from the tin. Hot filling is lava-like, but once set, the tarts will slip right out.
- For extra insurance, use a thin knife or offset spatula to gently loosen any caramelized edges before lifting them out.
- Butter tarts keep well in an airtight container at room temp for a couple of days, or tucked in the freezer for a treat down the road. If freezing, let them thaw at room temp for best texture.
Creative Ways to Serve Butter Tarts
Canadian Butter Tarts don’t need much to shine, but there’s always room for a little fun. Serve them as a standalone treat with coffee or tea, or go a little extra and swirl a dollop of lightly whipped cream or crème fraîche over the top.
New twists? Try adding chopped pecans, walnuts, or even a handful of dried cranberries or chocolate chunks for a modern punch. Taking them to a picnic? They travel like a dream—just line your container with a tea towel to cushion the ride.
For a festive feel, sprinkle a bit of flaky sea salt or a dusting of cinnamon over the still-warm tarts. Around the holidays, orange zest or a drizzle of maple whisky (if you’re feeling indulgent) takes them in a grown-up direction.
You can even bake them ahead and freeze. Come dessert time, a quick thaw brings them right back to chewy, golden glory.
FAQs about Canadian Butter Tarts
How should I store leftover Canadian Butter Tarts?
Butter tarts are best kept in an airtight container at room temperature if you’ll eat them within a day or two. For longer storage, keep them in the fridge, but let them come to room temperature before serving so the pastry doesn’t taste dense or cold.
Can I freeze Canadian Butter Tarts for later?
Absolutely—these tarts freeze beautifully. Arrange them in a single layer in a freezer-safe container, using parchment paper to separate layers if stacking. Thaw at room temperature for the best texture and flavor.
What’s the best substitute for maple syrup in butter tarts?
If you don’t have maple syrup, golden syrup or corn syrup works in a pinch, but you’ll miss some of that signature Canadian depth. The result will still be gooey and sweet, but the flavor won’t have that same earthy richness.
How do I keep the filling from leaking or crystallizing?
To keep the filling perfectly gooey, avoid overbaking—the centers should look just slightly puffed and wobbly when you take them out. Also, make sure you don’t overfill the shells, and wait until the tarts are cool before trying to remove them from the tin.
When the craving for something homey and decadent kicks in, it’s hard to beat Canadian Butter Tarts. They’re cozy, timeless, and bring out the kid in everyone at the table. With their golden shells and sticky-sweet cores, these tarts are made for lazy afternoons and festive gatherings alike. Grab one (maybe two), pile onto the couch, and let the caramel aroma fill your kitchen—no occasion needed.
More Delicious Recipes
- Classic Canadian Butter Tarts with Raisins: This variant features sweet raisins, adding a delightful chewy texture to the traditional buttery filling.
- Cinnamon Roll Sugar Cookies: These soft and sweet cookies bring the comforting flavors of cinnamon rolls to a fun cookie form, perfect for sharing.
- Soft Chewy Lemon Cookies: A zesty addition to your dessert table, these lemon cookies offer a refreshing contrast to the rich sweetness of butter tarts.
Canadian Butter Tarts Recipe
Ingredients
Equipment
Method
- Using a food processor, pulse the 2-1/2 cups flour, 1 tablespoon sugar and 1 teaspoon fine sea salt. Add the 1 cup unsalted butter in chunks, pulse 5 to 8 times, or until butter is in small pieces. Add the 3/4 cup cold water and pulse until the dough starts coming together.
- Turn the dough onto 2 plastic wrap pieces lying flat. Cover over and pat into a disc. Refrigerate for at least 1 hour. Dough will be super sticky, this is normal.
- Sprinkle a small amount of flour on a flat surface and roll out one portion at the time, about 1/8 of an inch thick. Use a round cutter or lid (4 inches) and cut 15 pieces.
- Grease 1 muffin pan completely and 3 muffin cups from a second pan. Press each dough circle into the bottom of a muffin pan cup. Refrigerate while making the filling.
- Preheat the oven to 350°F.
- Cream the softened ¼ cup unsalted butter and packed 1/2 cup brown sugar together. Add the 2 eggs one at the time. Mix in the 1 cup maple syrup, 1/4 teaspoon fine sea salt, and 1 teaspoon vanilla extract. The filling is a chunky custard and very loose. Allow the filling to sit for 5-10 minutes to let the sugars dissolved fully, then give it one more whisk.
- If adding raisins or nuts, sprinkle into each muffin well before adding the filling. Pour the filling into pie crust and bake for 25 minutes. It is easiest to use a glass measuring cup with a pour spout.
- Let the tarts cool for 5-10 minutes in the pan and remove to a cooling rack.