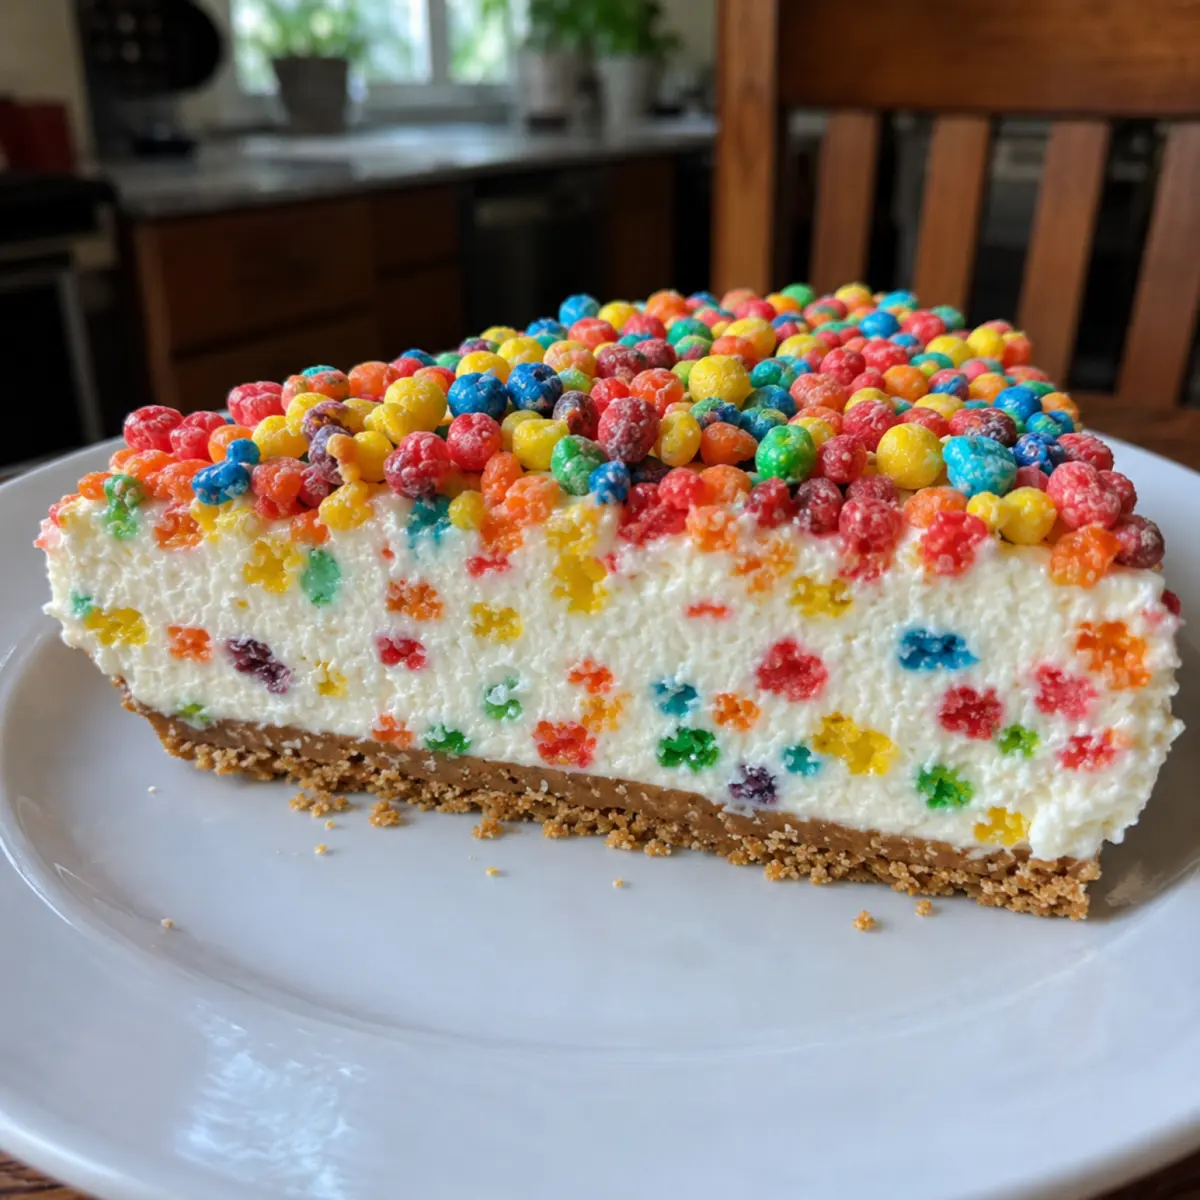
I can’t help but crack a smile every time I pull this No-Bake Fruity Pebbles Cheesecake from the fridge. It’s the kind of dessert that’s just plain fun—bursting with color and nostalgia. If you crave a slice of creamy cheesecake and love the crunch of sweet, fruity cereal, you’re in for a treat.
No rolling pins, ovens, or hot kitchens required; this recipe is all about keeping things easy and playful. The magic starts with a Fruity Pebbles crust that’s gooey and crisp at the same time, then finished with a marshmallow-laced cheesecake filling that’s plush and silky. Every bite is bright, bold, and never boring.
Burst of Color and Joy in Every Slice
When you want a dessert that’s guaranteed to catch everyone’s eye, No-Bake Fruity Pebbles Cheesecake is the way to go. It’s the dessert that invites instant smiles at birthday parties, potlucks, or family gatherings. The bright cereal crust is a playful ode to breakfast classics, and the creamy filling brings all the comfort of your favorite cheesecake—without turning on the oven. Each slice is a rainbow on your plate, crunchy at the edge and pillowy at the center, with sweet fruity notes that kids and grown-ups both adore.What makes this recipe truly stand out is its ease. There’s no baking, no water bath, and no fuss. You get a mix of flavors and textures that taste like pure celebration. If you love nostalgic treats or want an easy wow-factor dessert, this recipe’s got you covered.
Ingredients That Make This No-Bake Fruity Pebbles Cheesecake Pop
You’ll only need simple, fun ingredients—the kind that leap off the grocery store shelf and spark childlike joy in the kitchen. Here’s what goes into this colorful cheesecake:- Fruity, colorful rice cereal – The star ingredient for both crust and filling, adding crunch, sweetness, and that unmistakable pop of color. Use your favorite rainbow-hued cereal for the classic look.
- Miniature marshmallows – Melted with cereal for a chewy, marshmallowy crust that holds together and tastes like a treat on its own.
- Butter – Gives the crust rich flavor and that classic soft crunch, blending everything into tasty harmony.
- Full-fat cream cheese, softened – Creates the creamy, tangy base of the no-bake cheesecake filling. Let it come to room temperature for easy blending.
- Powdered sugar – Sweetens the filling while melting in smoothly for a plush texture.
- Pure vanilla extract – Adds a warm, comforting flavor that ties together the fruity and creamy components.
- Marshmallow creme – Whips into the cheesecake filling for lightness, sweetness, and a true marshmallow finish.
- Extra fruity cereal, lightly crushed or chopped – Folds into the cheesecake filling for bursts of crunch and color in every bite.
- Extra fruity cereal or colorful sprinkles (optional) – The perfect topping before serving, making each slice even more inviting and party-ready.
See the recipe card below for the full list of ingredients and measurements.
How to Assemble a No-Bake Fruity Pebbles Cheesecake
Ready to get started? Here’s how you make a No-Bake Fruity Pebbles Cheesecake, step by step:- Lightly grease your pie plate with butter or non-stick spray, making sure to get into every edge so the crust releases easily later.
- Combine the fruity cereal, miniature marshmallows, and butter in a large, microwave-safe bowl.
- Microwave the mixture until the marshmallows are melted and puffed. Stir gently so every bit of cereal is fully coated and glossy.
- Press the warm marshmallow-cereal mix firmly into the greased pie plate, pushing it evenly up the sides and across the bottom. Let it cool and firm up—this helps the crust hold its shape.
- In a large mixing bowl, beat the softened cream cheese, powdered sugar, and vanilla extract until smooth and creamy with no lumps.
- Add the marshmallow creme and mix again to get a light, fluffy, and silky cheesecake base.
- Fold in the lightly crushed fruity cereal for a surprise crunch and pop of color in every bite.
- Spoon the cheesecake filling into the cooled crust, smoothing the top with a spatula for evenness.
- Chill the cheesecake in the refrigerator until it’s firm and set. For a quicker treat, you can pop it in the freezer briefly.
- Decorate with extra fruity cereal or colorful sprinkles right before serving.
- Slice with a sharp knife, wiping between cuts for picture-perfect wedges.
Tips for Perfect Results and Cheesecake Texture
This cheesecake is as much about fun as it is about flavor, but a little care goes a long way to make every slice shine. Here are a few things to keep in mind as you go:- Press the cereal crust in while it’s still warm and pliable. It’ll set up firmly as it cools, locking in the shape and crunch.
- Make sure your cream cheese is truly soft for an ultra-smooth filling. Tiny lumps can sneak in if it’s too cold, so give it some time to warm up.
- Fold the cereal into the filling gently so you keep the crunch without crushing it into dust.
- Use a sharp, warm knife (run it under hot water and wipe dry) for the cleanest slices—especially important with a marshmallow and cereal crust.
- If the crust feels sticky as you slice, give the cheesecake a few extra minutes in the fridge or freezer.
Skipping the chilling step makes for a messier dessert, so patience pays off: let it firm up and you’ll be rewarded with easy, beautiful slices.
Serving Ideas and Fun Twists
This cheesecake is the ultimate bring-to-a-party dessert, but it’s endlessly customizable. For an extra burst of festivity, top with a tumble of extra cereal or rainbow sprinkles just before serving. The cereal adds a sparkly finish and extra crunch that kids especially love.You can switch things up with chocolate rice cereal or try swirling a little strawberry or lemon jam through the cheesecake layer for a fruity twist. Pair each slice with a scoop of vanilla ice cream or a drizzle of white chocolate. If it’s for brunch, cut them into mini squares for a bite-sized treat. However you serve it, the colors and flavors guarantee a crowd-pleaser.
Keeping Your No-Bake Fruity Pebbles Cheesecake Fresh
No-bake cheesecakes like this one do best when kept cool and covered. After serving, store any leftovers in the refrigerator, lightly covered with plastic wrap or in an airtight container so the cereal crust stays as crisp as possible.If you’re making it ahead, you can prepare the crust and filling separately and assemble just before a party. The finished cheesecake should be enjoyed within a couple of days for the brightest colors and crunchiest texture. Freezing is not recommended for long stretches, as the cereal softens; but a quick freeze to speed up setting is totally fine.
FAQs about No-Bake Fruity Pebbles Cheesecake
Can I use a different cereal in this No-Bake Fruity Pebbles Cheesecake?
Yes, you can swap in other colorful or crispy cereals if you like. Rice-based cereals work best for structure and a neutral flavor.
How long does No-Bake Fruity Pebbles Cheesecake stay fresh?
No-Bake Fruity Pebbles Cheesecake is tastiest within two days of assembling. The crust will slowly soften in the fridge but the flavor remains great.
What’s the best way to slice the cheesecake neatly?
Use a sharp knife, running it under hot water and wiping clean between every cut. This helps prevent the marshmallow crust from sticking for tidy, even slices.
Can I make this cheesecake ahead of time?
You can prep the crust and filling a day ahead and assemble before serving. Just keep everything chilled and covered for maximum freshness and snap.
Celebrate with a Slice of Fruity Fun
Nothing says “party” quite like a No-Bake Fruity Pebbles Cheesecake, with its cheerful colors and creamy, dreamy layers. It’s bright, easy, and always gets people talking. Whether you’re celebrating a birthday, finishing a weeknight dinner on a high note, or just want a reason to smile, this cheesecake brings joy to the table every single time.Savor each bite—the sweet crunch, the melt-in-your-mouth filling, and that whimsical rainbow crust. Simple, playful, and unmistakably delicious.
What To Try Next
If you enjoyed this no-bake treat, these sweet options are perfect to keep the easy dessert vibes going.
- No-Bake Biscoff Cheesecake Bars — shares the no-bake cheesecake method for effortless desserts.
- Strawberry Cheesecake Dump Cake — great for a fruity dessert perfect for any season.
- Rice Krispie Easter Nests — fun and crunchy, offering a playful texture contrast to creamy cheesecake.
Recommended Equipment


* As an Amazon Associate, I earn from qualifying purchases. There is no extra cost to you.

No-Bake Fruity Pebbles Cheesecake
Ingredients
Equipment
Method
- Lightly grease a 9-inch pie plate with butter or non-stick cooking spray, coating the bottom and sides evenly.
- In a large microwave-safe bowl, combine the fruity cereal, miniature marshmallows, and butter.
- Microwave the mixture uncovered on high power for 3 minutes until the marshmallows are melted and puffed. Stir carefully until the cereal is evenly coated.
- Press the warm cereal mixture firmly into the prepared pie plate, forming an even crust. Let it cool and firm up completely for about 20 minutes.
- In a large mixing bowl, beat the softened cream cheese, powdered sugar, and vanilla extract for 3 minutes until smooth and creamy.
- Add the marshmallow creme and mix until fully incorporated and the filling is light and fluffy.
- Gently fold in the lightly crushed or chopped fruity cereal until evenly distributed throughout the filling.
- Spoon the cheesecake filling into the cooled crust and spread the top evenly with a spatula.
- Refrigerate for 120 minutes until the cheesecake is firm and set. For a quicker set, freeze for about 30 minutes.
- Garnish with extra fruity cereal or colorful sprinkles before serving.
- Slice with a sharp knife, wiping the knife clean between cuts for neat slices.