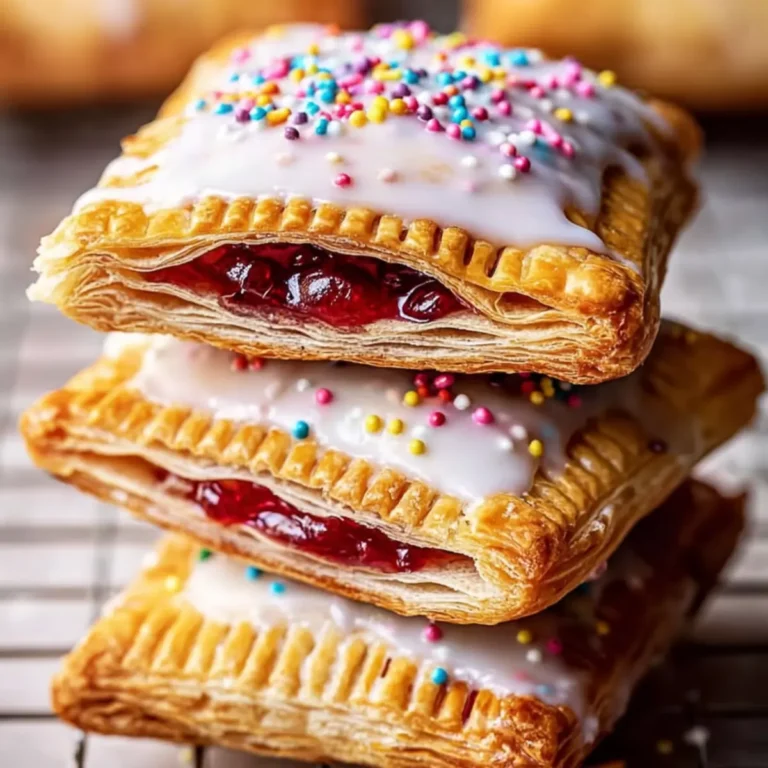
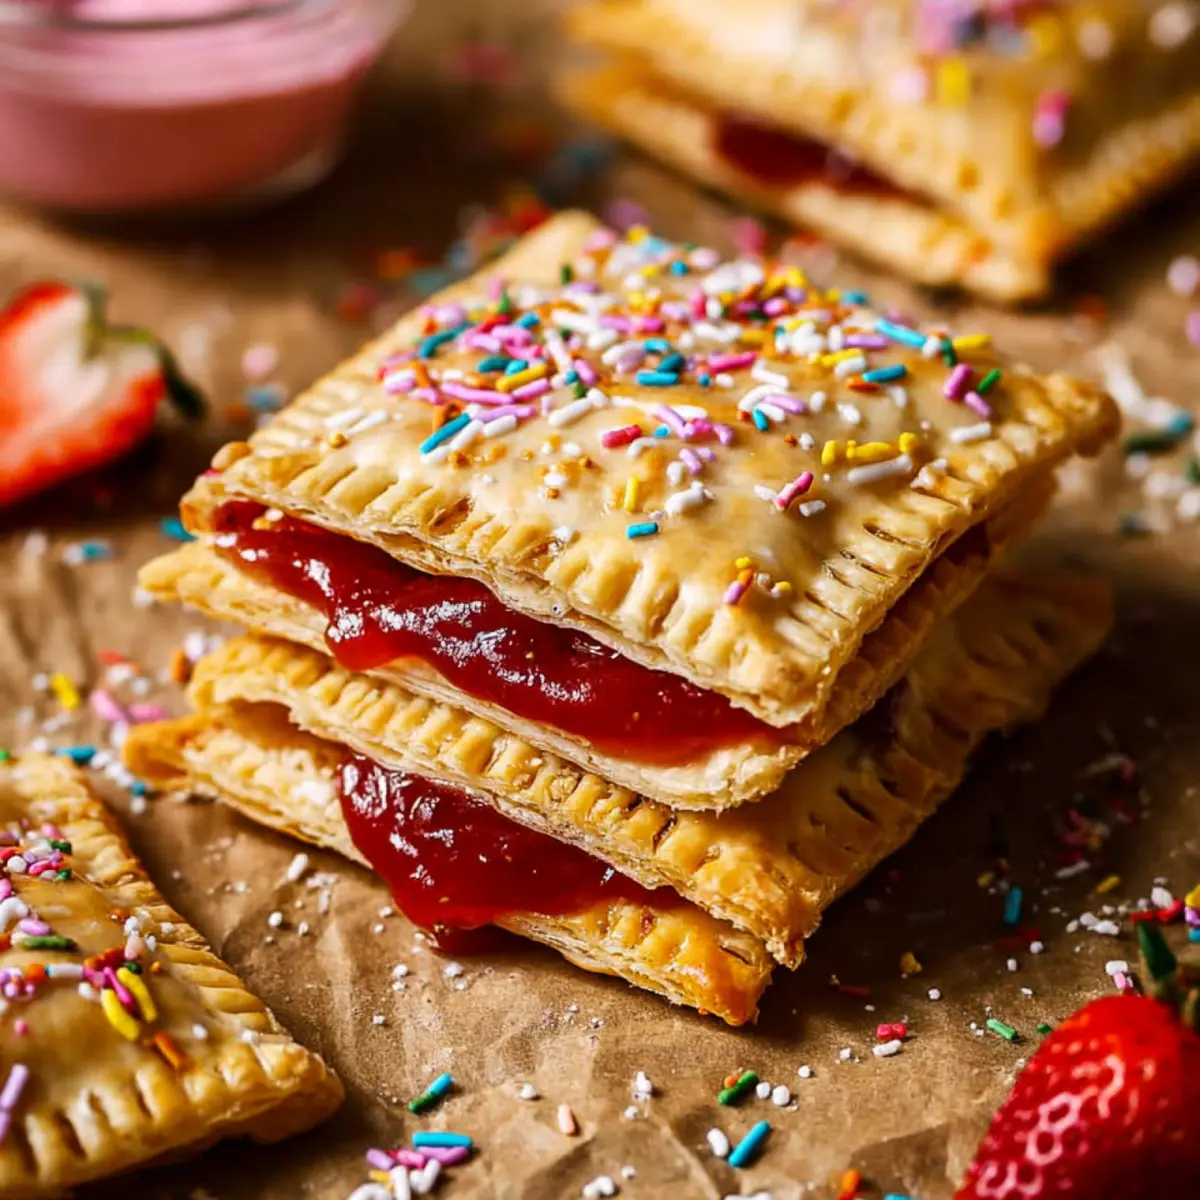
There’s nothing quite as nostalgic or joyful as biting into a Homemade Pop Tart with Pie Crust, especially when you’ve made them yourself. These flaky, jam-filled pastries are so much better than the ones you’ll find in a box at the store—think golden, tender crust, gooey preserves, and a simple icing you can jazz up however you like. This recipe is designed to be easy and fun, so you’ll spend more time enjoying warm pop tarts and less time fussing in the kitchen.
You can customize your jam, add sprinkles, and even get the kids involved in crimping and sealing those edges. The best part? You’ll have fresh, bakery-style pop tarts in about half an hour.
Essential tools for Homemade Pop Tarts success
If you want that perfect bakery look and crisp finish with your Homemade Pop Tarts with Pie Crust, here’s all the equipment you’ll actually need:
- Baking sheet – This gives your pop tarts a solid, even surface for golden baking.
- Parchment paper – Keeps your pastry from sticking and makes for easy cleanup.
- Rolling pin – Useful for those scraps of pie dough you’ll roll out again to make extra tarts.
- Sharp knife or pizza cutter – Helps you slice neat rectangles for that classic pop tart shape.
- Small bowl – For whisking the egg wash and mixing up the sweet icing.
- Fork – For crimping those pastry edges and sealing in all the goodness.
- Whisk – To get that icing smooth and ready for drizzling.
- Basting brush – The simplest way to coat your pastry with egg wash for a shiny, golden top.
Nothing fancy here—just simple tools that probably already live in your kitchen.
Ingredients that make these pop tarts shine
- Rolled pie crust – The true hack here: ready-made dough means less mess and reliably flaky layers.
- Jam or preserves – The heart and soul of the filling. Choose your favorite fruit or even a combo.
- Egg – Brushed on top for color and to help seal those edges together.
- sugar – Powdered, for a smooth, simple icing that ties everything together.
- Milk or cream – To bring the icing to the perfect, pourable consistency.
- Vanilla – Just a little, for aroma and extra flavor in the icing.
See the recipe card below for the full list of ingredients and measurements.
Shaping, baking, and icing your pop tarts: Step by step
- Preheat your oven to 200°C. This ensures an even, hot environment so your pop tarts turn out crisp and golden.
- Lay a sheet of parchment paper on a baking tray. Unroll your pie crust onto another piece of parchment. Cut as many rectangles (about 8×13 cm)—I use an index card for a guide—as you can from the dough. Gather scraps, roll them just under 0.5 cm thick, and cut more rectangles so nothing goes to waste.
- In a small bowl, beat the egg thoroughly for a slick, shiny wash.
- Arrange half the pastry rectangles on the lined baking sheet. Spoon about 1–1.5 tablespoons of jam into the center of each, leaving a generous border around the edges so the filling doesn’t escape during baking.
- Brush the edges of each rectangle lightly with egg wash—that’s your edible glue!
- Place a second rectangle over each filled one, gently pressing down the edges. Use a fork to crimp all sides: you’ll feel and hear the flaky dough start to seal up tight.
- Poke several small holes in the top of each pop tart with the fork. This lets steam escape and keeps the pop tarts from puffing up unevenly in the oven.
- Brush the tops and edges of your sealed pop tarts with the remaining egg wash for a golden, glossy finish.
- Bake for 12–15 minutes, or until the pop tarts are a warm, golden-brown hue and just barely firm to the touch. The aroma of sweet jam and pastry will fill your kitchen—it’s hard not to sneak a taste right away.
- Once the tarts are fully cool, whisk together powdered sugar, milk (or cream), jam, and vanilla until smooth and pourable. Spread or drizzle this icing over the pop tarts. Add a sprinkle of anything you like: colorful sprinkles, crushed freeze-dried berries, or even edible rose petals for a hint of fancy.
The pop tarts are at their best eaten fresh—the pastry will have that just-baked snap under your teeth.
Tips, troubleshooting, and common pop tart mistakes
Pie crust is pretty forgiving, but a little know-how goes a long way for Homemade Pop Tarts with Pie Crust:
- Crust thickness: Too thick and your pop tarts may puff up, leaving empty pockets instead of jammy centers. Aim for a dough thickness just under 0.5 cm for even filling.
- Crimping: Press firmly with the fork to seal the edges well, or the jam can bubble out during baking. If the crimping fades, try rolling the dough a bit thinner next time—thicker dough can lose detail when baked.
- Egg wash tips: Don’t just egg wash the seams—brush over the entire top to get a glossy, golden look. If you can’t use egg, milk or cream can work as a wash, though you’ll lose a little shine.
- Preventing jam leaks: Go easy on the filling, and leave a border at the edge so you can seal them tightly. Excess filling will ooze out and scorch.
- Icing consistency: If the icing seems runny, add a bit more powdered sugar. If it’s too thick, a splash more milk or cream helps it smooth out. For a more set icing, let the pop tarts sit uncovered at room temperature after icing before stacking or storing.
- Baking time: Ovens vary, so check after 10 minutes—if the tops are golden and the edges are firm, you’re good to go.
I found kneading the scraps into new dough oddly satisfying—don’t be shy about rolling those out for a couple extra treats.
Pairings and delicious twist ideas for Homemade Pop Tarts with Pie Crust
These pop tarts are sweet, simple, and versatile, making them a perfect companion to countless drinks and snacks.
- Pair with: A hot mug of coffee, chai, or a tall glass of cold milk for breakfast bliss. For a brunch treat, set a plate beside a bowl of fresh fruit or a yogurt parfait.
- Go savory: Feeling creative? Leave out the icing and swap the jam for a savory filling—think caramelized onions and cheese, or even pizza sauce and pepperoni. Friends in the reviews have even used ground chicken pastelillo style!
- Seasonal spins: Try apple butter, pumpkin puree with cinnamon sugar, or cherry preserves for a summer pop of color.
- Vegan option: Use a plant-based pie crust and brush with plant milk or oil instead of egg for a shine.
- Festive flair: Top with themed sprinkles or edible glitter for holiday mornings or kids’ birthdays.
You can change up the filling every time and always have a new flavor to look forward to.
FAQs about Homemade Pop Tarts with Pie Crust
How should I store Homemade Pop Tarts with Pie Crust?
Store fully cooled pop tarts in an airtight container for up to 2 days at room temperature. They’re best fresh, as the crust will start to lose its crispness over time. Avoid stacking them directly if the icing is still soft—use parchment between layers if needed.
Can I make Homemade Pop Tarts with Pie Crust ahead of time?
Yes! You can prepare the pop tarts up to the baking stage, then cover and refrigerate them for several hours before baking. Bake straight from the fridge (they may need an extra minute or two in the oven). For longer storage, bake and cool, then freeze un-iced pop tarts—just re-warm and ice before serving.
What are the best substitutions for the filling and egg wash?
You can use any fruit preserves, thick jam, or even pie filling. To avoid eggs, use milk, cream, or a plant-based alternative for the wash—the only difference is a slightly less shiny finish. The pop tarts are flexible; try chocolate spread, nut butter, or any homemade compote you love.
A crispy, flaky conclusion to fresh pop tarts
Homemade Pop Tarts with Pie Crust are everything you crave from a breakfast treat: crisp on the outside, soft and jammy inside, and topped with sweet, glossy icing. There’s a little magic in hearing that first fork-crimped edge snap, knowing you baked these beauties yourself. Serve them fresh, let the filling ooze a bit, and enjoy every flaky bite—warm, bright, and better than anything from a box.
More Tasty Ideas
- Banana Oat Muffins: These muffins are another delightful baked treat that pairs well with a warm beverage, just like your pop tarts.
- Soft Chewy Lemon Cookies: These cookies add a zesty twist, perfect for those who enjoy a sweet and tangy flavor alongside their pastries.
- Breakfast Danish Pastries: If you love flaky pastries, these danishes offer a variety of fillings that can complement your pop tart experience.
Easy Homemade Pop Tarts with Pie Crust
Ingredients
Equipment
Method
- Preheat oven to 400°F.
- Lay a sheet of parchment on a baking sheet and unroll crust onto another sheet of parchment. Cut as many pieces of approx. 3 in by 5 in (you could literally use an index card as a guide!) rectangles as you can from each crust. With remaining crust, knead together and then roll out into another large, thin piece (just under 1/4 in.) to cut remaining rectangles. (You can also do this by putting each tart together as you go.)
- Beat the egg for your egg wash in a small bowl. Lay out 8 rectangles on the parchment lined baking sheet. Add 1 1/2 Tablespoons of desired jam. Brush the edges with your egg wash and then place another rectangle on top of the rectangle with the jam. Gently pinch the edges to seal and then using a fork, crimp the edges. Poke some holes in the top of the pop tart and then brush the entire top, including edges, with the egg wash.
- Continue with the rest of the pop tarts. Bake for about 12-15 minutes or until golden brown.
- Once cooled, whisk together icing ingredients and spread over each pop tart. Add sprinkles, freeze dried berries crushed, rose petals (ha, that's what I used because I didn't have freeze dried berries) or just eat them as is! Store in an air tight container for up to about 2 days although they are best fresh1