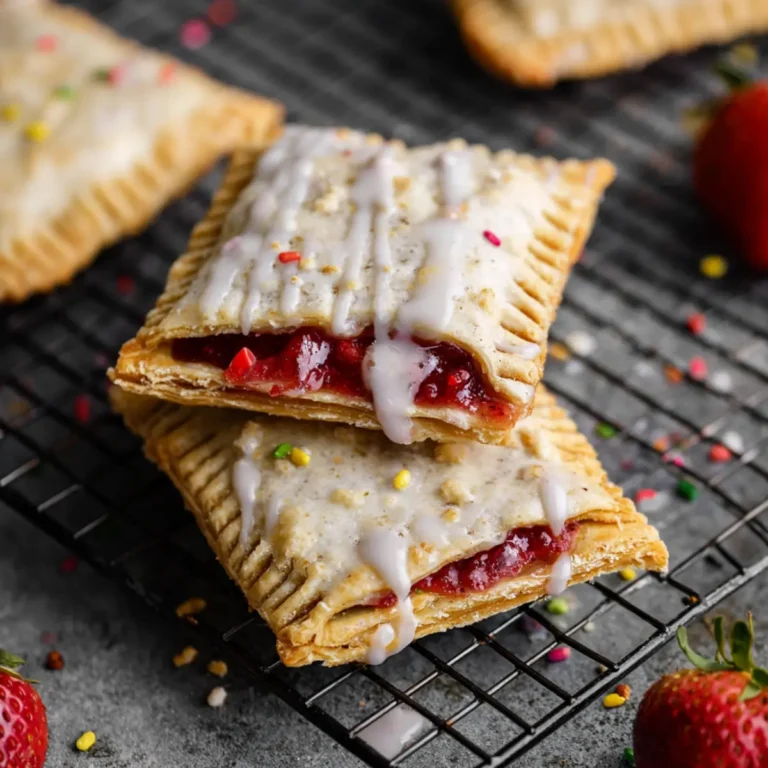
If you’ve been craving a throwback to your childhood breakfasts or you just want something extra-fun for a weekend treat, a Homemade Strawberry Sheet Pan Pop Tart is your answer. You get all the nostalgic joy of your favorite toaster pastry, but with that fresh, flaky pastry you only get from baking it yourself. Bonus: It’s absurdly simple to pull off and looks like something straight from a cozy bakery window.
You don’t have to fuss with crimping dozens of tiny pastries—this massive pop tart bakes up on a sheet pan and serves a crowd. Imagine slicing into a golden crust, watching that glossy icing set before your eyes, and seeing strawberry jam ooze just a little at the edges. Whether you’re feeding teenagers after a sleepover or making a breakfast surprise, this crowd-pleaser makes any morning feel special.
Why This Homemade Pop Tart Is a Game-Changer
There’s just something magical about making a Homemade Strawberry Sheet Pan Pop Tart that fills the kitchen with sweet, buttery aromas. You skip the fidgety effort of shaping individual pop tarts and instead make one glorious, bakery-worthy slab that everyone can dive into.
This recipe isn’t just easy—it’s an instant mood-lifter. The crust bakes up delicate and crisp, the strawberry jam gets delightfully gooey without being runny, and there’s that swirl of glossy icing and a shower of sprinkles for pure, simple joy. It’s the kind of treat you whip up when you want smiles all around, whether for birthdays, brunches, or just because.
No complicated steps, no fancy ingredients: this is comfort food with a playful twist. Even adults get wide-eyed when this giant strawberry pop tart comes out of the oven.
Homemade Strawberry Sheet Pan Pop Tart Ingredient Breakdown
The beauty of this homemade pop tart recipe is how accessible the ingredients are—but each one has its own special job.
- – Ready-to-bake pie crusts: Makes everything super simple while still giving you that golden, flaky base and top. No one will miss the work of rolling out dough from scratch.
- – Strawberry preserves: Brings that classic fruit center with a burst of sweet, jammy flavor. Any good-quality preserve puts you halfway in springtime already.
- – butter: Brushed over the top and edges, it helps the crust brown deeply and adds rich flavor all over.
- – Powdered sugar: Whipped into the icing, it gives that smooth, sweet finish that every true pop tart needs.
- – Milk: Helps loosen up the icing so it glides on creamy instead of clumping—a little goes a long way.
- – Sprinkles: A playful touch that brings the bakery-vibe home. Go for any color or shape that makes you smile.
See the recipe card below for the full list of ingredients and measurements.
Alternative Filling Ideas & Ingredient Swaps
If you’re not feeling strawberries, swap in raspberry or apricot preserves for a new flavor spin. Cherry or blueberry jam brings a bold, tangy sweetness that works just as well. For a slightly less sweet finish, try a thin layer of homemade fruit puree or low-sugar preserves—it’ll still give you a big pop of fruit flavor without overwhelming your palate.
No ready-to-bake pie crusts at hand? Use chilled puff pastry for a flakier but lighter result. Vegan butter or a neutral oil-based spread handles the brushing on top if you want to go dairy-free. And if you’re out of milk for the icing, splash in plant milk or even a few teaspoons of water till you get that silky drizzling texture. Let your pantry guide you—this homemade breakfast pastry is super forgiving.
Your Step-By-Step Guide to Pop Tart Perfection
Here’s how you bring this big, beautiful Homemade Strawberry Sheet Pan Pop Tart to life—no pastry chef skills required.
- Heat your oven until it’s good and hot. You want the crust to hit that initial blast of heat for the flakiest results.
- Lay out two pie crusts on a big board and press them together gently. Shape and trim the dough into a rectangle a bit larger than your pan—don’t stress over perfect edges; a little sunset-wavy is charming.
- Roll that dough up loosely and lay it on a sprayed sheet pan. The crust should cover the bottom with a tiny bit up the sides.
- Spoon the strawberry preserves all over, spreading them toward the edges but leaving a border for sealing. You want plenty of fruity filling in every bite, but not so much that it tries to escape.
- Repeat with the second batch of dough for the top. Drape it over the strawberry-smothered bottom crust, doing your best to match up the rectangles—it’s rustic, not gallery art.
- Pinch the edges together with your fingers, then press with a fork for that old-school pop tart vibe—and to hold in every bit of jam.
- Poke the top all over with a toothpick; this lets steam escape so your treat bakes up crisp and clean, not puffy and split.
- Brush the top and edges with melted butter. Watch how it makes everything glisten and sets the stage for golden brown magic.
- Slide the pan into the oven. Rotate it halfway if you know your oven cooks unevenly, and peek in once the scent gets gorgeous and toasty.
- If jam tries to sneak out, don’t panic—it happens. Catch any spillover on a pan below or scoop it off if necessary.
- Once the crust’s beautifully golden, set the whole pan aside to cool—you want it warm, not scorching hot, before icing.
- Whisk powdered sugar with milk until it’s totally smooth. If it runs off the spoon in thick ribbons, you’re there.
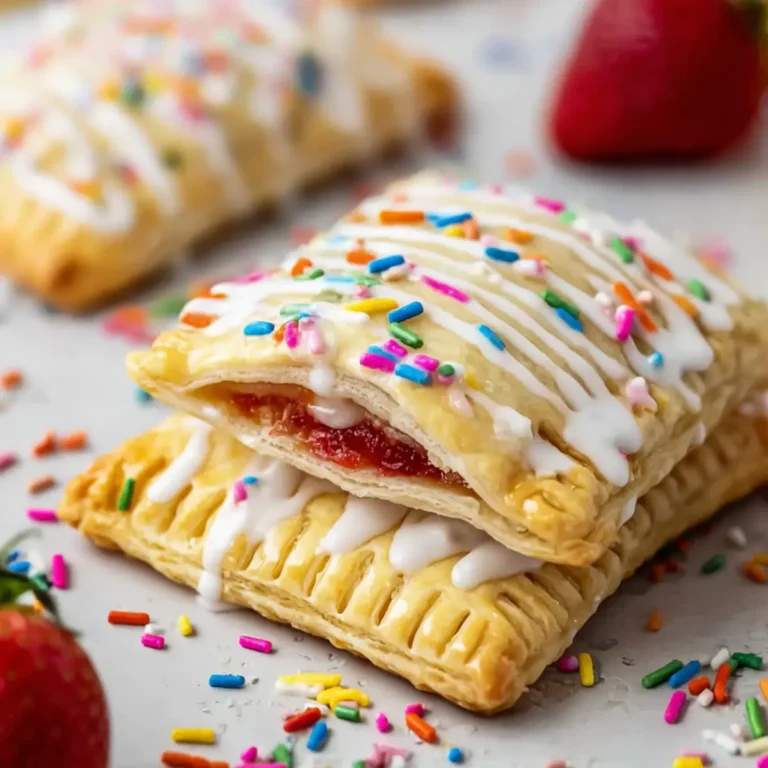
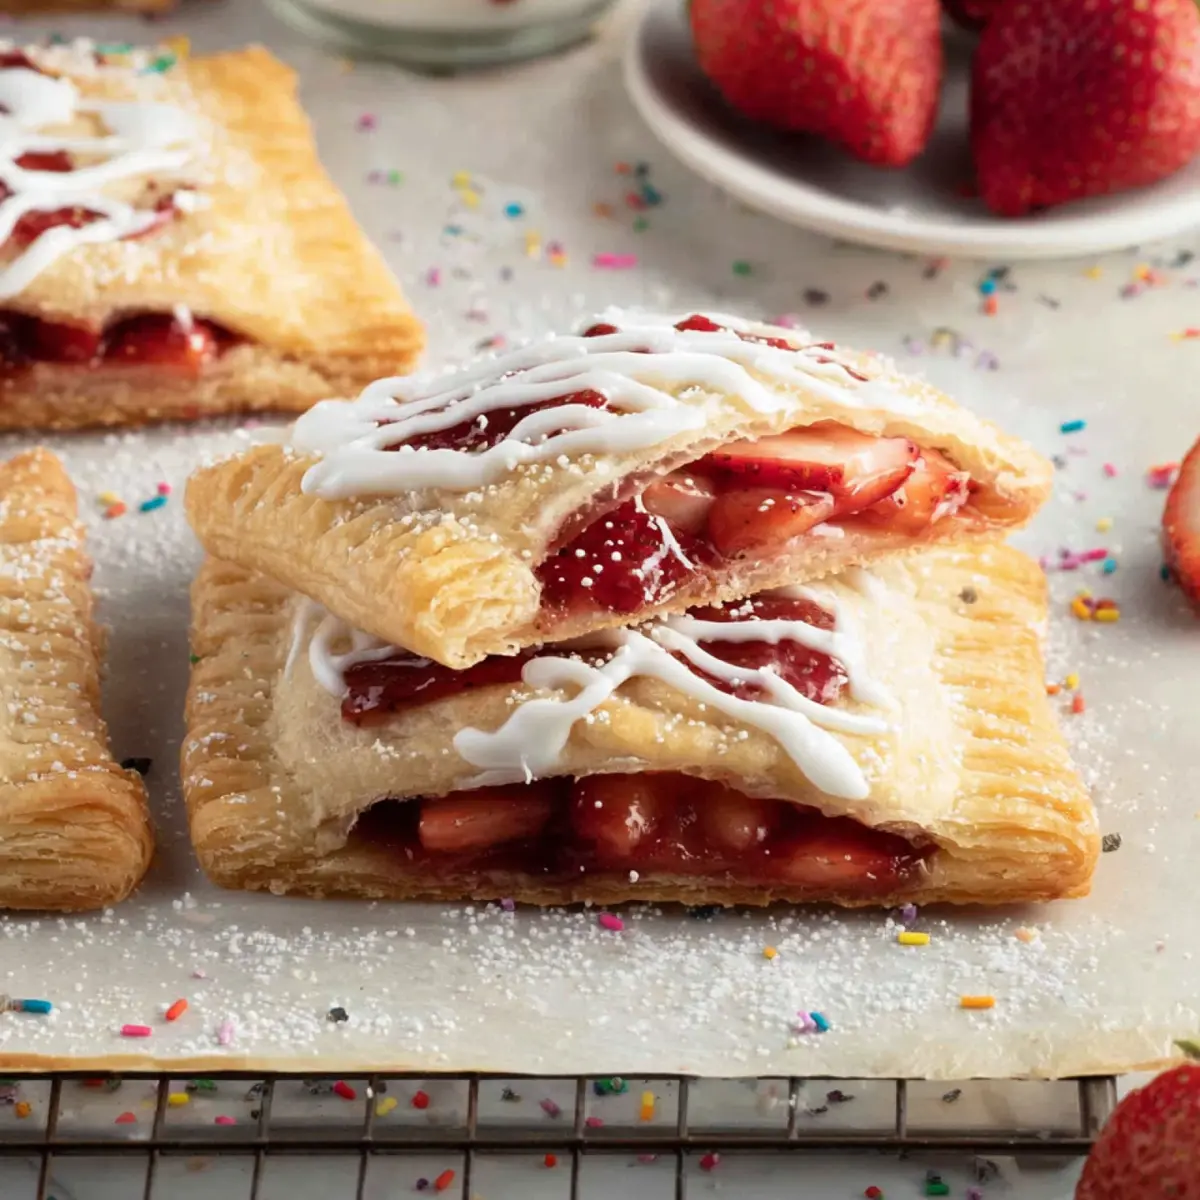
- Spoon the icing in the center, leaving the crimped edges plain for that classic look. Immediately hit it with sprinkles before the glaze sets.
- Let the icing firm up just a bit, then slice and serve. The first piece is always the best—warm and gooey, with jam and melt-in-your-mouth icing in every forkful.
Clever Tips from Pop Tart Experts
Chill your pie dough for a few minutes if it starts to feel soft or sticky—cold dough means flakier results. For an extra-crispy bottom, bake your pop tart on the lowest oven rack, but check often so it doesn’t cross into burnt territory.
If you want straight lines for easy slicing, gently score the icing with a butter knife before it fully sets. Leftovers can be stored at room temperature for a day or two, loosely covered—after that, pop the slices in the fridge. Reheat pieces briefly in the oven or toaster oven to revive that just-baked freshness.
For a slightly less sweet finish, go light on the icing or dust with powdered sugar instead. Let the pop tart cool until barely warm before icing, or you’ll risk melt-off and sticky puddles.
Pairings and Twist Ideas to Make It Your Own
Serve slices of this Homemade Strawberry Sheet Pan Pop Tart alongside a strong cup of coffee on a lazy Saturday morning—a classic combo that never disappoints. For a sleepover or kid’s birthday breakfast, throw in a platter of fresh fruit, yogurt, or crispy bacon to make it more of a brunch feast.
Want to riff on the classic? Swap the strawberry filling for another fruit preserve, stir a touch of almond extract into your icing, or use colored sugar instead of sprinkles for seasonal flair. For a make-ahead move, prep the pop tart the night before, cover tightly with plastic wrap, and bake it off in the morning.
It also freezes surprisingly well. Let slices cool completely, then wrap and freeze. Reheat gently—just enough to bring back the softness and aroma without melting the icing.
FAQs about Homemade Strawberry Sheet Pan Pop Tart
Can I use homemade pie crust instead of store-bought for this pop tart?
Yes, homemade pie crust works beautifully if you have the time and energy. The key is a rolled-out dough that’s thin and even, so your pop tart bakes up crisp and sturdy enough to hold all that jam.
What’s the best way to keep the filling from leaking out?
To prevent leaks, seal the edges tightly with your fingers and a fork after assembling. Don’t skip the border of plain dough—this buffer keeps the strawberry preserves tucked safely inside the crust.
How do I store leftover sheet pan pop tart?
Store leftover pop tart covered at room temperature if you’ll eat it soon, or in the fridge for longer freshness. Reheat briefly in an oven or toaster oven to restore the flakiness and revive the icing.
Can I make this pop tart with gluten-free substitutes?
Yes, you can use gluten-free pie crusts and ensure your preserves and other ingredients are gluten-free. The result will still be delicious and satisfyingly nostalgic, with just a touch more crumbly texture.
Final Thoughts on Homemade Strawberry Sheet Pan Pop Tart
Making a Homemade Strawberry Sheet Pan Pop Tart brings a little weekday wonder to your kitchen table. It’s easy enough for baking beginners, fun for families, and nostalgic for anyone who grew up on the boxed kind.
You get that perfect ratio of flaky crust, sweet jam, and vanilla-dreamy icing—with a messy swirl of sprinkles that tells everyone breakfast is meant to be fun. Pass around a stack of plates, let everyone cut their own slice, and watch this pop tart vanish before you even get to pour a second cup of coffee. This one’s sure to become a repeat request, and the smiles say it all.
More Delicious Recipes
- Breakfast Danish Pastries: These pastries offer a flaky, buttery treat that’s perfect alongside your pop tart for a delightful breakfast spread.
- Blueberry Cream Cheese Croissant Casserole: This dish combines sweet and creamy flavors, perfect for a brunch that matches the nostalgic vibe of homemade pop tarts.
- Strawberry Shortcake Truffles: These truffles capture the same sweetness of strawberries, making them a yummy treat to pair with your pop tart experience.
Homemade Strawberry Sheet Pan Pop Tart
Ingredients
Equipment
Method
- Preheat oven to 375°F.
- On a large cutting board, roll two of the ready-to-bake pie crusts together. Use a pastry wheel or sharp knife to cut the combined crusts to measure a rectangle that is 12×16-inches or the best size that will fit your sheet pan.
- Gently roll the crust up and transfer it to a large sheet pan that has been sprayed with non-stick cooking spray.
- Spread the strawberry jam on the center of the pie crust leaving a 1-inch border around the edges.
- On the same large cutting board, roll the other two ready-to-bake pie crusts together and trim so that it is the same size rectangle you have already on the sheet pan. Gently roll the top crust up and transfer it to lay evenly over the top of the strawberry jam topped crust on the sheet pan.
- Using your fingers, pinch together the two crusts all around the edges of the pop tart. Then use a fork to gently press and seal the edges together to seal the jam in.
- Use a toothpick to poke holes all over the top of the center of the pop tart.
- Brush all over the top and edges of the pop tart with the softened butter.
- Bake for about 25 minutes or until the crust is golden brown, rotating the sheet pan halfway through the baking time.
- If the jam starts to seep out of the edges and you’re not using a rimmed sheet pan, either place a larger pan underneath the pan in the oven so the jam doesn’t drip into your oven or remove the pop tart and scoop the jam from the pan and then return it to the oven to continue baking.
- Remove the pop tart from the oven and let cool while you make the icing.
- In a small mixing bowl, whisk together the powdered sugar and milk until smooth and of spreading consistency.
- Spread icing on top of the center of the pop tart leaving the crimped edges showing. Immediately sprinkle with sprinkles.
- Slice and serve.