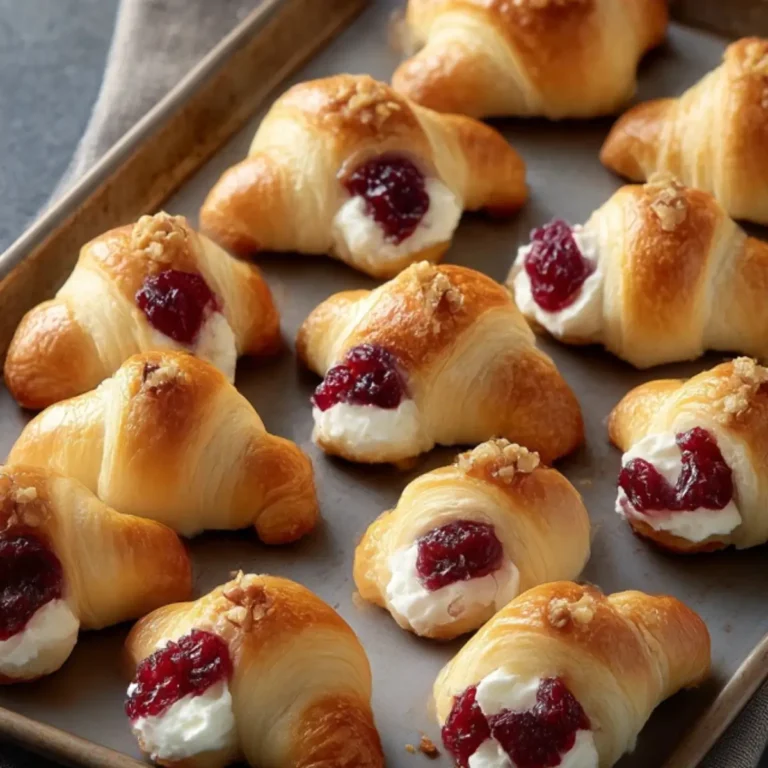
You know that unmistakable aroma—flaky pastry baking away, just starting to color and fill the whole kitchen with a rich, buttery scent. That was my weekend morning not long ago, when I threw together a batch of mini cheese Danish. These little pastries aren’t just pretty to look at, with their corners tucked in or left open for a peek at the creamy filling—they’re actually irresistibly light and slightly tangy, the kind of breakfast treat you want to linger over with a steaming cup of coffee. The best part? You don’t need professional pastry skills to pull them off at home; they’re easy, fast, and as cozy as a lazy brunch deserves.
What Makes These Mini Cheese Danish So Irresistible
Biting into a mini cheese Danish from your own oven is an experience that’s hard to top. The outside, golden and crisp, flakes apart with the most satisfying crunch—while inside there’s this smooth, slightly tangy pillow of sweetened cheese. Unlike the oversized pastries you might get at a bakery, these petites fit perfectly in hand, making them just right for breakfast platters, brunch spreads, or an afternoon treat. I love how they bring a bakery vibe to any morning, no matter how ordinary, and there’s always a moment when I have to stop myself from grabbing “just one more” off the cooling rack. The best part is that they’re incredibly approachable as pastries go—no need for yeast doughs or tricky lamination, just uncomplicated comfort in every bite.
The Ingredients That Give Mini Cheese Danish Their Magic
- Puff pastry – this ready-made favorite bakes up shatteringly crisp and light, making the base of each Danish effortlessly flaky.
- Cream cheese – brings a silky, tangy center that pairs so well with the sweetness and acts as the signature filling.
- Granulated sugar – sweetens the cream cheese mixture without making it cloying; you can swap in a sugar alternative if you prefer.
- Vanilla extract – just a splash draws out a rich, fragrant depth in the filling; pure extract gives the best results.
- Lemon juice – optional, but a bit adds brightness and keeps the filling from tasting flat.
- Egg – brushed on, it helps the pastries turn perfectly golden with a subtle shine; you can use milk if you want to skip the egg.
- Powdered sugar – essential for that classic simple glaze, lending a cloud-like sweetness to finish.
- Milk – loosens the glaze to just the right drizzly consistency; non-dairy options work here if needed.
See the recipe card below for the full list of ingredients and measurements.
Bringing These Mini Cheese Danish Together Step by Step
It’s surprisingly satisfying to see these come together so quickly. Here’s how those buttery little Danishes head from fridge to oven to breakfast table:
- Start by heating your oven and getting your baking sheet prepped with parchment—no sticking, no fuss.
- Unfold the thawed puff pastry on a lightly floured countertop, just enough to keep things from sticking. Use a sharp knife or pizza cutter to slice it into neat squares, about palm-size.
- Mix up the filling: in a bowl, bring together the cream cheese, sugar, vanilla, and a hit of lemon juice. Beat till smooth—you want it velvety.
- Spoon a dollop of the cream cheese mixture onto the center of each pastry square. No need to get fancy here; just a gentle little mound does the trick.
- You get to choose: fold each corner toward the middle and pinch, or leave the squares open for an old-school bakery look.
- Brush the pastry edges with beaten egg so they’ll bake up with a bronze, irresistible crust.
- Bake them until puffed up and golden, watching for that lush, layered look that only good puff pastry gives.
- Let them set up for a bit on a wire rack; you want the insides to firm up and the steam to escape so the bottoms stay crisp.
- Finish with a simple glaze: mix powdered sugar with a splash of milk until it runs smooth, then zigzag it over the cooled pastries.
- Enjoy warm, ideally with a mug of coffee or soothing tea while the world is still quiet.
Getting That Perfect Flaky and Creamy Balance
There’s a bit of magic in the way the crisp layers of pastry contrast against the rich, tangy cheese filling. If your puff pastry is handled gently—unfolded without too much manhandling, and kept cold until baking—you’ll get that signature puff and delicious crackle as you bite in. Don’t overload the filling; a moderate spoonful is all you need for the ideal pastry-to-cream ratio. Take a moment to drizzle the glaze on when the Danish have just cooled enough that it won’t melt off completely, but will still set up with a beautiful shine.
Easy Ways to Serve, Store, and Switch These Mini Cheese Danish
Mini cheese Danish are at their best the day they’re baked, the pastry freshly crisp and the filling delicate. For serving, I love piling them on a platter dusted with powdered sugar—beautiful and inviting. If you want to make them ahead, just keep the unbaked, assembled pastries covered in the fridge for a few hours; bake fresh before serving. Leftovers can be stored in an airtight container at room temperature for a day, or in the fridge for up to two days, though they do lose a little crispness.
To refresh that texture, briefly warm them in the oven at a gentle heat. If you want a twist, try swapping in a bit of citrus zest for the lemon juice, or even adding a touch of jam beneath the cheese. They also freeze well (without glaze); reheat from frozen and add the icing just before enjoying. Perfect for brunch spreads, holiday breakfasts, or just a morning when you need something special.
FAQs about Mini Cheese Danish
Can I make mini cheese Danish ahead of time for a brunch party?
Yes, you can assemble the pastries and keep them covered in the fridge for several hours before baking. Bake them off just before serving for the absolute freshest, flakiest result.
What’s the best way to store leftover mini cheese Danish?
Let the pastries cool fully, then store them in an airtight container. They’ll stay good at room temperature for a day, or in the fridge for up to two; you may want to pop them in a warm oven for a few minutes to revive the crisp pastry.
Can I freeze baked mini cheese Danish?
Absolutely—freeze them without glaze, wrapped tightly. When ready to enjoy, reheat in the oven until they’re warmed through and crisp, then add glaze just before serving for the best texture and flavor.
Is it possible to make these mini cheese Danish without eggs?
Yes, you can use milk instead of egg to brush the pastry edges. The pastry won’t be quite as shiny, but you’ll still get great color and flavor.
What other fillings can I use for mini cheese Danish?
While classic cream cheese is traditional, you can experiment with a little fruit jam or citrus zest swirled into the cheese, or try other soft cheeses mixed with sweetener and flavorings. Just be careful not to overfill, so the pastry puffs up well.
Sometimes all you want is something buttery and warm from the oven, and mini cheese Danish always deliver that gentle comfort. They’re the sort of thing that disappears quickly when family or friends gather around, and honestly, there’s something so satisfying about seeing that golden pastry crack apart before giving way to the creamy center. When you need a breakfast that feels a little special but doesn’t ask much of you, these mini cheese Danish really shine—no bakery lines or fancy equipment required.
More Tasty Ideas
- Andes Mint Mini Cheesecakes: These mini cheesecakes offer a creamy and delightful twist similar to your cheese Danish filling.
- Irish Shortbread: A buttery treat that pairs perfectly with coffee, much like the mini cheese Danish for a cozy brunch.
- Blueberry Protein Muffins: These muffins provide a light and fluffy texture that’s ideal for breakfast, similar to the delicate pastry you enjoy with your Danish.

Delicious Mini Cheese Danish: Easy Flaky Bliss at Home
Ingredients
Equipment
Method
- Preheat your oven to 400°F (200°C) and line a baking sheet with parchment paper.
- Unfold the thawed puff pastry on a lightly floured surface and cut it into 3x3 inch squares.
- In a mixing bowl, combine the softened cream cheese, granulated sugar, vanilla extract, and lemon juice. Mix until smooth.
- Spoon about 1 tablespoon of the cream cheese mixture into the center of each pastry square.
- Fold the corners of each square toward the center or leave them open-faced.
- Brush the edges of each pastry with the beaten egg for a shiny finish.
- Place the pastries on the lined baking sheet and bake for 15-18 minutes until golden brown.
- Let the Mini Cheese Danish cool slightly on a wire rack.
- Prepare the glaze by whisking together powdered sugar and milk until smooth, then drizzle over the danish.
- Serve warm for the ultimate treat alongside your favorite coffee or tea.